background image


968-407 

P2008  © Firma WJG, Braunschweig. Nachdruck oder Vervielfältigung  nur mit ausdrücklicher Genehmigung 


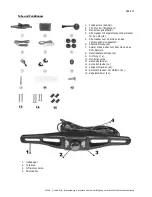
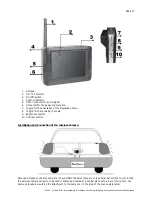
Parts and Functions: 


1.


Wireless camera (Emitter). 

2.


TFT-Monitor (Receiver). 

3.


Monitor vacuum cup holder. 

4.


Power supply cable of the monitor with 

cigarette lighter plug. 

5.


Power supply cable of the monitor 

connecting it to the vehicle’s fuse box. 

6.


Mounting shim (4x).  

7.


Audio/ Video cable for connecting an 
additional DVD-player. 

8.


Metal shim (2x). 

9.


Grommet (1x). 

10.


Monitor antenna. 

11.


Set cabel ties. 

12.


Short screw (1x). 

13.


Long screw (2x). 

14.


Bolt screw with nut (4x). 

15.


Wire connector (4x). 


1.


Bracket. 

2.


Photo lens. 

3.


Infrared sensors. 

4.


Power supply cable.  


Summary of Contents for McVoice FRS-36

Page 1: ...kommen Leistungsmerkmale Geeignet f r PKW LKW und Busse Leicht am Heck zu installierende Funkkamera Kein l stiges Kabelverlegen Verringert die Gefahr beim R ckw rtsfahren versehentlich gegen Bordstei...

Page 2: ...t Zigarettenanz nderstecker f r den Monitor 5 Stromkabel zum Anschluss an den Fahrzeugsicherungskasten 6 Abstandsst cke 4x 7 Audio Video Kabel zum Anschluss eines DVD Spielers 8 Metallabstandsst cke 2...

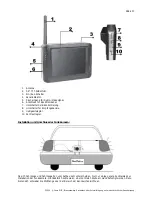
Page 3: ...7 Umschalter der Bildorientierung 8 Umschalter f r Empfangskan le 9 Helligkeitsregler 10 Kontrastregler Installation und Anschluss der Funkkamera Da sich Fahrzeuge und Fahrzeugarten vom Aufbau sehr u...

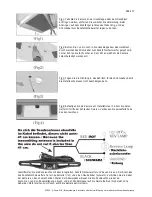
Page 4: ...rden soll Fig3 F gen Sie die Dichtung in das Bohrloch f r das Stromkabel damit die Metallkante dieses nicht besch digen kann Fig4 Befestigen Sie die Kamera am Installationsort indem Sie deren Halter m...

Page 5: ...Sie das Stromkabel in den Zigarettenanz nder des Fahrzeugs und verbinden Sie es dann mit dem Anschluss am Monitor Stellen Sie den Empfangskanal am Schalter auf der Monitorseite ein Wenn die Z ndung an...

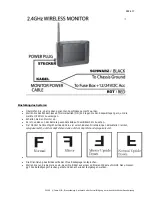
Page 6: ...alten Sie den Monitor ein Es ist nun das von der Kamera gesendete Bild auf dem Bildschirm zu sehen Der Monitor hat die M glichkeit das Bild in vier verschiedenen Orientierungen darzustellen normal spi...

Page 7: ...efore and while you are using your new device Capability Characteristics Suitable for automobiles trucks and busses Easy to install wireless camera to the back of the vehicle No annoying lying of cabl...

Page 8: ...cable of the monitor with cigarette lighter plug 5 Power supply cable of the monitor connecting it to the vehicle s fuse box 6 Mounting shim 4x 7 Audio Video cable for connecting an additional DVD pl...

Page 9: ...he displayed picture 8 Toggle for the receiving channels 9 Brightness control 10 Contrast control Installation and Connection of the wireless Camera Because all types of vehicles and all cars have dif...

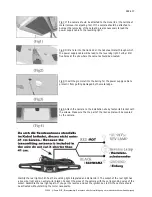
Page 10: ...at the site where the camera should be situated Fig3 Insert the grommet into the boring for the power supply cable to protect it from getting damaged by the metal edge Fig4 Attach the camera to the i...

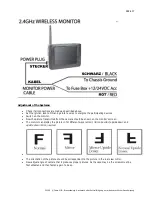
Page 11: ...s attached firmly Plug the power supply cable to the cigarette lighter of the vehicle and connect the other side to the connector of the monitor Adjust the correct receiving channel with the switch at...

Page 12: ...Switch on the monitor Now the picture transmitted from the camera should be shown on the monitor s screen The monitor can display the picture in for different ways normal mirror inverted upside down a...

Reviews: