background image


V1.15 

User information 

Y-Panel 

5/7 


III. 

Installation: 


1.  Once you have selected the desired location on the 

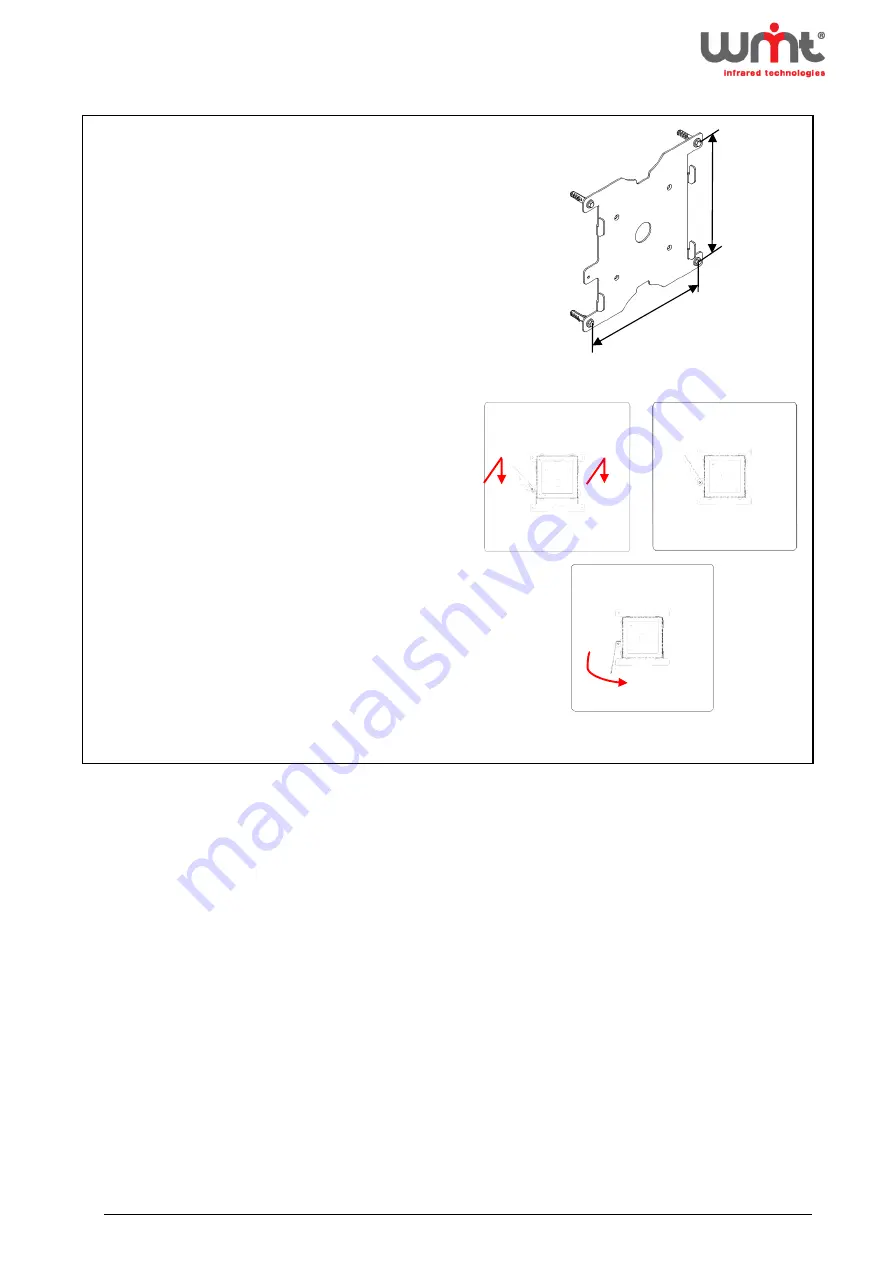
wall, mount the wall-bracket for the master module 
using the included screws and screw anchors. 

Warning:

 Use the correct screws and anchors for your 

wall construction type. 


2.  To add further Y-Panels (eg. for double or triple packs), 

use the supplied drilling template to mark out the drill 
holes. Insert screw anchors and fix the additional wall 
brackets. 

 
3.  Attach the mains cable and connecting cables to 

the master module and fit the appliance to the 
wall-bracket as shown (I). Slide the appliance 
down until it is held in place by the bracket (II). 


4.  Connect the slave modules together using the 

supplied connecting cables and mount the 
appliances on their respective wall-brackets.  


5.  Secure each Y-Panel to the wall-bracket using the 

locking lever to prevent the panels from being 
accidentally lifted off the brackets (III). 

 
6.  Plug in or install the mains supply cable to start 

operating the appliance(s). 


Warning:


Based  on  the  applicable  TÜV  requirements  c

eiling  mount  is  not 

permitted!


I. 

II. 

20,4cm 

20,4cm 

Summary of Contents for Y-Panel

Page 1: ...RAGE AND TRANSPORT 3 8 ASSEMBLY INSTRUCTIONS AND SKETCHES 4 9 WARRANTY 6 Thank you for the trust in WMT heating systems demonstrated by the purchase of your device WMT stands for innovative technology and Austrian quality Heating via infrared radiation guarantees high energy efficiency and cost effective operation Please read this instruction carefully before initial operation to ensure sufficient...

Page 2: ...otential dangers arising from its operation Do not allow children to play with the appliance Children must not carry out user maintenance or cleaning without adult supervision Children younger than 3 years old must be supervised to keep them away from the appliance When the appliance has been installed or positioned in its normal place of use children between the ages of 3 and 8 may switch the app...

Page 3: ...rmation of the glass surface whereby a large allocation of the radiant heat is enabled in the space The device must not be mounted immediately underneath a mains socket The device must not be mounted in the immediate vicinity of a bath or swimming pool according to valid norms Installation should only be carried out by a qualified tradesperson 4 Safety advice for safe operation Do not drill any ho...

Page 4: ... 6 Initial operation Placing out of operation Keep out of reach of children avoid unauthorized operation The device may only be operated when firmly mounted Allow the panel to cool down before dismounting 7 Cleaning storage and transport Always remove the mains plug before cleaning the device For cleaning just wipe with moist cloth Do not use any strong or abrasive cleaning products Device is to b...

Page 5: ...e Combination 1x Master 1x Slave available for Portrait or Landscape orientation Triplet Combination 1x Master 2x Slave available for Portrait or Landscape orientation M M M M S S S M M M M S S S S S S S S Observe the stated minimum distance to floor ceiling corners and other objects to prevent overheating of the appliance Between Y Panels observe a minimum distance of 1 cm and maximum distance of...

Page 6: ...ckets 3 Attach the mains cable and connecting cables to the master module and fit the appliance to the wall bracket as shown I Slide the appliance down until it is held in place by the bracket II 4 Connect the slave modules together using the supplied connecting cables and mount the appliances on their respective wall brackets 5 Secure each Y Panel to the wall bracket using the locking lever to pr...

Page 7: ...iance to become excessively dirty inappropriate interference or modification of the device or from fitting incorrect replacement parts either by the purchaser or by an unauthorized third party Moreover warranty is not applicable if the specification plate is altered or removed Damages caused by ingress of dirt or from wear and tear are exempted from warranty claims Please do not attempt disassembl...

Reviews: