Page
12
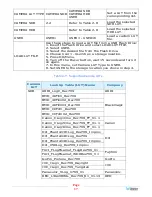
compliant with SMPTE 424M, SMPTE 259M, SMPTE292M/ITU-R BT601. It can
be viewed using the
SDI1
selection on the
Input
button menu.
2.
SDI 1 Out
:
This connector provides a regenerated duplicate of the
SDI 1 In
signal. This connection is compliant with SMPTE 424M, SMPTE 259M,
SMPTE292M/ITU-R BT601.
3.
SDI 2 In
:
This is the second 3G/HD/SD-SDI video signal input. This
connection is compliant with SMPTE 424M, SMPTE 259M, SMPTE292M/ITU-R
BT601. It can be viewed using the
SDI2
selection on the
Input
button
menu.
4.
Video In
: This is the input for an analog CVBS video signal. It can be viewed
using the
Video
selection on the
Input
button menu.
5.
HDMI In
: This input supports HDMI and DVI signals. It uses an HDMI Type-
A connector. It can be viewed using the
HDMI
selection on the
Input
button
menu.
6.
AUD In
: An analog stereo audio input related to the Line 1 video signal is
provided on a standard 1/8" stereo jack. This has a 47KΩ input impedance
and will accept up to a 5dBu signal. This input is selected when the
Video
selection is made on the
Input
button.
7.
USB
: A dual purpose USB connector is provided which can be used to load a
camera look up table (LUT). This connector can also be used for software
upgrades.
8.
Headphone
: A standard 1/8" stereo headphone jack is provided. The
speaker will mute when a headphone is inserted into this jack.
9.
Audio Out
:
A pair of analog outputs is provided on RCA jacks. They will
output the audio from the selected video source to be used with external
amplifiers and speakers if needed. They have a 500Ω output impedance and
will produce up to a 5dBu signal.
10.
AC Power Connector
:
The supplied IEC cord plugs into this connector. The
required power is 100 to 240VAC 50/60Hz.
11.
DC Power Connector
:
A standard XLR-4F connector can plug into this XLR-
4M connector to supply 11 to 17VDC at 3A to the product as an alternative to
AC power.
12.
Battery Holder
: An optional 11.0 to 16.8 V camera battery can be
mounted to the rear panel for portable use in the field.
13.
Power Switch
:
This switch removes all power from the product. Normally,
since this switch is on the rear panel, it is left in the
1 (On)
position and the
front panel
Power
button is used to start and stop product operation.
14.
RS-485 In/Out
:
These RJ-45 jacks are used for dynamic Tally/IMD
controls. Two jacks are provided for in & out daisy chain arrangements. They
are wired identically. Refer to Figure 2-4 below for the pinout and to Table 2-
2 for terminal connections. Either CAT5 or CAT6 cables may be used for
these jacks.
15.
Speaker
: The audio monitoring speaker is positioned on the rear panel. The
volume of the speaker is controlled using the Quick Menu. Refer to the Quick
Menu section of this chapter.


