Assembly
Operation
Mulch
„Mulching“ is a process in which the grass is finely chop-
ped by a special cutting system and then deposited on the
ground. The result is that the grass does not have to be
collected and disposed of. „Mulching“ also prevents the lawn
from drying out.
Note:
• Depending on how fast the grass grows, you should mulch
1-2 times each week.
• The grass should not be too high or very wet!
• Walk slowly.
• When cutting, the strips should overlap.
• Do not cut more than 20 cm of grass at a time.
Important!
„Mulching“ is not recommended if the lawn is mossy or
matted.
Reason:
The cut grass remains on top fo the moss or matted grass
and cannot reach the ground below.
Remedy:
The lawn should be aerated and fertilized regularly.
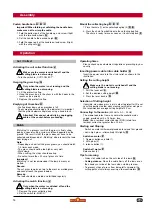
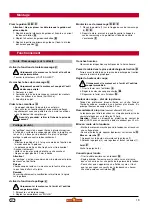
Activating the mulch function
J
Only when the motor is switched off and the
cutting blade is not moving.
1. Remove the grass collecting bag.
2. Set the switch to „MULCH“.
Cut / Collect
Operating times
Please check noise abatement regulations prevailing in your
country.
Selection of Cutting height
If possible, mow when grass is dry in order to protect turf. Do not
se cutting position too low when mowing very hight or wet grass.
We recommend an average cutting height of 4,0 cm.
Connecting to the mains
(230 Volts, A.C., 50 Hz)
The mower operates from any normal household mains
supply, provided with a 16 Amps. fuse.
Note:
Use a residual current device (RCD) rated for a
residual current not greater than 30 mA.
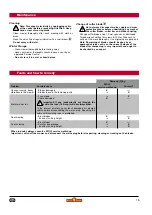
Starting and Stoping
• Switch on motor with mowerplaced on level and firm ground
• not in high grass - alternatively tilt slightly
O
.
Switch-on motor
P
1. Depress button and hold (1).
2. Lift up bar (2).
3. release button (1).
Switch-off motor
P
Release bar (2).
Tips for mowing
• Always let cable trail on the cut side of the lawn
Q
.
•
Cable guidance:
Place the cable firmly off the lawn or on
the already cur side of the lawn when starting to mow.
• To prevent strips of grass from being left unmowed, the
cutting paths must always overlap a few centimeters
R
.
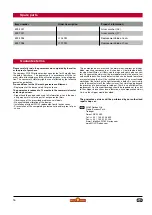
Inserting power cable into cable holder
K
Insert the power cord into the strain relief as shown in the
illustration.
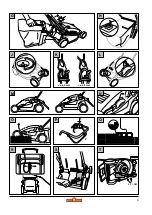
Hanging the grass bag
G
Only when the motor is not running and the
cutting blade is not moving.
1. Lift the protective flap.
2. Hang the grass bag in the chassis with the hooks in the
recesses (see arrow).
3. Replace the protective flap.
Emptying of Grassbox
H
• the flap drops down when grassbox is full
• To ensure properfunctioning of the indicator it is important
that the grilles beloware kept clean using a hand brush.
Attention! Disconnect electricity by unplugging
cable at the socket-before proceeding.
Activating the cut/ collect function
J
Make sure the motor is switched off and the
cutting blade is not moving.
• Turn the switch to „CUT/COLLECT“.
Setting the cutting height
Make sure the motor is switched off and the
cutting blade is not moving.
1. Pull the lever out
L
.
2. Set the desired cutting height
M
.
3. Press the lever back in
N
.
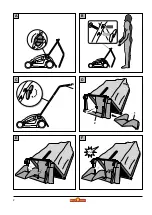
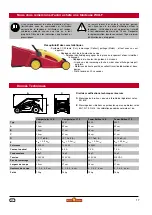
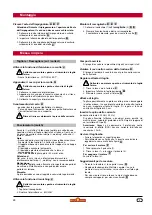
Fasten handle bars
A
B
C
Important! When folding or unfolding the handle bars,
make sure not to crimp the cable.
1. Fold the bottom part of the handle up and screw it tight
with the two hand wheels
A
.
2. Set the handle to the desired height
B
.
3. Fold the upper part of the handle out and screw it tight
with the wing nuts
C
.
Mount the collecting bag
D
E
F
1. Place the chute (1)
on the collecting bag flap (2)
D
E
.
2. Press the chute from behind onto the collecting bag flap.
The chute is ready for use as soon as it locks into place
F
.
14


