4.0 finishing
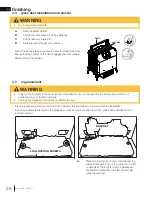
4.1 cast front installation and removal
A.
Remove safety barrier.
B.
Lift the top cast piece off of the
appliance.
C.
Detach the front cast piece from
the side pieces by removing the
screws from the brackets located
in the upper inside corners.
D.
Slide the front straight up to
remove.
Retainer
Door
Tab
Front
Bracket
Screws
Front
Front Legs
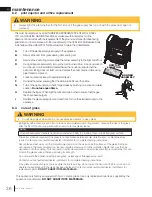
4.2 safety barrier installation and removal
A barrier designed to reduce the risk of burns from the hot viewing glass is provided with the appliance
and shall be installed.
A.
Lift the top casting up and remove the safety barrier. Remove and discard plastic.
B.
Tilt the top of the safety barrier and hook under the top casting, make sure to hold the safety barrier.
C.
Slightly lift the bottom of the safety barrier and push onto theappliance. Careful not to scratch the bottom
casting.
D.
Reverse these steps to remove.
!
WARNING
GLASS MAY BE HOT, DO NOT TOUCH GLASS UNTIL COOLED.
5.0 FINISHING
5.1 CAST FRONT INSTALLATION AND REMOVAL
A.
Remove safety barrier.
B.
Lift the top cast piece off of
the appliance.
C.
Detach the front cast piece
from the side pieces by
removing the screws from
the brackets located in the
upper inside corners.
D.
Slide the front straight up to
remove.
Follow the above steps in reverse
in order to reinstall the cast front.
Ensure that the tabs on the
underside of the front
t behind the
front legs.
NOTE: It is not necessary to
remove the cast front, in order to
remove the door.
FRONT
SCREWS
BRACKET
3
2
DOOR
RETAINER
FRONT
LEGS
TAB
FRONT
!
WARNING
RISK OF FIRE!
NEVER OBSTRUCT THE FRONT OPENING OF THE APPLIANCE.
DO NOT STRIKE, SLAM OR SCRATCH GLASS. DO NOT OPERATE APPLIANCE WITH GLASS
REMOVED, CRACKED, BROKEN OR SCRATCHED.
72.4
5.2 SAFETY BARRIER INSTALLATION AND REMOVAL
A barrier designed to reduce the risk of burns from the hot viewing glass, is provided with the
appliance and shall be installed.
A.
Lift the top casting up and remove the safety barrier. Remove and discard plastic.
B.
Tilt the top of the safety barrier and hook under the top casting, make sure to hold the safety barrier.
C.
Slightly lift the bottom of the safety barrier and push onto the unit. Careful not to scratch the bottom
casting.
D.
Reverse these steps to remove.
SAFETY
BARRIER
SAFETY
BARRIER
W415-1332 / A / 11.21.14
26
EN
45.3
!
WARNING
• Risk of fi re!
• Never obstruct the front opening of the appliance.
• Do not strike, slam, or scratch. Do not operate appliance with glass removed, cracked, or scratched.
• Glass may be hot.
• Do not touch glass until cooled.
!
WARNING
Follow the above steps in reverse in order
to reinstall the cast front. Ensure that
the tabs on the underside of the front fit
behind the front legs.
It is not necessary to remove the cast front in
order to remove the door.
note:
EN
W415-4016 / 08.09.21
25


