background image

12   

|

   Wolf Customer Care 800.222.7820
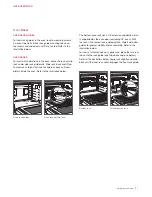
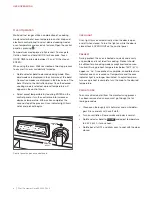
OVEN OPERATION

Self-Clean

During self-clean, the oven is heated to an extremely high 
temperature to burn off food soil. Remove all oven racks 
and rack guides. They will discolor if left in during self-clean.  
Oven door will lock and remain locked until self-clean is 
complete and oven temperature has cooled below 300°F


(150°C)

. Self-clean times include one hour for cool down.

Setting controls for 4-hour self-clean:

1

  Rotate selector bezel to CLEAN.

2

   Touch  ENTER.

Setting controls for 3-hour self-clean:

1

  Rotate selector bezel to CLEAN.

2

   Touch STOP TIME.

3

   Touch down arrow to reduce stop time by 1 hour.

4

   Touch ENTER twice.

 CAUTION

During self-clean, exterior surfaces may get hotter than 
usual. Children should be kept away.

Sabbath

This appliance is certified by Star-K to meet strict religious 
regulations in conjunction with specific instructions found on 
www.star-k.org. Sabbath overrides the automatic 12-hour 
shut off feature. Sabbath must be reset after a power failure.

Setting controls:

1

   Turn oven light on or off. 

2

   Rotate selector bezel to BAKE or ROAST and select 

desired temperature.

3

   Touch and hold ENTER for 5 seconds. ‘SAb’ will appear 

and flash on oven control knob indicating Sabbath mode 
has been initiated.  

4

   To change oven temperature while in Sabbath mode, 

turn control knob. Each turn will increase or decrease 
temperature by 10° (F or C). Display and audible chime 
are disabled, but temperature will randomly change after 
new temperature is selected. Oven will remain on until 
selector bezel is rotated to OFF.
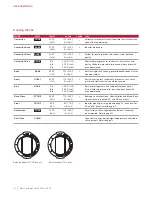
Auto Program

TIMED COOK

Timed cook automatically turns the oven off at a specified 
time. Oven will begin to heat immediately and will turn off at 
desired stop time. Clock must be set to the correct time for 
timed cook to function properly. Use in any cooking mode 
except broil, convection broil and bake stone.

Setting controls:

1

   Rotate selector bezel to desired cooking mode.

2

   Touch ENTER to select preset temperature or turn con-

trol knob to change temperature.

3

   Touch COOK TIME. Use arrows to select the desired 

cook time in hours and minutes.

4

   Touch  ENTER. 

DELAYED START

Delayed start automatically turns the oven on and off at 
specified times. Oven will remain idle until desired start time 
and will turn off at desired stop time. Clock must be set to 
the correct time for delayed start to function properly. Use 
in any cooking mode except broil, convection broil and bake 
stone.

Setting controls:

1

   Rotate selector bezel to desired cooking mode.

2

   Touch ENTER to select preset temperature or turn con-

trol knob to change temperature. If ENTER is touched, 
the oven will begin to heat immediately, but will enter idle 
mode once stop time is set.

3

   Touch COOK TIME. Use arrows to select the desired 

cook time in hours and minutes.

4

   Touch STOP TIME. Use arrows to select the time the 

oven should turn off.

5

   Touch  ENTER. 

Summary of Contents for DF364C

Page 1: ...Dual Fuel Ranges Use Care Guide ...

Page 2: ...enter or select one from our list of providers available at wolfappliance com locator All factory certi fied service providers are carefully selected and thoroughly trained by us SERVICE INFORMATION Model Number Serial Number Date of Installation Certified Service Name Certified Service Number Authorized Dealer Dealer Number Important Note To ensure this product is installed and operated as safely...

Page 3: ...urchase record in case of a home insurance claim You may register by one of the following options Mail in the completed Wolf product registration card Register online at wolfappliance com register and create a personalized My Sub Zero Wolf account using the serial number on your product Register by phone by calling Wolf Customer Care at 800 222 7820 As a Wolf owner you can count on ongoing support...

Page 4: ... location Anti tip device engaged WARNING A child or adult can tip this appliance and be killed Verify the anti tip device has been properly installed and engaged Ensure the anti tip device is re engaged when this appliance is moved Refer to the illustrations below for how to verify correct installation Do not operate this appliance without the anti tip device in place and engaged Failure to do so...

Page 5: ...f valves approved for use within the state province or region where this appliance is being installed A flexible gas connector when used must not exceed 3 9 m IMPORTANT INSTRUCTIONS GENERAL SAFETY PRECAUTIONS Be sure the oven cool air intake above the door and oven exhaust vent below the door are unob structed at all times Wear proper apparel Loose fitting or hanging garments should never be worn ...

Page 6: ... yourself with the safety practices features operation and care recommendations of your Wolf dual fuel range Clean the range thoroughly with hot water and mild detergent Rinse and dry with a soft cloth to remove any residual oil and grease left from the manufacturing process Refer to care recommendations on page 17 Verify surface burner components are assembled correctly To ensure the best results...

Page 7: ...front rack notch engages the front rack guide Oven Racks OVEN RACK GUIDES To insert rack guides in the oven locate mounting screws on oven side walls Place rack guide mounting tabs over the screws and slide down until fully seated Refer to the illustration below OVEN RACKS To insert a standard rack in the oven place the rack anti tip lock under side rack guide rails Slide rack back and lift up to ...

Page 8: ... F 290 C for one hour 4 Rotate bezel to OFF and allow oven to cool with the door closed OVEN OPERATION Oven Operation Wolf dual fuel ranges utilize a combination of a cooking mode selector bezel oven temperature control knob and electronic control panel to select desired cooking modes oven temperature and exclusive features Open the control panel by pressing Temperatures are displayed in Fahrenhei...

Page 9: ...4 hour clock press and hold clock for 5 seconds Touch CLOCK then ENTER TIMER The timer can be set for a maximum of 9 hours and 59 minutes Once a time is set the countdown is illuminated on the control panel display The last minute counts down in seconds The timer is independent from the oven Setting the timer does not affect cook time or stop time For infor mation regarding auto program features r...

Page 10: ...OIL Br1 Br2 Br3 350 F 175 C 450 F 230 C 550 F 290 C Best for broiling meats fish and poultry pieces up to 1 thick Utilize two piece broiler pan and always broil with oven door closed Bake Stone STONE 400 F 205 C 170 550 F 75 290 C Baking on a ceramic stone Great for pizza and bread Bake stone accessory required 30 and 36 ovens only Proof PROOF 85 F 30 C 85 110 F 30 45 C Ideal for proofing or risin...

Page 11: ... as Lo 6 An audible chime indicates internal temperature has reached probe set point Remove then reinsert probe to verify internal temperature CAUTION Probe and probe receptacle will be very hot Handle with care OVEN OPERATION Proof Setting controls for 30 and 36 ovens 1 Rotate selector bezel to BAKE 2 Turn oven control knob left until PrF is displayed then release 3 Oven temperature is preset at ...

Page 12: ... will increase or decrease temperature by 10 F or C Display and audible chime are disabled but temperature will randomly change after new temperature is selected Oven will remain on until selector bezel is rotated to OFF Auto Program TIMED COOK Timed cook automatically turns the oven off at a specified time Oven will begin to heat immediately and will turn off at desired stop time Clock must be se...

Page 13: ...ue to turn knob to desired simmer setting During a power outage surface burners can be lit manually Turn knob to HI and light using a multi purpose lighter CAUTION Never leave pans on a high setting unattended Be careful when cooking food in fat or grease it can become hot enough to ignite Oven Light WARNING Verify power is disconnected from electrical box before replacing light bulb Allow oven to...

Page 14: ...roiler grate CAUTION Use care when assembling charbroiler to avoid contact with igniter CHARBROILER OPERATION Stainless steel cover must be removed prior to operation 1 Turn on ventilation 2 Push and turn control knob counterclockwise to HI Igniter will begin to click until burner is lit 3 Allow to preheat for 10 minutes CHARBROILER CARE After cooking is complete allow charbroiler to remain on for...

Page 15: ...l Once cool wipe off any excess oil GRIDDLE OPERATION Stainless steel cover must be removed prior to operation 1 Turn on ventilation 2 Push and turn control knob counterclockwise to desired temperature Igniter will begin to click until burner is lit Double griddle has separate controls for each side 3 Indicator light above the knob illuminates until griddle reaches set temperature The light will c...

Page 16: ...LOW LOW LOW MED MED CENTER PLATE HOOK French top heating zones Center plate removal FRENCH TOP OPERATION Stainless steel cover must be removed prior to operation 1 Turn on ventilation 2 Push and turn control knob counterclockwise to HI Igniter will begin to click until burner is lit 3 Allow to preheat for 30 minutes CAUTION Never leave pans on a high heat zone unattended Be careful when cooking fo...

Page 17: ...le French top Refer to pages 14 16 for care recommendations Control knobs Bezels Using a damp cloth wipe with mild detergent or spray degreaser rinse and dry Do not place in dishwasher Control panel Use spray degreaser to remove fingerprints and food soil Spray on a cloth before wiping panel IMPORTANT NOTE Do not spray cleaners directly on the control panel Oven interior Before utilizing self clea...

Page 18: ...set Turn circuit breaker off for 5 seconds then turn back on OPP displayed on the oven control knob One of the ovens may be in self clean mode If one oven is in self clean the other can not be used OE OC or other error displayed Contact Wolf factory certified service Oven pops or bangs during preheat or cool down Normal with new oven cavity expansion and contraction Run self clean cycle If it pers...

Page 19: ...ANTY The warranty applies only to products installed for normal residential use The warranty applies only to products installed in any one of the fifty states of the United States the District of Columbia or the ten provinces of Canada This warranty does not cover any parts or labor to correct any defect caused by negligence accident or improper use maintenance installation service or repair THE R...

Page 20: ...WOLF APPLIANCE INC P O BOX 44848 MADISON WI 53744 WOLFAPPLIANCE COM 800 222 7820 822582 REV A 4 2013 ...

Reviews: