-
9
-
PILOT ADJUSTMENT
Using a flathead screwdriver, turn the slotted hex-head pilot adjustment screw clockwise
to decrease the flame, and counterclockwise to increase the flame.
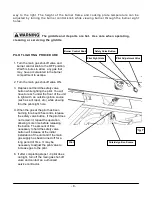
LEVELING
The griddle must be level (side -to-side and front-to-back) during operation to ensure
proper performance. Improper leveling can result in uneven temperature distribution.
1. Place a level on the griddle.
2. Adjust level by turning the bolts on the bottom of the unit. Using pliers or a crescent
wrench, turn the bolts counter -clockwise to increase height, and clockwise to decrease
height until leveling is achieved.
SHUTDOWN
1. Turn burner control knobs to the OFF position to cut off burners.
2. The pilots will remain lit as long as the main gas supply is on.
EXTENDED SHUTDOWN
1. Shut off the main gas supply valve.
2. Apply a heavy coat of vegetable oil over the griddle plate to inhibit rust.
CLEANING THE GRIDDLE
Empty the grease drawer as needed throughout the day and regularly clean at least once
daily.
Clean the griddle regularly. A clean griddle always looks better, lasts longer an d performs
better. To produce evenly cooked, perfectly browned griddle products keep the griddle
plate clean and free of carbonized grease. Carbonized grease on the surface hinders the
transfer of heat from the griddle surface to the food, resulting in spo tty browning and loss
of cooking efficiency. Carbonized grease tends to cling to griddle foods, giving them a
highly unsatisfactory and unappetizing appearance.
To keep the griddle clean and operating at peak efficiency, follow these procedures:
AFTER EACH USE
Clean the griddle with a wire brush
or
flexible spatula.
ONCE PER DAY
Thoroughly clean the griddle back splash, sides and front. Remove, empty and wash the
grease drawer in the same manner as an ordinary cooking utensil.
ONCE PER WEEK
Clean the griddle surface thoroughly. Use a griddl e stone, screen, or Scotch Brit
e™ pad
on the surface as necessary. Rub with the grain of the metal while the griddle is still
warm (not hot). A detergent may be used on the plate surface to help clean it, but be sure
the detergent is thoroughly removed by flushing with clear water.
Summary of Contents for TYG48
Page 12: ... 12 NOTES ...
Page 13: ... 12 REMARQUES ...


