background image

1

ASSEMBLY INSTRUCTIONS

 YOKOHAMA

018150|14

COMFO

RT

LINE

ASSEMBLY INSTRUCTIONS

Top quality from Japan 

Metal shed Yokohama

The assembly video can be found on: www.finnhaus.de

Summary of Contents for Takubo Yokohama

Page 1: ...1 ASSEMBLY INSTRUCTIONS YOKOHAMA 018150 14 COMFORT LINE ASSEMBLY INSTRUCTIONS Top quality from Japan Metal shed Yokohama The assembly video can be found on www finnhaus de...

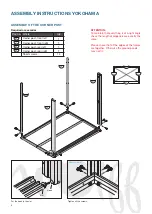
Page 2: ...rner basement front right 1 Metal fitting for corner basement rear 2 01 02 03 04 05 01 02 03 04 05 A A B C Metal fitting rear corner Metal fitting front right Metal fitting front left Drive the metal...

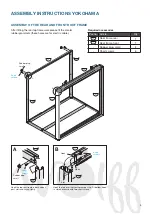
Page 3: ...e door opens and closes easily FITTING OF THE BASE FRAME AND THE CROSS BEAM 01 02 03 04 05 Required accessories Pce no Article Qty Short screws 12 Spirit level 1 B C Metall fitting for the front Short...

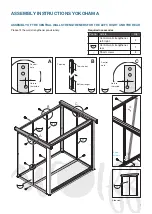
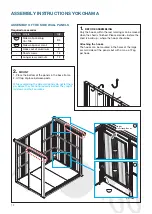
Page 4: ...ar left 1 Corner post rear right 1 Short screws 14 06 07 08 09 08 06 09 Slot Hook Put the hook in the slot Short screws Tighten all the screws 07 01 04 02 03 ATTENTION To maintain that everything is a...

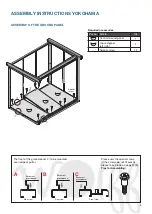
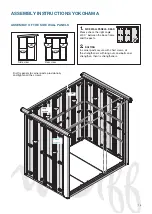
Page 5: ...Short screws Short screws Rubber plug small Slot Hook Hook Rubber plug small Short screws Hook the top rear frame in both corner post slots and screw tightly Hook the top over the front corner post li...

Page 6: ...YOKOHAMA ASSEMBLY OF THE LEFT AND RIGHT DECORATIVE COVER Required accessories Pce no Article Qty Decorative cover left 1 Decorative cover right 1 Short screws 6 17 18 A B Short screws Short screws A B...

Page 7: ...ease fit the wall strengthener provisionaly A 11 11 11 B 14 14 14 Top side Hole to the inside Central hole Top shorter Bottom longer Required accessories Pce no Article Qty Central wall strengthener l...

Page 8: ...Short screws B Lower Attachement The base of the strengthener is pressed and secured into the third hole of the corner post Please watch the hook direction Left Right For a door opening left The stren...

Page 9: ...SSEMBLY OF THE GROUND PANEL 29 30 The front of the ground panel C to be mounted over ledge of gutter Please usw the special srews If the screws do not fit exactly please take a look on page 27 3 Tips...

Page 10: ...sories Pce no Article Qty Roof panel big 2 Roof panel small 2 Short screws 12 Snow plug 3 Bags 21 27 27 27 27 15 15 27 27 27 28 27 28 28 28 28 28 28 28 Fit roof starting left then centre and last righ...

Page 11: ...ch with 10 16 11 11 16 16 27 11 11 Lift the roof stabilisator and secure with two long screws central holes Strengthering of the roof panels lower side upper side long screw nut nut long screw long sc...

Page 12: ...can be moved when the shed is finished Please decide before the shed is build up where the hooks should be Attaching the hooks The hooks can be mounted in the holes of the large or small sides of the...

Page 13: ...Please check the right angle of 90 between the base frame and the posts 2 BOLTING In corner posts secure with short srews all the strengtheners with long nuts and bolts and strengthen then fix strengt...

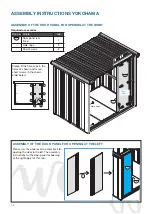
Page 14: ...ws 8 24 ASSEMBLY OF THE DOOR PANEL FOR OPENING AT THE LEFT Please turn the panel over to assemble it for opening the door to the left The assembly instructions for the door panel for opening at the ri...

Page 15: ...e Qty Decorative cover front 1 Height compensation cover bar 1 Hole caps 3 Short screws 7 25 51 Short screws Hole caps Roof panel 25 51 25 25 19 1 2 Hook the trim panel in the front roof frame Rotate...

Page 16: ...NS YOKOHAMA ASSEMBLY OF THE GUTTER Required accessories Pce no Article Qty Gutter 1 Short screws 4 26 26 Hook both ends of the gutter on the trim panels Rotate over the roof and secure it with short s...

Page 17: ...raubung wird dieselbe Schraube verwendet die bereits f r den Eckpfosten verwand wurde Bend Drain hole Drain pipe Hole cover Hole cover Rubber plug Angle joint Screw the three angle joints with short s...

Page 18: ...ers top and bottom as shown Take precaution that the cylinder lock isn t scratched Short screws Metal stopper Metal stopper Door stop cover For a right hand door fit door stop cover on the right Runne...

Page 19: ...or frame and door leaf Door stop cover Door stop cover Short screws Runner wheel unit Metal stopper Door stop cover Runner wheel unit at the door Secure top and bottom metal stoppers on the door with...

Page 20: ...eels so that there is a wheel either side of the fixed door strengthener Afterwards place front door in front sill and hook on runner wheels on either side of drip ledge 2 1 10 1 2 Hook bottom of door...

Page 21: ...ase warm the plastic for easier fittment Check the following points 1 Before fitting the front decoration cover check that both doors completly open and shut 2 Check the doors are square 3 The door lo...

Page 22: ...etal holder for the upper front decoration cover 2 Short screws 4 34 Short screws 34 Metal holder for the upper front decoration cover 1 Fit the front decoration cover between the corner posts and pro...

Page 23: ...0 Mount with long screws and nuts Fix Pce no with 88 14 Bottom of rack frame fits in gap between ground and wall panels 39 90 Building the racks Hook the rear rack frame in the last gap on wall panels...

Page 24: ...s supports TY33 336 100402 You can find the sticker with the piece number under the shelf HT 05W HT 07W HT 12W HT 13W HT 14W HT 15W TY19 335 TY20 335 TY33 335 TY22 335 TY20 336 TY33 336 If more shelve...

Page 25: ...ainst falling over The accessoires marked may be used when the shed is more than 120 mm above ground In this case the large anchors can be lengthened with the short anchors and short screws Fix two an...

Page 26: ...fore you fit all 41 screw head covers and the door slot covers on In cold weather the plastic cover can become hard In this case warm up for example in your trouser pocket to soften Screw head cover C...

Page 27: ...oes not get damaged Please wear gloves and a longarmed shirt while building the metal shed to protect your hands and arms from insury MOUNTING ADVISE FOR THE SUBSTRUCTURE FLOOR PANELES 1 Ensure yousel...

Page 28: ...readed Then tighten Please screw CAREFULLY to protect the screws threads from damage 4 Please anker the shed to the ground with supplied accessoires Control that all is correctly screwed 5 For electri...

Reviews: