background image

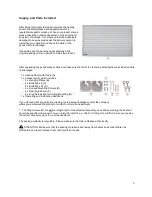
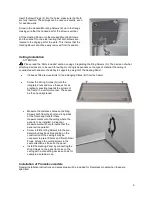
Insert the Rawl Plugs (F) into the holes; make sure that both 
are fully inserted. These plugs can be used universally, even 
for wooden walls. 
 
Screw in the Hooked Mounting Screws (E) up to the flange 
making sure that the hooked part of the screw is vertical. 
 
Lift the Heating Panel onto the Hooked Mounting Screws 
and then slide it to one side insuring that both screws are 
located in the dogleg part of the slots. This insures that the 
Heating Panel cannot be easily removed from its position. 


Ceiling Installation 


ATTENTION 


 Please read the ‘Parts included’ section on page 3 regarding the Ring Screws (G). The decision of what 

attaching devices are to be used for ceiling mounting is dependant on the type of material the ceiling is 
constructed with and also the ability to support the weight of the Heating Panel. 




if already fitted remove Bolts (C) and Hanging Plates (B) from the heater. 




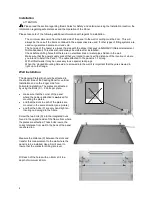
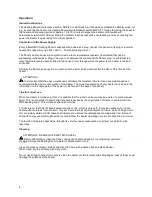
Screw the 4 Ring Screws (G) into the 
integrated nuts and move these as far as 
practically possible towards the corners of 
the frame in a uniform manner. These can 
be then hand tightened. 




Measure the distances between the Ring 
Screws both from the short and long sides 
of the frame and transfer these 
measurements onto the ceiling where the 
panel is to be installed. A diagonal 
measurement will help to insure that the 
panel will be parallel. 



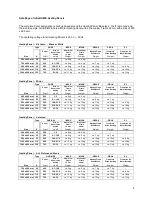
Screw 4 further Ring Screws into the pre-
determined positions. Depending on the 
construction of the ceiling it may be 
necessary to pre-drill holes and fit with Rawl 
Plugs. Arrange the ceiling screws in the 
same direction as those on the panel. 



Install the Heating Panel by connecting the 
Ring Screws on the panel to those on the 
ceiling with a connecting device such as for 
example a karabiner clip. 


Installation of Frameless models 

Special Installation Instructions and accessories will be included for Frameless models when these are 
specified. 


Summary of Contents for infraNOMIC

Page 1: ...infraNOMIC INFRARED HEATING PANELS Operating and Installation Instructions Installation Instructions only for Framed Panels Wolff Meier GmbH Co KG Glaswerke Am Wingert 16 35428 Langgöns Germany ...

Page 2: ... make sure that you use the heater exactly as per the following instructions the adherence to these instructions is a pre condition to the manufactures liability regarding any guarantee cases After completion please store these instructions in a safe place so that they can be used again if necessary and also can be given to another user if the panel changes hands Contents Thank you for your purcha...

Page 3: ...clamp or in any other way damage the connecting cable attached to the Panel If the attached connecting cable does appear to be damaged please refer to the manufacturer or his service department or a similarly qualified person to undertake any repair work Do not attempt to carry out any repairs changes or modifications to the Heating Panel Before any assembly or cleaning work is carried out disconn...

Page 4: ... A 1 x Accessory Set which includes 2 x Hanging Plates B 4 x Bolts M6 x 8 C 2 x Bolts M6 x 25 D 2 x Hooked Mounting Screws E 2 x Rawl plugs 8mm F 4 x Ring Screws M6 for Ceiling Mounting G 1 x Operating and Installation Handbook If you discover that any parts are missing or are damaged please contact the company where you purchased the product or contact our Service department The Ring Screws G are...

Page 5: ... is 1 7 m long With difficult walls it may be necessary to use special rawl plugs When the Hooked Mounting Screws are screwed into the wall it is important that they are screwed in right up to the flange Wall Installation The Hanging Plates B should be attached to the shorter side of the heating Panel for vertical Installation and on the longer side for a horizontal installation The plates are att...

Page 6: ... Bolts C and Hanging Plates B from the heater Screw the 4 Ring Screws G into the integrated nuts and move these as far as practically possible towards the corners of the frame in a uniform manner These can be then hand tightened Measure the distances between the Ring Screws both from the short and long sides of the frame and transfer these measurements onto the ceiling where the panel is to be ins...

Page 7: ...r consumption of the Heater The power consumption of your heater is included in the information on the nameplate of the heater to be found on the back of the panel Tips for correct use When the Heater is turned on at first it is possible that for a short while you may be aware of a distinct sweet smell This is not harmful to health and if present is caused by the vaporisation of silicon in contact...

Page 8: ...etails of all current models are listed in the Data Page see page 8 The units comply with the test requirements of the European Low Voltage specifications 2006 95 EG and the harmonised Product Standards EN 60335 1 and EN 60335 2 30 and are marked with a CE Conformity Label Guarantee and Service The Heating Panels are guaranteed by Wolff Meier for 2 years after the purchase date If these Operating ...

Page 9: ...0 mm 65 400 9 1 14 5 ca 7 kg ca 5 kg ca 8 kg ca 7 kg 900 x 600 mm 96 500 14 6 21 8 ca 10 kg ca 10 kg ca 11 kg ca 13 kg ca 8 kg 1100 x 600 mm 116 600 21 9 25 9 ca 11 kg ca 11 kg ca 13 kg ca 16 kg ca 10 kg 1200 x 600 mm 126 700 26 34 ca 12 kg ca 12 kg ca 13 kg ca 17 kg ca 11 kg Heating Panel Coloured Type GHE RAL M10 X M24 X HB30 X P RL X SL Power Size of Room to be heated Aluminium Frame 10 mm Alum...

Reviews: