background image

Assembling Your

Attachments

Warning:

 Use caution, as blades are 

extremely sharp. Always handle all blades 

by their central plastic section. Never 

grasp the cutting blade itself. 

Note:

 All attachments must be firmly 

attached to the Spindle. Always adjust the 

attachments until you are sure that they 

are correctly fitted.

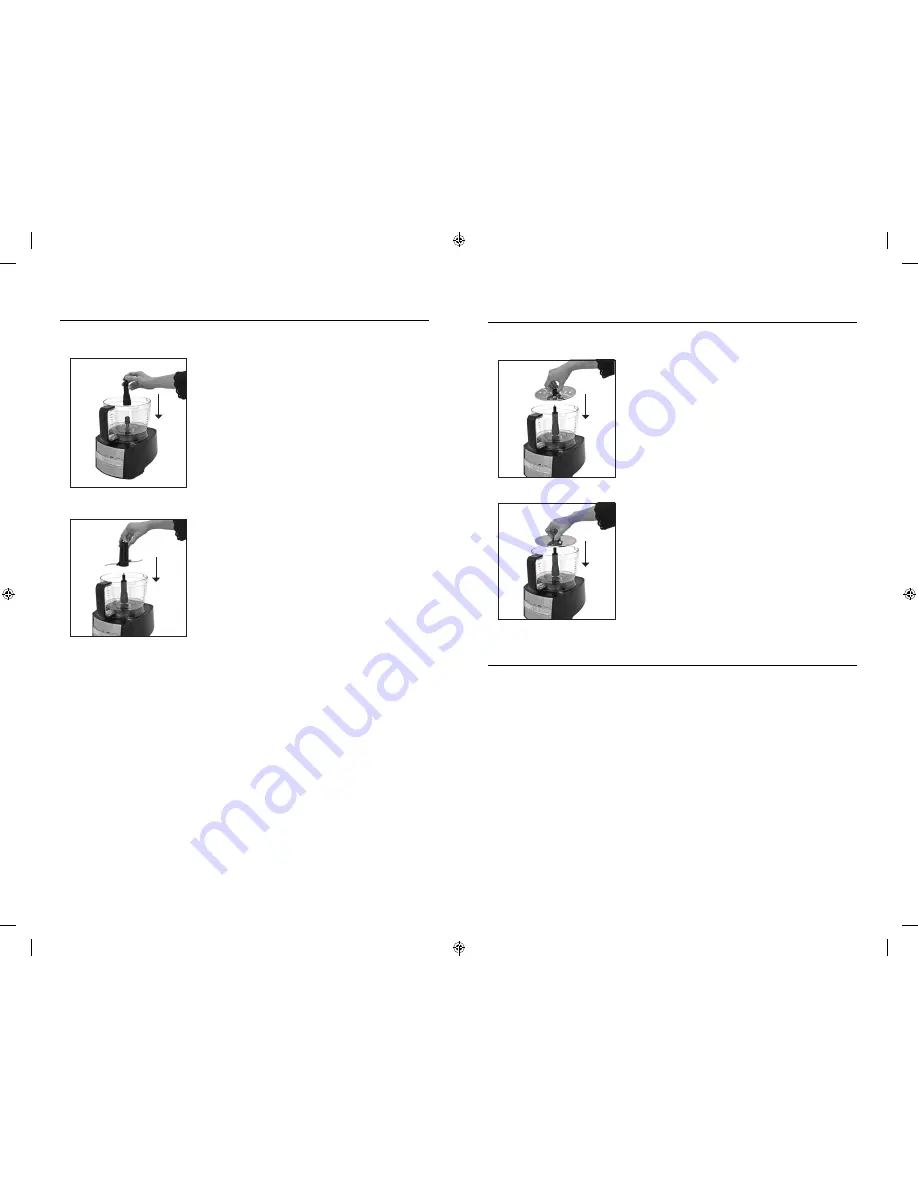
Processing Blade

Fit the Work Bowl and Spindle as detailed 

in figures 1, 2 & 4.

Fit the Processing Blade over the Spindle. 

It may be necessary to turn the blade 

slightly left or right in order to fit the 

blade properly onto the Spindle (See  

figure 5).

Place ingredients into the Work Bowl.

Fit the Bowl Lid onto the Work Bowl (see 

figure 3), and place the two-piece food 

pusher into the Feed Tube.

Plug the power cord into a 120V AC 

power outlet.

Start processing using the On or Pulse 

buttons.

When processing is complete, press the 

Off button or release the Pulse button to 

turn the motor off and unplug the cord 

from the wall outlet. Remove the Spindle 

and Processing Blade from the Work Bowl 

before removing the processed food.

1

2

3

4

5

6

7

Figure 4

Figure 5

Assembling Your

Attachments (Cont.)

Reversible Slicing & Shredding Discs

Fit the Work Bowl and Spindle as 

detailed previously, in figures 1, 2 and 4.

Select the ‘Reversible’ disc of your choice 

-  Shredding (fine or coarse) or Slicing 

(fine or coarse) as seen in figures 6 and 7.

Warning:


Use caution as the blades are 

sharp.

Fit the Bowl Lid onto the Work Bowl as 

previously shown in figures 3a and 3b. 

Place the two-piece food pusher in the 

feed tube.

Plug the power cord into a 120V AC 

power outlet.

Start processing using the On or Pulse 

buttons.

When processing is complete, press the 

Off button or release the Pulse button to 

turn the motor off and unplug the cord 

from the wall outlet. Remove the disc 

and Spindle from the Work Bowl before 

removing the processed food.

1

2

3

4

5

6

Figure 6

Figure 7

Using Your Food Processor

Important:

 If the processing bowl and lid are not correctly assembled, 

the Food Processor will not function.

Note:


For maximum control load the feed tube first before turning 

on your food processor. Always use the food pusher for more evenly 

processed foods and never use your fingers.

Important:


The Food Processor is fitted with a safety thermal cut-out 

device and will shut off in the event of overload. If this occurs, switch the 

appliance off, wait 10 minutes, and it will automatically reset when cool.

Plug the power cord into a 120V AC power.

Using the On button on the control panel, press once to start 

processing. The Pulse function remains on as long as the Pulse 

button is pressed down. Further ingredients can also be added 

while processing by pouring through the feed tube once the

food pusher has been removed.

After you have completed processing, press the Off button or 

release the Pulse button to turn the motor off and unplug the 

cord from the wall outlet.

1

2

3

10

11

Summary of Contents for BFPR1000

Page 1: ... PHONE 1 800 275 8273 or visit our website at wphousewares com Please read operating instructions before using this product Please keep original box and packing materials in the event that service is required W P APPLIANCES INC Toll Free 800 275 8273 Model BFPR1000 Printed In China REV 1 0 USE AND CARE Photos throughout this manual may differ slightly from actual product ...

Page 2: ...uction manual and keep the appliance out of reach of children 1 2 3 4 5 6 7 8 9 10 11 12 Additional Safety Information Short Power Cord A short power supply cord is provided to reduce the hazards resulting from entanglement or tripping over a longer cord An extension cord may be used with care however be sure the marked electrical rating is at least as great as the electrical rating of this applia...

Page 3: ... Hints Disassembly of Your Food Processor Care and Cleaning Recipes Limited Warranty Contact Information 2 3 3 4 4 6 8 9 10 11 12 14 16 17 18 75 BACK Table of Contents Additional Safety Precautions If you have any concerns regarding the performance and use of your appliance please contact Consumer Service Line at 800 275 8273 Always use extreme care when handling processing blades and cutting disc...

Page 4: ...sor 6 7 Work Bowl Storage Tray Cover Storage Tray Spindle Reversible Shredding Disc Reversible Slicing Disc Spatula Feed Tube Bowl Lid Food Pusher Two Piece Food Pusher Set Food Pusher Insert Processing Blade Motor Housing ...

Page 5: ...andle by black center hub Only handle by black center hub Assembling Your Food Processor Before you assemble the food processor ensure that the power cord is unplugged Place the Motor Housing facing you on a dry level surface Place the Work Bowl onto the Motor Housing The Work Bowl will only sit correctly on the Motor Housing when the handle is at the 3 o clock position see figure 1 Rotate the han...

Page 6: ...nd 7 Warning Use caution as the blades are sharp Fit the Bowl Lid onto the Work Bowl as previously shown in figures 3a and 3b Place the two piece food pusher in the feed tube Plug the power cord into a 120V AC power outlet Start processing using the On or Pulse buttons When processing is complete press the Off button or release the Pulse button to turn the motor off and unplug the cord from the wa...

Page 7: ...hen storing The Spindle and Processing Blade store within the Work Bowl The Storage Tray Cover allows the food processor to nest on top when not in use Storing Your Accessories 1 2 3 4 5 6 Figure 8 Figure 9 Figure 10 Figure 11 Figure 12 Processing Bowl Storage Fit the Work Bowl and Spindle as detailed in figures 1 2 and 4 Place the Processing Blade over the Spindle and then fit the Bowl Lid onto t...

Page 8: ...eady and upright with the food pusher press down evenly until all ingredients are sliced or shredded Do not use excessive force or you may damage the food processor Warning Never use fingers to push food down the Feed Tube Always use the food pusher Helpful Hints Cont For best results when slicing the Feed Tube should always be packed firmly to allow each piece of food to support the others There ...

Page 9: ... only on the top rack of your dishwasher Once your food processor and accessories have been cleaned and dried thoroughly store your food processor as outlined in the section Storing your Food Processor Disassembly of Your Food Processor Remove the Bowl Lid by turning counter clockwise and lifting straight up If using the Processing Blade lift straight up to remove from Spindle Never handle the bla...

Page 10: ...ieve from water and with the back of a large metal spoon drain out excess water Set aside Repeat with remaining bunches of spinach 2 Place artichokes in bowl of your food processor fitted with the Processing blade Process for about 5 to 7 seconds or until very coarsely chopped Pre heat oven to 375 degrees F 3 Add mayonnaise mascarpone cheese crème fraiche Parmesan goat cheese roasted garlic lemon ...

Page 11: ...tro Add aromatics mixture Season with salt and pepper Set aside to cool completely When ready to form the spring rolls squeeze out all the excess liquid Filling 1 2 cup onions julienned 1 medium carrot julienned 4 ounces shiitake mushrooms stems discarded sliced into julienne 1 1 2 cups red bell pepper julienned 2 cups green cabbage julienned 3 tablespoons peanut oil for stir frying Salt and fresh...

Page 12: ... popular potato pancakes of the Jewish kitchen make a wonderful appetizer side dish or even a vegetarian main course INGREDIENTS 8 medium baking potatoes peeled 1 medium onion peeled Lemon juice 1 cup all purpose flour 1 cup milk 1 egg 1 tablespoon baking powder 2 tablespoons unsalted butter melted Peanut oil Freshly grated nutmeg Salt and pepper to taste Watercress for garnish Caviar for garnish ...

Page 13: ...n 1 4 cup milk 1 2 cup all purpose flour 1 cup panko Peanut oil or vegetable oil for deep frying Bottled hoisin sauce for serving METHOD 1 In an automatic deep fryer or a deep heavy frying pan preheat several inches of oil to a temperature of 350 F If you don t have an automatic deep fryer check the temperature by clipping a deep frying thermometer to the side of the pan Meanwhile pat the scallops...

Page 14: ...nd pulse until chunky Transfer to a nonreactive bowl and add the vinegar sugar salt and pepper Slowly whisk in 1 cup of olive oil Cover with plastic wrap and reserve in the refrigerator 3 To start the Quesadillas In a mixing bowl stir together the peanut oil ginger garlic cilantro green onion and red pepper Add the chicken breasts turn to coat them well cover with plastic wrap and marinate in the ...

Page 15: ...ng the next batch Arrange the chips attractively in one or more napkin lined baskets and serve Savory Crepes Serves 4 6 INGREDIENTS 3 4 cup all purpose flour 1 4 teaspoon salt 1 teaspoon sugar 3 large eggs 3 tablespoons unsalted butter melted 1 1 2 cups milk METHOD 1 Put the flour salt and sugar in the bowl of a food processor fitted with the Processing blade and turn the processor on With the mac...

Page 16: ...ste paprika cayenne 2 teaspoons salt and black pepper Cover with plastic wrap and refrigerate for 2 hours 2 In batches transfer the chilled gazpacho mixture to your food processor fitted with the Processing blade and pulse the machine until the soup is coarsely puréed Transfer the batches as ready to another nonreactive bowl Stir the mixture to blend the batches Taste it and add salt and pepper to...

Page 17: ...salt 1 4 teaspoon freshly ground black pepper METHOD 1 Using the large holes of reversible shredding disc in your food processor shred the potatoes Change to the grating disc and grate the onion 2 Line a large bowl with a clean kitchen towel Transfer the mixture to the towel lined bowl twist the towel around it and squeeze out as much liquid as you can alternatively you can pick the mixture up by ...

Page 18: ...d delicious yet satisfying Serve with fresh fruit and dust with powdered sugar Crookneck Squash Casserole Serves 6 8 INGREDIENTS 1 2 inch piece of leek white part only 6 medium crookneck squash ends removed 3 tablespoons butter 1 teaspoon salt 1 teaspoon pepper 4 oz piece Swiss Fontina or Kasseri Cheese Cracker Topping see separate recipe in Dough Crust section METHOD 1 Preheat oven to 350 degrees...

Page 19: ...ay with Fresh Mint Soy Vinaigrette Serves 8 12 INGREDIENTS For the chicken satay 2 skinless boneless chicken breast halves 1 1 2 teaspoons curry powder 1 teaspoon freshly ground black pepper 1 2 teaspoon kosher salt 1 2 teaspoon ground cumin 2 tablespoons peanut oil or vegetable oil For the mint soy vinaigrette see separate recipe in Sauces Dressings METHOD 1 Soak two dozen 6 inch bamboo or wooden...

Page 20: ... the heat and if time allows let the chicken cool in the liquid 2 Remove the chicken from the pot strain the light broth and use for another purpose When it is cool enough to handle either shred the meat by hand or pulse in your Food Processor with the Processing blade attached to the desired consistency Transfer to a bowl 3 Wash the lettuce breaking the larger leaves in half across the middle You...

Page 21: ... and season lightly with salt and pepper Remove the pizzas from the oven arrange the lettuce on each of the pizzas and top with some of the shaved Parmesan Cut into slices and serve immediately 40 41 Caesar Chicken Pizza Makes 4 pizzas 8 to 10 servings See recipe for Whole Wheat Pizza Dough in the Dough Crust section of this manual Two favorite dishes Caesar salad and pizza become one in this popu...

Page 22: ...es 5 Remove the pizza from the oven and transfer to a firm surface Arrange the smoked salmon slices over the surface of the pizza covering completely Garnish with the chopped chives and salmon eggs 42 43 Calzone with Artichokes Hearts and Porcini Mushrooms Makes 4 calzones 12 servings INGREDIENTS Pizza dough see separate recipe in Dough Crust section 2 tablespoons extra virgin olive oil 2 large ar...

Page 23: ... transfer to a cutting board cut into slices and serve immediately 44 45 Cameron s Four Cheese Pizza When my son Cameron was younger this was the only pizza he would eat He told me just what he wanted on his pizza and he s eaten it the same way ever since Makes one 10 inch or two 8 inch pizzas Serves 3 to 4 INGREDIENTS 12 ounces 1 2 recipe Pizza Dough see separate recipe in Dough Crust section 2 t...

Page 24: ...ine the garlic cloves and olive oil and heat Reduce the heat and simmer until the garlic begins to turn brown 10 to 15 minutes Do not let the garlic get too brown or the oil will have a bitter taste 2 Remove from the heat and cool to room temperature Add the red pepper flakes and let sit to infuse for at least 2 hours to seal flavors Refrigerate in a covered container for up to 2 weeks 46 47 Sauce...

Page 25: ...packed parsley washed with large stems removed 1 cup firmly packed basil leaves 2 tablespoons chopped blanched garlic 1 tablespoon finely ground almonds 3 4 cup olive oil 1 teaspoon salt 1 teaspoon freshly ground white pepper 2 teaspoons lemon juice METHOD 1 In the food processor fitted with the Processing blade combine the parsley basil garlic almonds and a little of the oil until combined well W...

Page 26: ...e 3 tablespoons milk or cream 1 clove garlic 2 oz chunk of Parmesan cheese 2 tablespoons fresh parsley leaves 1 2 teaspoon salt 1 2 teaspoon fresh ground pepper METHOD 1 Place Cream cheese milk or cream Ricotta and garlic into the bowl of the food processor fitted with the Processing blade 2 With the Processing blade still attached to the Spindle place the Grating disc onto Spindle as well and sec...

Page 27: ...ece of dough into a thick strip no wider than the machine to enable it to pass through the rollers If necessary dust the pasta very lightly with flour Run the pasta through the machine Fold in thirds crosswise and run through the machine again Repeat this procedure two more times until the dough is smooth and somewhat elastic Set the machine to the next smaller opening and run the dough through th...

Page 28: ...om of the ball Repeat 4 or 5 times Then on a smooth unfloured surface roll the ball under the palm of your hand until the top of the dough is smooth and firm about 1 minute Cover the dough with a damp towel and let rest 1 hour At this point the balls can be wrapped in plastic and refrigerated for up to 2 days 54 55 Spinach Pasta Serves 6 8 INGREDIENTS 2 cups fresh spinach firmly packed 1 1 2 cups ...

Page 29: ...a is evenly blended in Gather each batch of dough into a ball wrap it in plastic wrap and refrigerate for at least 1 hour or as long as overnight 56 57 Whole Wheat Pizza Dough Makes enough for four 7 to 8 inch pizzas Try this robust dough in place of my regular pizza dough The honey brings out a wonderful rich flavor in the crust INGREDIENTS 1 package yeast 1 4 cup warm water 1 tablespoon honey 3 ...

Page 30: ...than the other Pat each piece into a flattened disk wrap it in plastic wrap then chill the disks in the refrigerator for at least 2 hours 58 59 Lemon Shortbread Crust Used in Zesty Lemon Bar recipe in the Desserts section Makes enough crust for two dozen bars INGREDIENTS 1 1 2 cups all purpose flour 3 4 cup confectioners sugar 3 tablespoons cornstarch 1 8 teaspoon salt 1 tablespoon grated lemon ze...

Page 31: ...eed tube while pulsing 2 or 3 times so all the ingredients are evenly distributed 60 61 Breadcrumb Topping for Casserole Makes enough for 1 large casserole INGREDIENTS 8 slices firm texture bread 4 tablespoons melted butter 1 tablespoon fresh flat leaf parsley METHOD 1 Place all the ingredients into the bowl of the food processor fitted with a Processing blade 2 Process until all ingredients are c...

Page 32: ...ends removed 3 1 3 cups all purpose flour 2 teaspoons baking soda 1 1 2 teaspoons salt 1 2 teaspoon baking powder 1 teaspoon ground cinnamon 1 teaspoon vanilla 2 3 cup nuts 2 3 cup raisins METHOD 1 Preheat oven to 350 degrees Grease two loaf pans or spray with non stick spray 2 Into the food processor fitted with processing blade place the butter sugar and eggs Process until smooth Add the orange ...

Page 33: ... floured rolling pin to roll out the smaller disk of chilled dough to an even circle with a diameter of 11 inches Gently fold the dough in half or into quarters and transfer it to a 9 pie pan Unfold the dough and gently ease it into the contours of the pan Roll out the larger disk of dough to a circle about 12 inches in diameter 3 Fill the lined pie pan with the cooled apple mixture Dot the apples...

Page 34: ...et 2 cups white grape juice 1 cup water 1 2 cup sugar 4 cups raspberries rinsed and dried on paper towels METHOD 1 Put the grape juice in a small saucepan and bring to a boil over medium high heat Boil until it reduces to 1 cup 7 10 minutes Make a simple syrup by combining the water and sugar in another saucepan and boiling until the sugar has dissolved Combine the syrup and grape juice and chill ...

Page 35: ... Makes 6 servings INGREDIENTS For the poached peaches 3 large ripe firm freestone peaches 2 cups water 2 cups sugar 1 4 cup lemon juice Grated zest of 1 lemon For the fresh raspberry sauce 1 pound raspberries 1 2 cup sugar 2 tablespoons lemon juice METHOD 1 Bring a saucepan of water to a boil and boil peaches for about 20 seconds Transfer to a bowl of ice water to cool Drain and peel away skin 2 I...

Page 36: ...aspoon allspice Cream Cheese Frosting see separate recipe opposite page METHOD 1 Preheat oven to 350 degrees Grease bottoms of two round baking pans Dust lightly with flour 2 Place the shredding disc in the food processor with the small holes facing up 3 Stand the carrots into the feed tube and guide through the shredding disc with the pusher without excess pressure 4 Remove the shredding disc and...

Page 37: ...Notes Notes 72 73 ...

Page 38: ...gift recipient During the applicable warranty period we will repair or replace at our discretion any mechanical or electrical part which proves defective or replace unit with a comparable model To obtain service under the terms of this warranty call Toll Free 800 275 8273 THIS LIMITED WARRANTY COVERS UNITS PURCHASED AND USED WITHIN THE UNITED STATES AND DOES NOT COVER Damages from improper install...

Reviews: