Using Your Pressure Cooker
Gather all ingredients and be familiar with
your recipe. Pour required amount of liquid
into Removable Cooking Pot, and then add
food. Use the Steaming Rack, if desired.
Do not fill the unit over 2/3 full. When
cooking foods that expand during cooking
such as rice or dried vegetables, do not
fill the unit over 1/2 full. Over filling may
cause a risk of clogging the Vent Pipe and
developing excess pressure.
See instructions for cooking on page 11.
Make sure Sealing Gasket is securely
positioned in the underside of the Lid. Always
examine the Sealing Gasket before installing
and before each use. Make sure it is in good
working order and free of any tears.
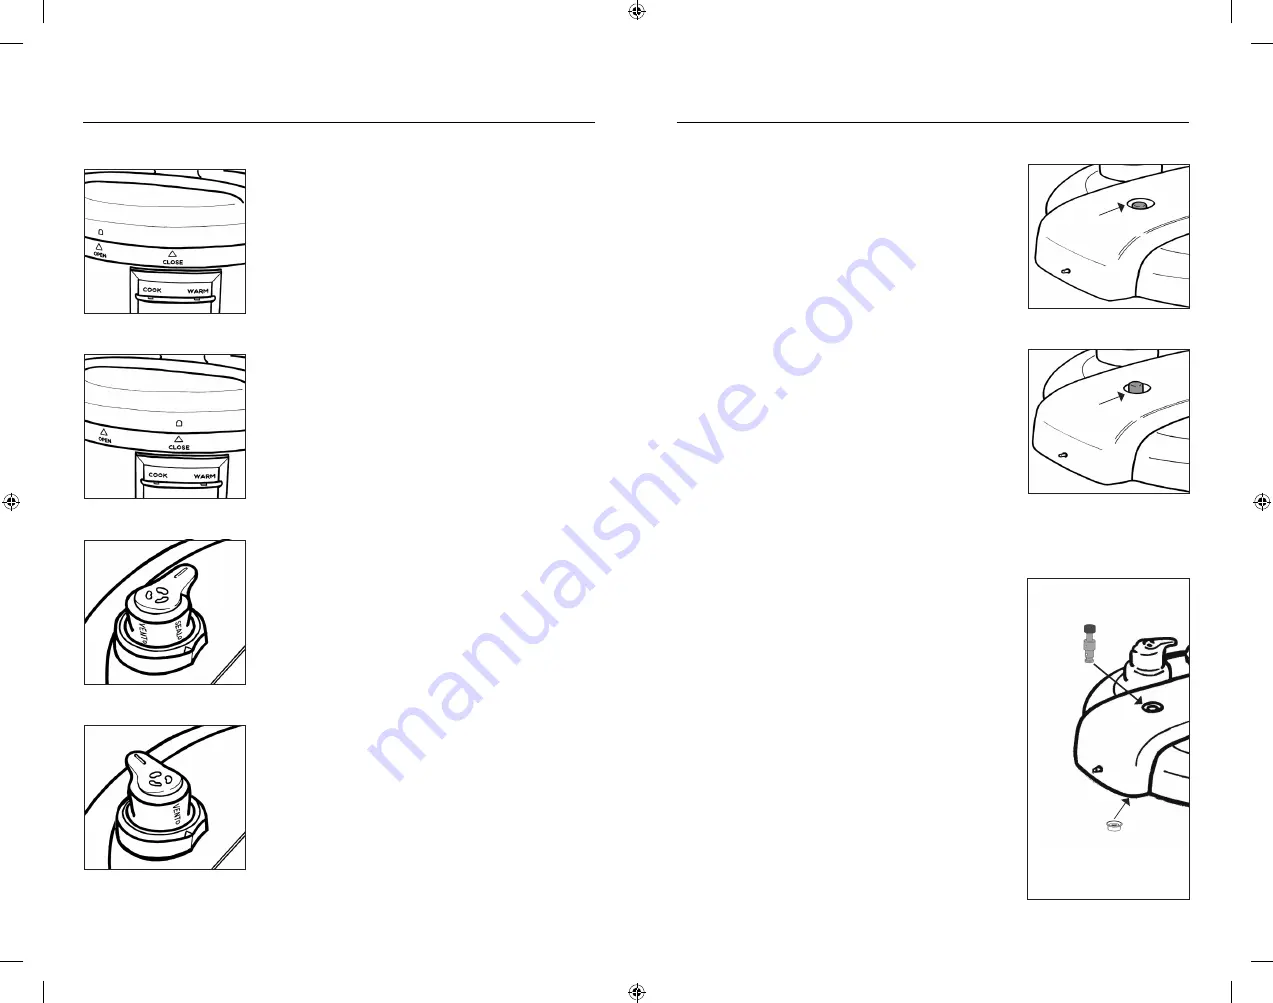
Secure the Lid on pressure cooker by aligning
the Triange-OPEN symbol (see Figure 1)
on the Pressure Cooker Housing with Arch
symbol on the pressure cooker Lid. Turn
the Lid counter-clockwise until the Arch
symbol on the Lid aligns with the Triangle-
CLOSE symbol (see Figure 2) on the Pressure
Cooker Housing. Do not attempt to cook in
your pressure cooker unless the Lid is in the
CLOSE position as shown in figure 2.
Set the Pressure Release Device by holding
the Finger Grip and set Pointer to the SEAL
position (See Figure 3).
Plug power cord into unit first and then into a
120-volt 60 Hz AC only outlet.
Turn the Timer Dial to the time specified for
the recipe, the Red COOK Indicator Light
will illuminate. The countdown timer will not
start until the unit has reached the operating
pressure.
When the operating pressure has been
reached the Red Pressure Indicator will rise
(see Figure 6) and the countdown timer will
begin.
After pressure cooking is complete the Red
COOK Indicator Light will turn off and the
Green WARM Indicator Light will illuminate
indicating that the cooker is in KEEP WARM
mode. The Green WARM Indicator Light and
Red COOK Indicator Light will cycle on and
off alternatively during the KEEP WARM
mode.
Figure 1
Figure 5
Figure 6
Figure 2
Figure 3
Figure 4
1
2
3
4
5
6
7
8
Using Your Pressure Cooker
(cont.)
The pressure can be released manually or
on its own. If a recipe states "let pressure
release naturally" unplug the cooker and
let sit until the Red Pressure Indicator has
dropped (see Figure 5) AND the lid turns
without any resistance.
WARNING:
Do not release steam manually
with recipes containing lots of liquid, such
as soups and stews. Turn the Timer Dial
counter-clockwise to the WARM position
and unplug the cooker. NEVER force the
Pressure Cooker Lid open. If there is any
resistance in opening the Lid and the Red
Pressure Indicator is raised (see Figure 6) it
indicates that your Pressure Cooker is still
under pressure and can cause injury if forced
open.
Pressure is completely reduced when the
Pressure Release Device is in the Vent
position (see Figure 4) and you no longer
hear steam escaping from the valve AND
the Red Pressure Indicator has dropped (see
Figure 5) AND the Lid opens freely with no
force. Only then is it safe to remove pressure
cooker Lid and serve food. Remove Lid by
grasping the Pressure Cooker Lid Handle
and twisting Lid clockwise to the OPEN
position.
9
10
Removing and Replacing the
Red Pressure Indicator
Before removing or taking off parts make
sure your pressure cooker is unplugged and
has fully cooled.
Your Red Pressure Indicator removes for
easy cleaning and inspection. To remove
from Lid grasp the Silicone Cap located on
the underside of the Lid and pull straight off.
Slide the Red Pressure Indicator out from the
top of the lid.
To replace slide the Red Pressure Indicator
into the valve receptacle through the top
of the Lid. While holding the Red Pressure
Indicator in with your finger place the Silicone
Cap onto the bottom of the Red Pressure
Indicator on the underside of the Lid ensuring
that it is fully seated (see Figure 7).
Note:
Your pressure cooker will not build
pressure if the Red Pressure Indicator Cap is
not properly placed onto the bottom of the
Red Pressure Indicator.
Figure 7
Pressure
Indicator
Down
Red Pressure Indicator
Silicone Cap
Snap onto bottom of the
Red Pressure Indicator from
underside of Lid
Red Pressure Indicator
Place in Red Pressure
Indicator Receptacle
Pressure
Indicator
Up
9
10


