background image

Using Your Pie & Pastry Baker (Con't)

Using Your Pie & Pastry Baker (Con't)

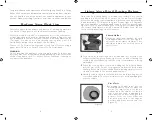
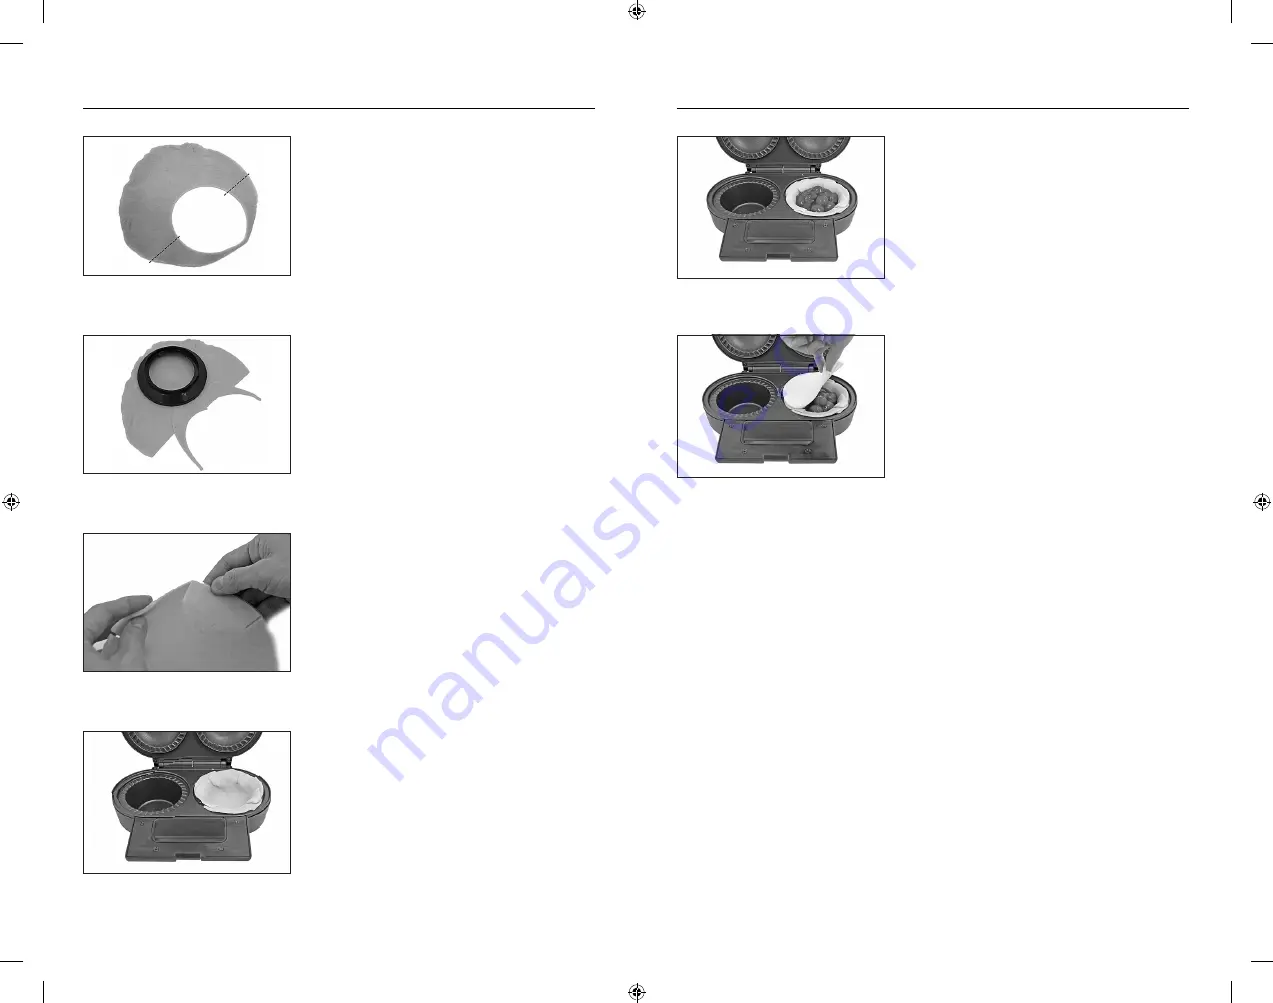
For  the  second  mold  cut  the  pie 

edges from the side and reposition 

in  the  center  (see  Figure  3a  and 

3b).  The  Reversible  Pastry  Cutter 

creates  slits  in  the  dough  for  the 

bottoms that allow you to overlap 

the  dough  for  a  better  fit  (see 

Figure 4).

Unless the recipe states otherwise 

we  recommend  using  puff  pastry 

dough  for  the  tops  and  standard 

pie crust dough for the bottom

(pie  tarts  do  not  have  tops, 

when  finished  filling  the  bottom 

mold  close  the  cover  and  start 

the  cooking  process).  If  using 

store-bought  dough  you  can  find 

puff  pastry  dough  in  the  freezer 

section  of  most  supermarkets. 

Pie  crust  dough  is  usually  found 

in  the  refrigerated  section  near 

the  cookie  dough,  biscuits,  and 

cinnamon roll dough.

Open  the  Pie  &  Pastry  Baker  and 

place  the  large  bottom  dough 

over the Pie Mold (see Figure 5).

Add  about  3/4  cup  of  your  fillings 

(unless  recipe  states  otherwise)  to 

the  prepared  bottom  dough  (see 

Figure 6). The weight of the fillings 

will cause the dough to drop down 

into the Pie Mold. You can also use 

the  bottom  of  a  ladle  or  rounded 

spoon  to  gently  press  the  dough 

into the Pie Mold, being careful not 

to tear the dough. Press the dough 

down gently over the edges.

WARNING:


Surfaces  are  hot.  Never  touch  the 

cooking  surface  directly  with  your 

fingers. 

If  your  recipe  calls  for  a  top,  place 

the  molded  dough  top  over  the 

filled Pie Mold and close the Lid (see 

Figure 7). Press the Locking Latch in 

until you hear a click indicating that 

it is locked. 

Set  a  timer  for  the  specified  time 

as indicated in your recipe. You will 

notice  that  the  green  Ready  Light 

cycles on and off during the cooking 

process  indicating  that  the  correct 

temperature is being maintained.

When the cooking time is complete 

unplug the Pie & Pastry Baker from 

the wall outlet. Pull the Locking Latch 

up  from  the  bottom  and  carefully 

lift  the  Lid.  If  you  need  additional 

browning, simply close the Lid and 

set a timer to the desired time.

Carefully  remove  the  pie  from  the 

Pie  Mold  by  using  a  thin  nylon  or 

wooden  spatula.  You  can  also  use 

a  bamboo  skewer  to  slide  down 

the  side  of  the  pie.  Lift  one  end  of 

the  pie  up  and  slide  the  spatula 

underneath to remove the pie from 

the Pie Mold. Be careful as the pie, 

contents,  and  appliance  are  hot. 

Do  not  use  metal  utensils  to  avoid 

damaging the nonstick surface.

2

3

4

5

6

7

Figure 6

Figure 7

Figure 3a

Figure 3b

Figure 4

Figure 5

10

11

Summary of Contents for SWPPM0020

Page 1: ...is required Model SWPPM0020 For questions or concerns please contact customer service at Wolfgang Puck is a trademark of Wolfgang Puck Worldwide Actual product may differ slightly from images in this...

Page 2: ...or electrical or mechanical adjustment WARNING TO REDUCE THE RISK OF FIRE OR ELECTRIC SHOCK ONLY AUTHORIZED PERSONNEL SHOULD DO REPAIRS The use of accessory attachments not recommended by Synergy Hou...

Page 3: ...y California living and an insistence on only the freshest ingredients From his legendary finediningicons hisentrepreneurial spirit has built an empire from dining to catering to products for the home...

Page 4: ...ocking Latch Handle Lid Pie Molds Cord Storage Nonskid Feet Reversible Pastry Cutter A B C D E F G H I Your Pastry Cutter is double sided to cut both the top and bottom of your pie crusts Use the smal...

Page 5: ...and let the Pie Pastry Baker run for 15 minutes You may notice some smoking coming from your Pie Pastry Baker during this initial phase this is normal Season the Pie Molds with vegetable oil and rub...

Page 6: ...d spoon to gently press the dough into the Pie Mold being careful not to tear the dough Press the dough down gently over the edges WARNING Surfaces are hot Never touch the cooking surface directly wit...

Page 7: ...completely cool In order to prevent food residue buildup clean your Pie Pastry Baker after each use Wipe the inside and the Pie Molds of your Pie Pastry Baker with a clean soapy sponge or cloth Remove...

Page 8: ...o Pie Molds 7 Divide chicken mixture between the Pie Molds 8 Top with smaller puff pastry rounds 9 Close Lid and cook for 7 9 minutes or until well browned 10 Carefully remove and let cool for a few m...

Page 9: ...salt 3 ripe peaches about 5 ounces each diced 1 tablespoon cornstarch 2 circles prepared pie dough cut with larger cutter 2 circles prepared puff pastry thawed cut with smaller cutter METHOD 1 In a me...

Page 10: ...h pie with a puff pastry circle 9 Close Lid and cook for 7 8 minutes or until crust is well browned 10 Remove and let cool for a few minutes before serving Makes 2 Servings INGREDIENTS 2 large eggs be...

Page 11: ...15 minutes or until crust is brown and mixture is set 6 Remove and let cool for a few minutes before serving Makes 2 4 servings INGREDIENTS 1 tablespoon milk 1 can 15 ounces pumpkin 1 2 cup vegetable...

Page 12: ...edges are brown 11 Remove and let cool for a few minutes before serving Makes 4 large cupcakes INGREDIENTS 1 4 cup unsalted butter softened 1 4 cup shortening 1 1 2 teaspoons baking powder 2 3 cups gr...

Page 13: ...Notes Notes 24 25...

Page 14: ...rmal household use we will repair or replace at our discretion any mechanical or electrical part which proves defective or replace unit with a comparable model To obtain service under the terms of thi...

Reviews: