background image

MAINTENANCE

The firmware (software) of your Visualizer (including the o

) can easily be upgraded to the 

latest version. The firmware update can be done via RS-232, USB, Ethernet (LAN) or USB stick.
Firmware update files can be downloaded free of charge at 

www.wolfvision.com/support

Updates via RS-232, USB or Ethernet/LAN can be made with the WolfVision vLink Software.
Updates via USB stick need the firmware file to be placed in the folder 

root:\WOLFVISION\

 (default folder 

can be changed in the on-screen menu  

Advanced Settings / USB Settings

).

Alternatively, the firmware update can be started in the on-screen menu (A

dvanced Settings / Device Info

), 

provided the Visualizer is connected to the Internet and a nameserver IP address is assigned (

Advanced 

Settings / Ethernet Settings

). By selecting the line ”Check For FW Update”, the Visualizer checks the 

WolfVision server for newer firmware files. Follow the on-screen instructions to start the update process.

For a RS232 connection, use a crossed serial RS232 cable (Null modem cable).

n-screen HELP

Firmware Upgrades

WARNING: 

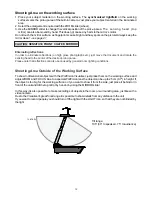
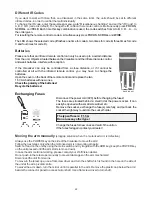
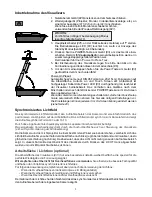
To clean the mirror inside the unit, the unit has to be opened!

Opening the unit is reserved for WolfVision or authorized service personnel only!

The unit might be in need of adjustment after opening.

Cleaning

Cabinet

:

Clean the cabinet by gently wiping it with a soft, lint free cloth. 

Glass:

Clean the glass by gently wiping it with a soft, lint free cloth (do not use a paper tissue!). Clean by 

breathing on the glass to create moisture then wipe with a lint free cloth (If not clean, use special 
optical cleaner only).

Mirror:

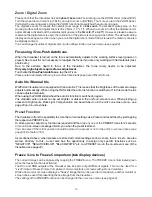
Clean the mirror by gently wiping it vertically with the supplied WolfVision cleaning cloth. Clean 

by breathing on the mirror to create moisture then wipe with the WolfVision cloth (If not clean, 
use a special optical cleaner only).

Never use strong cleaning agents such as acetone or benzene!
These  substances  can  damage  the  surface  and  anti-reflex  coating  of  the  glass! 

Alcohol  and 

ordinary glass cleaner can cause a slightly blue mirror surface!

Please note that dust on the mirror inside the unit and the glass has little effect on the picture quality (as it is 
out of the focal range).

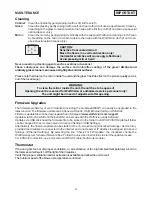
CAUTION: 
Sensitive front coated mirror! 
Move the tissue in a vertical direction only! 
(horizontal scratches will cause ugly reflections).
Avoid pressing mirror hard!

21

IMPORTANT

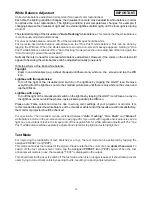
If the unit gets too hot (improper ventilation, or air extraction or too high ambient temperature) a built in 
thermal sensor will switch off the light of the Visualizer.
Verify that proper ventilation and air extraction is available and allow the unit to cool!
The rotation speed of the blower is temperature controlled.

Thermostat

Summary of Contents for VZ-P18

Page 1: ...Check out our Internet Homepage for additional information www wolfvision com support VZ P18 VZ P38 INSTRUCTIONS BEDIENUNGSANLEITUNG INSTRUCTIONS BEDIENUNGSANLEITUNG ENGLISH DEUTSCH VZ P18 VZ P38 R ...

Page 2: ...ooting Area Outside of the Working Surface 12 Functions Zoom Digital Zoom 13 Focusing One Push Autofocus 13 Auto Iris Manual Iris 13 Preset Function 13 Freeze 13 White Balance Adjustment 14 Text Mode 14 Image Memory 15 Snapshot 15 View Mode 15 Built in Digital Scaler 16 Picture in Picture PiP 16 Integrated Seamless Switch 16 Image Turn Mode 16 Ports USB Port to Computer 17 Ethernet LAN Port 17 DVI...

Page 3: ...pose the Visualizer to water metallic objects or any flammable material Avoid installing the Visualizer in locations exposed to strong magnetic fields or electrical currents Avoid installing the Visualizer in environments where there is radiation This could cause monitor image distortion or damage to the CCD camera Do not pull the plug from the power socket with wet hands If the Visualizer is not ...

Page 4: ...cording to Directive EMC and to Directive electrical equipment Inspections tests and evaluation are according to UL60950 CSA22 22 60950 Inspections tests and evaluation are according to the CB Scheme Inspections tests and evaluation are according to the PCT Scheme Marks on the unit Approval Worldwide Patents Copyright Information Copyright by WolfVision All rights reserved WolfVision Wofu Vision a...

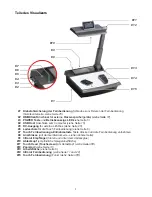
Page 5: ...ote Release button press and lift the Touch Remote Control 8 Connectors on the back as shown on next page 9 Infrared receiver one ir receiver on the back and on behind the glass 10 Sensing Head Mirror sensitive front coated mirror 11 Touch Head Panel on the sensing head see pages 6ff 12 Zoom wheel see page 13 13 Working surface see page 5 14 Infrared Remote Control see pages 11 and 22 15 Touch Rem...

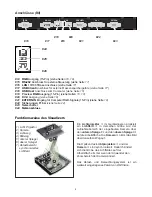
Page 6: ...S 232 RGB Connectors 8 FUSE T3 15A 25 24 26 How the Visualizer Works 1 light projector 2 camera 3 light path 4 image path 5 base mirror 6 top mirror 7 pickup area synchronized lightfield A light projector inside the unit projects a light field the same size as the pick up area of the built in camera via the base mirror and the top mirror onto the working surface The image is recorded by the camera...

Page 7: ...6 21 and or 22 IMPORTANT For choosing the right output please read the detailed description on page 18 The synchronized light field makes positioning of objects very easy by marking the pick up area of the built in camera on the working surface The light field zooms synchronous to the camera zoom and shows the 4 3 or 16 10 pick up size of the camera Additionally the built in LCD monitor eliminates...

Page 8: ...Synchronize Remote keep the Home icon pressed for four seconds to activate theToolbox screen TheTouch Remote Control is equipped with a lithium polymer rechargeable battery Before you use the remote control the first time please insert the battery and charge it for three hours To recharge the battery place the remote control in the Visualizer s charging dock The Visualizer has to be powered on at ...

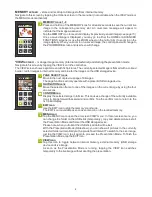
Page 9: ... AUTO FOCUS AF icon Perform the one pushAuto Focus function see page 13 VIEW icon Enter the VIEW mode and the control panel switches to the VIEW screen see page 15 ZOOM slider Tap the magnifying glass and drag it toward to zoom in and toward to zoom out The closer the icon is to the middle the slower the zoom motor operates Using the ZOOM sliders also switches the auto iris on again ADVANCED FUNCT...

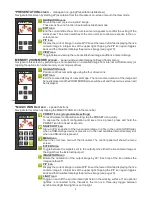
Page 10: ...ext or previous page of 9 images The page functions will only operate with a present USB storage device NAVIGATION icons Move the selection frame to one of the images on the current page by using the four arrow icons CONFIRM icon Display the selected image in full size This causes a change of the currently available icons to image forward backward and confirm Tap the confirm icon to return to the ...

Page 11: ...oggles back and the Visualizer displays the previous image see page 16 LIGHT icon Toggle on and off the synchronized light field on the working surface If an optional lightbox is connected to the Visualizer the icon is a three way toggle between synchronized light field light box and no light MEMORYZOOM MODE screen pan around a zoomed image retrieved from memory Navigate to this screen by performi...

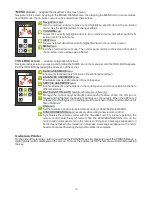
Page 12: ...and functions in the control panel SERVICE USER MODE icon Enable all screens and functions in the control panel and move certain functions to different screens BACK LIGHT ON AUTO icon touch remote control only Manage the control panel backlight power saving feature When the ON icon is tapped and highlighted the backlight will stay on continuously When the AUTO icon is tapped and highlighted the ba...

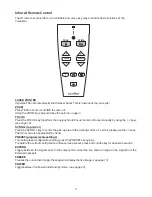
Page 13: ...SCROLL key to centre the pick up area to the working surface To scroll please use the keys The mirror can also be adjusted by hand PRESET programmable settings To recall a preset configuration setting press the PRESETkey quickly To capture the current configuration and save it as a preset press and hold the key for at least 2 seconds EXTERN Toggle between the signals sent to the output ports eithe...

Page 14: ...urface 1 Place your subject material on the working surface The synchronized lightfield on the working surface marks the pick up area of the built in camera Just place your subject material in the illuminated area 2 Select the enlargement required with the ZOOM slider wheel 3 Use the MIRROR slider to change the vertical position of the pick up area The sensing head top mirror can also be moved by ...

Page 15: ...to a PRESET icon in the on screen menu of the Visualizer see page 20 p an tap any one of the or more s p You can select if the mirror position should be stored in a preset or not in the unit s on screen menu see page 20 Default is YES Preset Function Freeze Live to Freeze Comparison two display devices The current image can be captured by tapping the FREEZE icon The FREEZE icon is illuminated gree...

Page 16: ... the colors on the screen still appear to be wrong the white balance can be adjusted manually one push Hints to perform a One Push white balance Top light Zoom in on a white object e g a sheet of paper until there is only white on the screen and tap the WB icon Lightbox with transparencies Turn off the light of the Visualizer and switch on the lightbox by tapping the LIGHT icon Remove everything f...

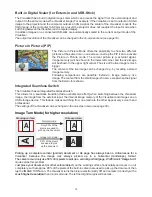
Page 17: ...he on screen menu Advanced Settings USB Stick Settings like default picture folder document directory and the file names WV and consecutively numbered 15 Snapshot Tapping the VIEW icon toggles between VIEW mode of internal memory VIEW mode of USB memory and LIVE image A split image with 3x3 stored pictures will be displayed Additionally a status line with picture information is displayed on top of...

Page 18: ...itical issue for a Visualizer because the image s always picked up in a horizontal landscape format The camera could only use 50 of its pixels to pick up a vertical portrait page WolfVision s Just place your document or other vertical object º wa Image turn mode solves this problem on the working surface horizontally and zoom in on it completely so that approx 90 of the pixels of the built in came...

Page 19: ...on over the Internet if it is assigned an official WAN IPaddress Administrators of a larger number of Visualizers can use the LAN port to control support and update all of their units from their local desktop PC The list of applications for the Visualizers LAN port is constantly increasing It can be used for controlling capturing still images viewing live video streams firmware updates adjustments...

Page 20: ...han their native resolution but only in compressed mode and with inferior picture quality Do NOT set the output of the Visualizer to a higher standard than the native resolution of your display unit Do not set a higher refresh rate than your monitor or projector can display otherwise the monitor or projector can be damaged Follow the instructions in the user manual of the connected units Please no...

Page 21: ...k 170MHz Gamma 2 2 Preferred resolution SXGA 1280x960 60Hz The Preview output of the Visualizers always outputs the image of the Visualizer camera while all other outputs DVI RGB etc can be set to output an external image This can be used for a Live Picture to External Picture Comparison on two monitors or screens with just one Visualizer While one monitor or screen displays an external image that...

Page 22: ...lor saturation is not correct changing he Color Mode can help For better readability of handwritten texts the image can be changed to BLUE To change the Detail Settings sharpness and to change the Output Resolution manually Hint Use the Resolution Test function to change to the selected resolution temporarily for ten seconds This way the compatibility of the connected display device can be easily ...

Page 23: ...adjustment after opening Cleaning Cabinet Clean the cabinet by gently wiping it with a soft lint free cloth Glass Clean the glass by gently wiping it with a soft lint free cloth do not use a paper tissue Clean by breathing on the glass to create moisture then wipe with a lint free cloth If not clean use special optical cleaner only Mirror Clean the mirror by gently wiping it vertically with the su...

Page 24: ...e batteries Recycle the batteries Batteries back open X X 22 Disconnect the power cord 26 before changing the fuses The fuses are situated behind a small lid at the power socket It can easily be opened with a small screwdriver etc Remove the socket exchange the fuse s carefully and put back the socket the right way round into the socket holder The type of fuse is F 1 5A Do not use any other type C...

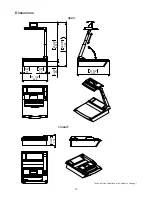
Page 25: ...Dimensions 747 29 3 8 439 17 1 4 651 5 25 5 8 95 3 3 4 15 5 8 15 5 8 551 21 3 4 172 6 3 4 open closed Technical Specifications are Subject to Change 23 ...

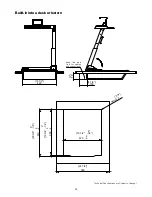
Page 26: ...hnical Specifications are Subject to Change 24 420 16 1 2 75 3 100 3 7 8 420 2 0 16 1 2 1 8 0 502 2 0 19 3 4 1 8 0 Rmax 3 1 8 519 2 0 20 3 8 1 8 0 580 22 7 8 Build in into a desk or lectern keep this area free for cables and connections ...

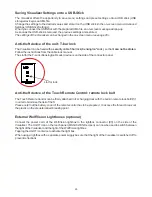
Page 27: ...e of the Visualizer The LIGHT icon on the touch panel MAGIC WAND screen can now be used to switch between the light of the Visualizer and the light of the WolfVision lightbox Tapping the LIGHTicon twice to activate the light box When using a lightbox with a separate power supply be sure that the light of the Visualizer is switched off to prevent reflections External WolfVision Lightboxes optional ...

Page 28: ...hable yes 90 180 and 270 degrees automatic and manual flickerless for Shutter only automatic and manual yes one push autofocus focusing is rarely necessary due to high depth of focus yes in size of pick up area of camera with 4 3 16 10 switching yes one on sensing head and one on remote control size 96x49mm 3 8 x 1 9 yes outputs can show different signal live freeze extern yes yes yes via USB und ...

Page 29: ...eze Weißabgleich Text Modus Bildspeicher Bild in Bild Picture in Picture PiP Eingebauter Bildmischer Anschlüsse USB Anschluss zum Computer Ethernet LAN Anschluss DVI RGB Ausgang Externer Eingang RS 232 Serieller Steuereingang Wartung Abmessungen Speichern der Visualizer Einstellungen auf einem USB Stick Diebstahlschutz Externe Lichtboxen Technische Daten 1 2 2 Copyright Information 2 3 4 4 5 5 5 6...

Page 30: ...entflammbaren oder metallischen Gegenstände oder Flüssigkeiten in das Geräteinnere dringen lassen Das Gerät nicht im Bereich von starken Magnetfeldern und elektrischen Feldern in Betrieb nehmen Das Gerät nicht im Wirkungsbereich von Röntgenstrahlung betreiben Dadurch können Teile der Kamera beschädigt werden Das Netzkabel und den Netzstecker niemals mit feuchten Händen berühren Wird das Gerät läng...

Page 31: ...equipment Inspections tests and evaluation are according to UL60950 CSA22 22 60950 Inspections tests and evaluation are according to the CB Scheme Inspections tests and evaluation are according to the PCT Scheme Aufkleber am Gerät Weltweite Patente Copyright Information US C LISTED 9902476 Tested to complywith FCC standards for home or office use Prüfungen Copyright WolfVision Alle Rechte vorbehal...

Page 32: ...6 7 Touch Fernbedienungs Entnahmetaste Taste drücken und die Fernbedienung entnehmen 8 Anschlüsse auf der Geräterückseite siehe nächste Seite 9 Infrarot Empfänger hinten und unter dem Abdeckglas 10 Abtastkopf empfindliche Spiegeloberfläche 11 Touch Head Touchscreen am Abtastkopf siehe Seiten 6ff 12 Zoomrad siehe Seite 13 13 Arbeitsfläche siehe Seite 5 14 Infrarot Fernbedienung siehe Seite 11 und 2...

Page 33: ... 232 RGB Anschlüsse 8 FUSE T3 15A 25 24 26 Funktionsweise des Visualizers 1 Licht Projektor 2 Kamera 3 Lichtweg 4 Bildweg 5 unterer Spiegel 6 oberer Spiegel 7 Abtastbereich synchronisiertes Lichtfeld Ein Lichtprojektor im Geräteinneren projiziert ein Lichtfeld in derselben Größe wie der Aufnahmebereich der eingebauten Kamera über den unteren Spiegel und den oberen Spiegel auf die Arbeitsfläche Die...

Page 34: ...CHTIG 18 Power OnPreset aus Das synchronisierte Lichtfeld markiert den Aufnahmebereich der Kamera und vereinfacht dadurch das positionieren von Objekten auf der Arbeitsfläche Das Lichtfeld zoomt synchron zum Kamerafeld und zeigt dieAufnahmegröße im Format 4 3 oder 16 10 Durch das eingebaute Vorschaudisplay wird kein separater Vorschaumonitor benötigt Das eingebaute Vorschaudisplay dient durch die ...

Page 35: ...ithium PolymerAkku ausgestattet Vor der ersten Benutzung der Fernbedienung bitte denAkku einlegen und für 3 Stunden laden Das Batteriesymbol auf der Fernbedienung zeigt den Ladezustand des Akkus an grün voll rot leer Sobald der Akku beinahe leer ist erscheint eine entsprechende Meldung auf dem Touch Screen der Fernbedienung Um den Akku zu laden legen Sie die Fernbedienung in die Ladeschale des Vis...

Page 36: ...ne PushAuto Fokus aus aufTastendruck siehe Seite 13 VIEW Icon Zum Starten des VIEW Modi Die Fernbedienung wechselt in den VIEW Screen siehe Seite 15 ZOOM Slider Tippen Sie auf die Lupe und schieben diese in Richtung um einzuzoomen bzw auszuzoomen Je näher die Lupe in der Mitte ist umso langsamer bewegen sich die Motoren Benutzung des Zoom Sliders aktiviert dieAuto Iris Funktion ERWEITERTE FUNKTION...

Page 37: ... NAVIGATION Icons Verschieben Sie den farbigen Rahmen mit den Pfeil Icons BESTÄTIGUNGS Icon Zur Darstellung des aktuell ausgewählten Bildes in voller Größe farbiger Rahmen In diesem Modus sind die Icons nächstes voriges Bild und Bestätigung verfügbar BeiTippen auf das Bestätigungs Icon wechselt der Visualizer zurück zur 3x3Ansicht EXIT Icon Benutzen Sie das EXITIcon um den Memory Zoom Modus zu sto...

Page 38: ...dargestellt Erneutes Tippen auf das PiP Icon wechselt zurück zur vorigen Darstellung siehe Seite 16 LICHT Icon Schaltet das synchronisierte Lichtfeld ein und aus Sobald eine externe Lichtbox am Visualizer angeschlossen wurde wechselt der Visualizer zwischen Oberlicht Lichtbox und Licht aus MEMORYZOOM MODUS Screen verschieben des eingezoomten Bild aus dem Bildspeicher Navigation zu diesem Screen er...

Page 39: ... Icon Alle Funktionen und Screens sind auf dem Bedienpanel verfügbar SERVICE BENUTZER MODUS Icon Alle Funktionen und Screens sind auf dem Bedienpanel verfügbar nur die Anordnung der Icons unterscheidet diesen Modus zum Erweiterten Benutzer Modus HINTERGRUNDBELEUCHTUNG EIN AUTO Icon nur auf der Fernbedienung Steuert die Stromsparfunktion der Fernbedienung Wenn ON grün leuchtet dann ist die Hintergr...

Page 40: ...urch Drücken der SCROLL Taste wird der Aufnahmebereich auf die Arbeitsfläche zentriert Um zu Scrollen drücken Sie auf Der Spiegel kann auch per Hand gedreht werden PRESET programmierbare Einstellungen Zum Aufrufen der programmierten Einstellungen drücken Sie Taste nur kurz Um die gegenwärtigen Einstellungen zu speichern drücken und halten Sie dieTaste für mindestens 2 Sekunden EXTERN Wechsel zwisc...

Page 41: ... zu präsentierende Vorlage auf die Arbeitsfläche legen Ein synchronisiertes Lichtfeld auf der Arbeitsfläche zeigt den Aufnahmebereich der eingebauten Kamera Legen Sie einfach das Objekt in den beleuchteten Bereich 2 Wählen Sie die gewünschte Vergrößerung mit dem ZOOM Slider Rad 3 Mit dem Spiegel Slider kann die vertikale Position desAufnahmebereiches geändert werden Der obere Spiegel kann auch hän...

Page 42: ...n siehe Seite 20 Um eine Preset Einstellung zu programmieren stellen Sie zuerst alle gewünschten Einstellungen ein und berühren dann eine der Preset Icons für mehr als 2 Sekunden Am Bildschirm erscheint eine Meldung sobald die Einstellungen übernommen wurden Die Speicherung der Spiegelposition Abtastkopf kann im On Screen Menü de aktiviert werden siehe Seite 20 Standardeinstellung JA YES Preset Fu...

Page 43: ... Push Weißabgleich durchführt werden Tipps beimAusführen eines One Push Weißabgleiches Oberlicht Zoomen Sie auf einen weißen Gegenstand z B weißes Blatt Papier bis das gesamte Bild weiß ist und tippen dann auf das Lightbox mit Overheadfolien Schalten Sie das Visualizer Licht aus und die Lichtbox ein durch Tippen auf das LICHT Icon Entfernen Sie alles von der Arbeitsfläche und zoomen Sie auf die kl...

Page 44: ...hnis picture folder und Dateinamen WV und fortlaufendeNummerierung E Die Bilderwerdenmit Zeit und Datumsangabeabgespeichert 15 Snapshot Schnappschuß Tippen auf das VIEW Icon wechselt zwischen VIEW Modus des internen Speichers des USB Speichers und dem LIVE Bild Die Schnellansicht Splitscreen mit 3x3 gespeicherten Bildern wird dargestellt Zusätzlich wird eine Statuszeilemit Bildinformationenam ober...

Page 45: ...immer schon eine kritische Anforderung für einen Visualizer da die Bildwiedergabe stets im Breitformat erfolgt So konnten nur etwa 50 der Pixel der Kamera für die Abtastung der hochformatigen A4 Seite verwendet werden WolfVisions Image Turn Bilddreh Modus löst dieses Problem Platzieren Sie Ihre hochformatige Vorlage z B Brief einfach in horizontaler Richtung auf der Arbeitsfläche und zoomen Sie di...

Page 46: ... es auch zur Kommunikation über das Internet verwendet werden Administratoren einer größeren Anzahl von Visualizern schätzen besonders die Möglichkeit über den LAN Anschluss alle Visualizer in ihrem Netzwerk von einem Desktop PC in ihrem Büro aus zu steuern zu warten und upzudaten Die Liste der Anwendungsmöglichkeiten des LAN Anschlusses wächst ständig Steuerung Übertragung Speicherung von Standbi...

Page 47: ...re Bildwiederholfrequenz als Ihr Monitor oder Projektor darstellen kann gewählt wird kann Ihr Monitor oder Projektor beschädigt werden Beachten Sie hierzu die Hinweise in der Bedienungsanleitung des angeschlossenen Gerätes Bitte beachten Sie Wenn 4 3 und 16 9 bzw 16 10 Auflösungen gleichzeitig eingestellt sind zeigt der 4 3 Ausgang oben und unten schwarze Balken damit alleAusgänge denselben Bildin...

Page 48: ...talfrequenz Limit 30kHz 121kHz Maximaler Pixel Clock 170MHz Gamma 2 2 BevorzugteAuflösung SXGA 1280x960 60Hz SXGA 1280x960 60Hz F Plug Play Der Ausgangspegel am VGA und Preview Ausgang kann auf 700mV eingestellt werden Dies ist hilfreich um mögliche Helligkeitsunterschiede auszugleichen z B bei Verwendung des Externen Einganges Für eine exakte Einstellung wird die Verwendung von Messgeräten empfoh...

Page 49: ...Falls Ihnen das Bild auf Ihrem Bildschirm zu hell oder zu dunkel erscheint beziehungsweise die Farbsättigungnichtstimmt kann der Farbmodusgeändertwerden Für bessereLesbarkeitvon handgeschriebenenTextenkann der BLAU Modusverwendetwerden ÄndertEinstellungenmitAuswirkungauf dieAusgangssignalewie SchärfeundAuflösung Tipp Die Auflösungstestfunktion hilft zur Erkennung der vom Wiedergabegerät unterstütz...

Page 50: ...iesem Fall Zu und Abluft freilegen und das Gerät abkühlen lassen Die Geschwindigkeit des Lüfters ist temperaturgesteuert Thermostat ACHTUNG Um die Spiegel im Gerät zu reinigen muss das Gerät geöffnet werden Dies darf nur durch WolfVision oder einen autorisierten Servicetechniker erfolgen da das Gerät nach der Reinigung möglicherweise neu abgeglichen werden muss Reinigung Gehäuse Glas Spiegel Verwe...
Page 51: ...te Batterien der Wiederverwertung zuführen Batterien hinten offen X X 22 Benutzen Sie immer die POWERTaste am Gerät um denArm zu bewegen Folgen Sie der folgenden Beschreibung nur wenn der motorischeArm nicht ordnungsgemäß funktioniert Gerät mit dem Hauptschalter aus und wieder einschalten und versuchen Sie es erneut mit der ARM Taste POWERTaste am Gerät gedrückt halten Sollte wieder erwarten immer...

Page 52: ...Abmessungen 747 29 3 8 439 17 1 4 651 5 25 5 8 95 3 3 4 15 5 8 15 5 8 551 21 3 4 172 6 3 4 Arbeitsposition gefaltet Technische Änderungen vorbehalten 23 ...

Page 53: ... 420 2 0 16 1 2 1 8 0 502 2 0 19 3 4 1 8 0 Rmax 3 1 8 519 2 0 20 3 8 1 8 0 580 22 7 8 Einbau des Visualizers in einen Tisch oder ein Pult Technische Änderungen vorbehalten 24 Halten Sie diesen Bereich für Kabel anschlüsse frei ...

Page 54: ...en dem Licht für die Arbeitsfläche und dem Licht der WolfVision Lichtbox umgeschaltet werden Berühren Sie das Icon zweimal zurAktivierung der Lichtbox Falls eine Lichtbox mit separatem Netzteil verwendet wird muss das Licht des Visualizers abgeschaltet werden um Reflexionen zu vermeiden Externe WolfVision Lichtbox optional 25 Speichern der Visualizer Einstellungen auf einem USB Stick Der Visualize...

Page 55: ...ten 30 Bilder Vollbilder SXGA 1280 x 960 WXGA 1280 x 800 HD 720p 1280 x 720 schaltbar ja 90 180 und 270 automatisch und manuell Flickerless nur beim Shutter automatisch und manuell ja One Push Autofokus fokussieren ist aufgrund hoher Tiefenschärfe selten nötig ja in der Größe der Abtastfläche der Kamera mit 4 3 16 10 Umschaltung ja einmal am Abtastkopf und einmal auf der Fernbedienung Größe 96x49m...

Page 56: ...l 81 0 3 3360 3231 Fax 81 0 3 3360 3236 E mail wolfvision japan wolfvision com Canada WolfVision Canada Inc Ottawa Tel 1 613 741 9898 Toll free 877 513 2002 Fax 1 613 741 3747 E Mail wolfvision canada wolfvision com United Kingdom WolfVision UK Ltd Maidenhead Tel 44 1628 509067 Fax 44 1628 509100 E Mail wolfvision uk wolfvision com Toll free Tel 1 650 648 0002 Toll free 800 356 WOLF Fax 1 650 648 ...

Reviews: