background image


85 

S

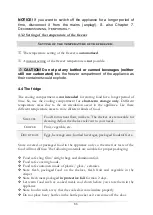
EVEN DIFFERENT REFRIGERATION TEMPERATURES OR COOLING LEVELS CAN 

BE SET

Cooling level 

Cooling: Off 

Cooling level 

1 - 2 

Lower / slight cooling 

Cooling level 

3 - 4 

Medium / average cooling 

Cooling level 

5 - 7 

High / strong cooling 


If you turn the temperature controller to 

0

, the cooling will be switched off. 


If you turn the temperature controller to 

1 - 2

, the temperature of the fridge 

will be increased (lower / slight cooling). 


If you turn the temperature controller to 

3 - 4

, the temperature of the fridge is 

set to a medium temperature value (medium / average cooling). The cooling 

levels 3 and 4 are suitable for daily use. 


If you turn the temperature controller to 

5 - 7

, the temperature of the fridge 

will be decreased (high / strong cooling). The higher the setting is, the longer 
the compressor operates to reach the set cooling temperature. 


The description of the cooling levels represents standard values only. 


You can check the temperature inside the cooling compartment using a suitable 

thermometer (not included in the scope of delivery). 


When  the  ambient  temperature  is  very  high,  it  is  recommended  to  set  the 
temperature controller to a colder setting if needed (cooling level 5 / 6 or 7). If 

the colder setting should cause strong formation of encrusted ice, please select a 

lower setting (cooling levels 1 - 4). 


High ambient temperatures and simultaneously operating at the coldest setting 

may  make  the  compressor  operate  permanently  to  keep  the  temperature 

constant inside the appliance. 


 WARNING!

  The  setting 

0

  switches  off  the  compressor  only.  You 

must unplug the appliance to disconnect it from the mains.


Summary of Contents for KGK 280 A+++

Page 1: ...HNOLOGIE F R DEN HAUSHALT TECHNOLOGY FOR DOMESTIC USE 16 05 2018 Bedienungsanleitung Instruction Manual K HL GEFRIERKOMBINATION FRIDGE FREEZER KGK 280 A Deutsch Seite 2 English Page 55 www pkm online...

Page 2: ...klassen 10 3 Installation 11 3 1 Entpacken und Wahl des Standortes 11 3 2 Raumbedarf und Bel ftung 12 3 2 1 Raumbedarf 12 3 2 2 Bel ftung 12 3 3 Ger t ausrichten 14 3 4 Wechsel des T ranschlags 15 3 4...

Page 3: ...halten Lieferung ohne Inhalt Der Hersteller beh lt sich das Recht vor solche nderungen vorzunehmen die keinen Einfluss auf die Funktionsweise des Ger tes haben Entsorgen Sie das Verpackungsmaterial en...

Page 4: ...n Das Ger t ist ausschlie lich zur privaten Nutzung bestimmt sowie zur Nutzung 1 in Personalk chen von Gesch ften B ros und hnlichen Arbeitsumgebungen 2 durch G ste von Beherbergungsbetrieben wir Hote...

Page 5: ...lge hat 1 2 Sicherheitsanweisungen GEFAHR Zur Verringerung der Stromschlaggefahr 1 Eine Nichtbeachtung der Anweisungen in dieser Bedienungsanleitung gef hrdet das Leben und die Gesundheit des Ger tebe...

Page 6: ...00a ist brennbar Deshalb ist es unbedingt erforderlich dass keine Systemteile des K hlkreislaufs w hrend des Betriebs oder Transports des Ger tes besch digt werden 2 Sollte ein Systemteil Besch digung...

Page 7: ...l ngerungskabel 11 Sie ben tigen eine dem Netzstecker entsprechende ordnungsgem geerdete und ausschlie lich dem Ger t zugewiesene Sicherheitssteckdose Anderenfalls kann es zu gef hrlichen Unf llen ode...

Page 8: ...ungen zu entfernen Durch dadurch resultierende Besch digungen des Innenraums droht STROMSCHLAGGEFAHR 27 Essen Sie keine Lebensmittel die noch gefroren sind und geben Sie Kindern kein Eis direkt aus de...

Page 9: ...wird kann l aus dem Kompressor in den K hlkreislauf gelangen 6 Lassen Sie das Ger t f r mindestens 6 8 Stunden aufrecht stehen bevor Sie es an die Stromversorgung anschlie en damit das l in den Kompre...

Page 10: ...E 19 Um den ordnungsgem en Betrieb zu gew hrleisten sollte der Gefrierbereich des Ger tes regelm ig abgetaut werden s Kapitel REINIGUNG UND PFLEGE 20 Das Typenschild darf niemals unleserlich gemacht o...

Page 11: ...herungen Klebeband gesch tzt Entfernen Sie diese komplett Benutzen Sie keine aggressiven Reinigungsmittel um Reste der Transportsicherungen zu entfernen 3 Bauen Sie das Ger t an einer geeigneten Stell...

Page 12: ...C H he D 558 mm 550 mm min 1090 mm 1800 mm min 966 mm T R FFNUNGSWINKEL mind 1350 Beachten Sie bitte den zus tzlichen vorderen und seitlichen Platzbedarf s oben C D der ge ffneten T r en entsprechend...

Page 13: ...T ren D 1 Raumbedarf des Ger tes Breite bei ge ffneten T ren 1350 A 1 B 1 C 1 H he D 1 min 578 mm min 590 mm min 1110 mm min 1900 mm min 966 mm T R FFNUNGSWINKEL mind 1350 Beachten Sie bitte den zus t...

Page 14: ...df e Sie k nnen die Standf e mittels eines geeigneten Schraubenschl ssels einstellen Abb hnlich Abb dient ausschlie lich als Beispiel F r den ordnungsgem en Betrieb muss sich das Ger t in einer stabil...

Page 15: ...n zur Seite k nnen ihr Fu boden und die Rollen besch digt werden 3 4 Wechsel des T ranschlags WARNUNG Schalten Sie das Ger t vor dem Wechsel des T ranschlags aus und ziehen Sie den Netzstecker aus der...

Page 16: ...dabei das Ger t immer gegen eine feste und unverr ckbare Fl che damit das Ger t w hrend der Arbeitsschritte nicht wegrutschen kann Legen Sie das Ger t niemals flach hin da Sie dadurch das K hlsystem...

Page 17: ...1 GLASABLAGEN und Kapitel 4 4 2 T RABLAGEN 3 Schlie en Sie die T r Abb hnlich Abb dient ausschlie lich als Beispiel 4 L sen Sie die Schraubenlochabdeckung A auf der linken Oberseite des Ger tes s Abb...

Page 18: ...e nicht herabf llt C SELBSTSCHNEIDENDE SCHRAUBEN D OBERES T RSCHARNIER 8 Entnehmen Sie das obere T rscharnier D s Abb oben 9 L sen Sie die Scharnierachse des oberen T rscharniers s Abb unten 1 E und e...

Page 19: ...EN T RSCHARNIERS 12 Heben Sie die K hlschrankt r an und entnehmen Sie sie vorsichtig s Abb unten HINWEIS Achten Sie auf die Unterlegscheibe n 1 des mittleren T rscharniers Die Unterlegscheibe n kann k...

Page 20: ...ANKT R G SELBSTSCHNEIDENDE SCHRAUBE DES T RBLOCKS 16 L sen Sie die zwei selbstschneidenden Schrauben I des mittleren T rscharniers H s Abb unten 17 Halten Sie w hrenddessen die Gefrierschrankt r mit d...

Page 21: ...21 H MITTLERES T RSCHARNIER I SELBSTSCHNEIDENDE SCHRAUBEN DES MITTLEREN T RSCHARNIERS 20 Legen Sie die Gefrierschrankt r mit der Au enverkleidung nach oben auf eine glatte Oberfl che s Abb unten...

Page 22: ...rblock J wieder mit der selbstschneidenden Schraube K an der gegen berliegenden Seite links der Gefrierschrankt r s Abb unten J T RBLOCK DER GEFRIERSCHRANKT R K SELBSTSCHNEIDENDE SCHRAUBE DES T RBLOCK...

Page 23: ...s Ger t nicht ber einen Winkel von 450 hinaus 25 Schrauben Sie die verstellbaren Standf e M ab s Abb unten 26 L sen Sie die selbstschneidenden Schrauben P des unteren T rscharniers N und entnehmen Sie...

Page 24: ...sie in der nebenliegenden ffnung R an Legen Sie die Unterlegscheibe S auf s Abb unten Die Unterlegscheibe S kann an der T r festh ngen HINWEIS Achten Sie auf die Unterlegscheibe des unteren T rscharn...

Page 25: ...n L chern auf der linken Seite aus und schrauben Sie es mit Hilfe der selbstschneidenden Schrauben P fest s Abb unten 30 Richten Sie den vorderen Standfu halter O ordnungsgem an den vorbereiteten L ch...

Page 26: ...n Sie die T r in Position s Abb unten 33 Drehen Sie das mittlere T rscharnier H um 1800 Richten Sie das mittlere T rscharnier H ordnungsgem an den vorbereiteten L chern auf der linken Seite aus s Abb...

Page 27: ...charnierachse des mittleren T rscharniers vorsichtig in die untere Scharnier ffnung der K hlschrankt r ein Halten Sie die T r in Position s Abb unten 37 Richten Sie das vorbereitete s oben Schritt 7 8...

Page 28: ...BSTSCHNEIDENDE SCHRAUBEN D 1 VORBEREITETES OBERES T RSCHARNIER um 1800 gedreht s a Schritt 7 8 9 oben 40 Befestigen Sie die Schraubenlochabdeckung A auf der rechten Oberseite des Ger tes s Abb unten 4...

Page 29: ...hlschrankt r und verbinden Sie das Ger t wieder mit der Stromversorgung HINWEIS Richten Sie die T ren ordnungsgem aus Die Dichtungen m ssen ordnungsgem anliegen 3 4 1 Wechsel des T rgriffs nur f r Mo...

Page 30: ...ht hat k nnen diese Lebensmittel auftauen und oder verderben 1 Entfernen Sie vor der ersten Benutzung alle Verpackungsmaterialien 2 Stellen Sie die Standf e ein und reinigen Sie das Innere und u ere d...

Page 31: ...Anweisungen 4 2 Ger tebeschreibung Abb dient ausschlie lich als Beispiel Modifikationen sind m glich 1 K HLBEREICH 2 BELEUCHTUNG LED TEMPERATURREGLER 3 GLASABLAGEN 4 GEM SESCHUBLADE MIT BRUCHSICHERER...

Page 32: ...K hlbereich ein Die Temperatur innerhalb der einzelnen Bereiche des K hlbereichs kann von dem eingestellten Wert abweichen abh ngig von der Menge und der Lagerstelle der eingelagerten Lebensmittel Di...

Page 33: ...peraturregler auf 5 7 wird die Temperatur im K hlbereich verringert hohe starke K hlung Je h her die gew hlte Einstellung ist desto l nger arbeitet der Kompressor um die eingestellte k ltere Temperatu...

Page 34: ...der SCHNELLGEFRIEREN MODUS aktiviert ist da diese explodieren k nnten 4 4 Der K hlbereich Der K hlbereich eignet sich nicht zur Langzeitlagerung frischer Lebensmittel Verwenden Sie also den K hlberei...

Page 35: ...laschenfach da sich das Fach ansonsten von der T r l sen kann HINWEIS Lebensmittel insbesondere l bzw fetthaltige Lebensmittel d rfen nicht in direkten Kontakt mit der Innenverkleidung des K hlbereich...

Page 36: ...ntnommen werden5 T RABLAGEN ENTNEHMEN EINSETZEN 1 Entfernen Sie vor der Entnahme alle Lebensmittel aus den entsprechenden Ablagen 2 Heben Sie die Ablage vorsichtig senkrecht ab 3 Installieren Sie die...

Page 37: ...efroren Angaben zu maximales Gefrierverm gen in 24 Stunden finden Sie im Kapitel TECHNISCHE DATEN Kaufen Sie nur eingefrorenen Lebensmittel deren Verpackung unbesch digt ist Besch digte Verpackungen s...

Page 38: ...Essen kann im Ger t frisch gehalten werden Lassen Sie es dazu vorher auf Zimmertemperatur abk hlen Verwenden Sie zum Verpacken farblose geruchslose luftundurchl ssige und widerstandsf hige Materialien...

Page 39: ...gen gend bel ftet wird Das Ger t muss an allen Seiten gut bel ftet werden Eisablagerungen f hren zu einem h heren Stromverbrauch Tauen Sie Eisablagerungen ab wenn diese gr er als 3 mm sind 4 7 Bedeutu...

Page 40: ...frischen Lebensmitteln Tiefk hlbereich 6 0 C Meeresfr chte Fisch Garnelen Schalentiere S wasser und Fleischprodukte Empfohlene Lagerdauer 1 Monat Nicht geeignet zum Einfrieren von frischen Lebensmitte...

Page 41: ...e sehr frisch und von guter Qualit t sind Stellen Sie sicher dass die Lebensmittel vor der Lagerung gut verpackt oder abgedeckt sind Dadurch wird verhindert dass Lebensmittel austrocknen sich verf rbe...

Page 42: ...sfr chte ber Nacht oder l nger lagern m chten achten Sie besonders darauf sehr frischen Fisch zu kaufen Ganze Fische sollten mit kaltem Wasser gesp lt werden um lose Schuppen und Schmutz zu entfernen...

Page 43: ...ebensmittel einfrieren Um den bestm glichen N hrwert Geschmack und Farbe zu erhalten sollte das Gem se vor dem Einfrieren blanchiert werden Auberginen Paprika Zucchini und Spargel ben tigen kein Blanc...

Page 44: ...gszeit Speck Aufl ufe Milch 1 Monat Brot Eiscreme W rste Pasteten zubereitete Schalentiere liger Fisch 2 Monate Nicht fettiger Fisch Schalentiere Pizza Geb ck und Muffins 3 Monate Schinken Kuchen Keks...

Page 45: ...HLAGGEFAHR WARNUNG Trennen Sie das Ger t vor allen Wartungs und Reinigungsarbeiten von der Stromversorgung STROMSCHLAGGEFAHR WARNUNG Um das Ger t von der Stromversorgung zu trennen m ssen Sie den Netz...

Page 46: ...es Reinigungsmittel f r hartn ckige Verunreinigungen 2 Wischen Sie anschlie end mit klarem Wasser nach 3 Wischen Sie die gereinigte Fl che trocken INNEN 1 Reinigen Sie das herausnehmbare Zubeh r und d...

Page 47: ...Abtau System 2 Das Abtauwasser verl sst das Ger t durch die Ablaufrinne10 an der R ckseite des Ger teinnenraums 3 Das Wasser sammelt sich in einem Beh lter unterhalb des Kompressors in welchem es ver...

Page 48: ...HE MASSNAHMEN GER T ARBEITET BERHAUPT NICHT 1 Das Ger t ist mit dem Netzstecker nicht an der Steckdose angeschlossen 1 Schlie en Sie das Ger t ordnungsgem an die Steckdose an 2 Der Netzstecker ist loc...

Page 49: ...s Ger t ber hrt eine Wand oder einen anderen Gegenstand 1 Richten Sie das Ger t neu aus 2 Das K hlgut ist falsch positioniert 2 Richten Sie das K hlgut neu aus 3 Gegenst nde sind hinter das Ger t gefa...

Page 50: ...die Seitenw nde des Ger tes aufgrund des Betriebs des K hlkreislaufs warm werden AUSGEPR GTE GER USCHBILDUNG Bei Erstinbetriebnahme oder warmen Innentemperaturen Der Kompressor arbeitet mit hoher Lei...

Page 51: ...den K hlbereich c lagern Sie alle daf r geeigneten Lebensmittel im Gefrierbereich WENN SIE DAS GER T BEWEGEN WOLLEN 1 Sichern Sie alle herausnehmbaren Teile und den Inhalt des Ger tes Verpacken Sie d...

Page 52: ...im K hlbereich ja 1 5 W LED Beleuchtung im Gefrierbereich nein Glasablagen im K hlbereich 3 Gem seschublade mit bruchsicherer Glasabdeckung 1 T rablagen im K hlbereich 4 Gefrierschubladen 3 H henverst...

Page 53: ...zstecker ziehen und danach das Stromanschlusskabel am Ger t abschneiden und direkt mit dem Netzstecker entfernen und entsorgen Demontieren Sie immer die komplette T r damit sich keine Kinder einsperre...

Page 54: ...Beschaffenheit die auf den Gebrauchswert des Produkts keinen Einfluss haben 3 Sch den infolge Betriebs und Bedienungsfehler 4 Sch den durch aggressive Umgebungseinfl sse Chemikalien Reinigungsmittel 5...

Page 55: ...ning 63 3 2 Space and ventilation requirements 64 3 2 1 Space requirement 64 3 2 2 Ventilation 65 3 3 Levelling 66 3 4 Change of the hinge position 68 3 4 1 Change of the door handles for models incl...

Page 56: ...n such a case Delivery without content Any modifications which do not influence the functions of the appliance shall remain reserved by the manufacturer Please dispose of the packaging with respect to...

Page 57: ...to be used 1 in staff kitchen areas of shops offices and other working environments 2 by clients in hotels motels B B and other residential type environments 3 for catering and similar non retail appl...

Page 58: ...nergy supplier must meet the data on the rating plate of the appliance 4 Do not modify the plug provided with the appliance if it will not fit the outlet have a proper outlet installed by a qualified...

Page 59: ...appliance 5 Do not install the appliance near of volatile or combustible materials e g gas fuel alcohol paints and in rooms which may have poor air circulation e g garage 6 EXPLOSION HAZARD Do not sto...

Page 60: ...nce in a place where it may come in contact with water rain otherwise the insulation of the electrical system will be damaged 24 Do not put a water boiler or vases onto your appliance The electrical c...

Page 61: ...allow any lateral motion Lateral motion can damage the appliance and floor seriously 4 Do not tilt the appliance more than 450 5 If the appliance is transported in a horizontal position some oil may...

Page 62: ...them from damage 18 Clean the appliance at least once a month s chapter CLEANING AND MAINTENANCE 19 The freezing compartment of the appliance should be defrosted regularly to ensure proper operation...

Page 63: ...etc Remove such tapes very carefully Remove remains of such tapes with a damp cloth using lukewarm water and a mild detergent see also chapter CLEANING AND MAINTENANCE Never remove any components of...

Page 64: ...Width C Depth when the doors are open D Space requirement of the appliance width when the doors are open door opening angle 1350 A B C Height D 558 mm 550 mm approx 1090 mm 1800 mm approx 966 mm DOOR...

Page 65: ...minimum distances for proper ventilation MINIMUM DISTANCES REQUIRED FOR PROPER VENTILATION Back wall min 20 mm Sides wall min 20 mm Free space above min 100 mm SPACE REQUIREMENT OF THE APPLIANCE INCL...

Page 66: ...bserve the additional front and lateral space requirement s above C D of the open door s relevant to the door opening angle of your appliance The following minimum distances are recommended by the man...

Page 67: ...o ensure proper operation The 2 front supporting feet must stand firmly on the ground so that the appliance does not wobble Adjust the supporting feet accordingly The firm contact of the supporting fe...

Page 68: ...ied technician if you want to have the door swing reversed Only try to carry out the steps described below when you believe that you are qualified to do so NOTICE Adjust the doors properly before you...

Page 69: ...REQUIRED IN THE PLASTIC BAG Left hinge cover HOW TO CHANGE THE HINGE POSITION 1 Disconnect the appliance from the power supply unplug 2 Open the fridge door appliance in upright position and remove th...

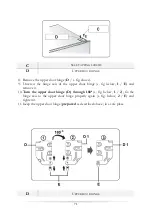
Page 70: ...ver 5 Also remove the upper hinge cover B on the right top of the appliance s fig below carefully using a putty knife or a flat bladed screwdriver A SCREW HOLE COVER B UPPER RIGHT HINGE COVER 6 Unscre...

Page 71: ...nge axis of the upper door hinge s fig below 1 E and remove it 10 Turn the upper door hinge D through 1800 s fig below 1 2 fix the hinge axis to the upper door hinge properly again s fig below 2 E and...

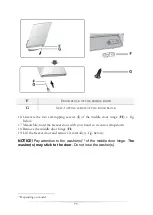
Page 72: ...door hinge The washer s may stick to the door Do not lose the washer s 13 Place the fridge door on a smooth surface with the external cladding facing up s fig below 14 Unscrew the self tapping screw...

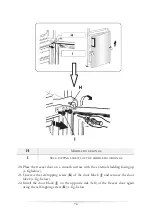
Page 73: ...hinge H s fig below 17 Meanwhile hold the freezer door with your hand so it cannot drop down 18 Remove the middle door hinge H 19 Lift the freezer door and remove it carefully s fig below NOTICE Pay a...

Page 74: ...door on a smooth surface with the external cladding facing up s fig below 21 Unscrew the self tapping screw K of the door block J and remove the door block s fig below 22 Install the door block J on t...

Page 75: ...OOR BLOCK OF THE FREEZER DOOR K SELF TAPPING SCREW OF THE DOOR BLOCK 23 Install the screw hole covers L of the middle door hinge on the opposite side s fig below L SCREW HOLE COVERS OF THE MIDDLE DOOR...

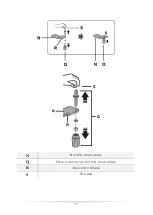
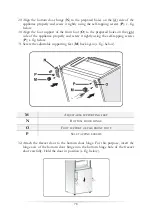
Page 76: ...it s fig below 27 Unscrew the self tapping screws P of the foot support of the front foot O and remove it s fig below M ADJUSTABLE SUPPORTING FEET N BOTTOM DOOR HINGE O FOOT SUPPORT OF THE FRONT FOOT...

Page 77: ...77 N BOTTOM DOOR HINGE Q HINGE AXIS OF THE BOTTOM DOOR HINGE R ADJACENT OPENING S WASHER...

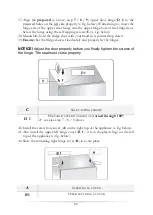
Page 78: ...pliance properly and screw it tightly using the self tapping screws P s fig below 31 Screw the adjustable supporting feet M back again s fig below M ADJUSTABLE SUPPORTING FEET N BOTTOM DOOR HINGE O FO...

Page 79: ...old the freezer door with your hand so it cannot drop down 35 Ensure that the freezer door is fixed safely and properly by the hinges NOTICE Adjust the door properly before you finally tighten the scr...

Page 80: ...hat the fridge door is fixed safely and properly by the hinges NOTICE Adjust the door properly before you finally tighten the screws of the hinge The seal must close properly C SELF TAPPING SCREWS D 1...

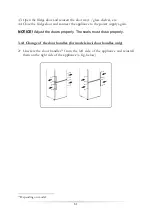
Page 81: ...ppliance to the power supply again NOTICE Adjust the doors properly The seals must close properly 3 4 1 Change of the door handles for models incl door handles only Unscrew the door handles14 from the...

Page 82: ...hed its normal operating temperature this foods can thaw and or spoil 1 Remove all packaging materials 2 Adjust the feet and clean the appliance see chapter CLEANING AND MAINTENANCE 3 Do not start the...

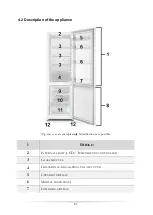
Page 83: ...pliance Fig serves as an example only Modifications are possible 1 FRIDGE 2 INTERNAL LIGHT LED TEMPERATURE CONTROLLER 3 GLASS SHELVES 4 CRISPER INCL BREAK PROOF GLASS COVER 5 UPPER DOOR TRAY 6 MIDDLE...

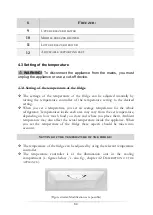
Page 84: ...ture you set an average temperature for the whole refrigerator Temperatures inside each area may vary from the set temperature depending on how much food you store and where you place them Ambient tem...

Page 85: ...e decreased high strong cooling The higher the setting is the longer the compressor operates to reach the set cooling temperature The description of the cooling levels represents standard values only...

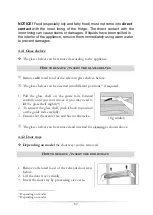
Page 86: ...ce Use these different temperature areas to store different kinds of food SHELVES Food from wheat flour milk etc The shelves are removable for cleaning Adjust the shelves relevant to your needs CRISPE...

Page 87: ...lves can be inserted into different positions15 if required 1 Pull the glass shelf on the guide rails forward carefully until you can remove it you may need to lift the glass shelf slightly16 2 To rei...

Page 88: ...aluminium foil cling film air and water tight plastic bags polyethylene containers or other suitable plastic containers with a lid Leave some free space between the single pieces of frozen food as pro...

Page 89: ...release strong odours You can avoid these by wrapping them into aluminium foil or plastic wrap or putting them into an airtight bag or container Allow ample storage place for your food Do not overfil...

Page 90: ...e energy consumption of the appliance 4 6 Meaning of the labelling of freezers 1 2 and 3 stars freezers are not suitable for freezing fresh food 2 stars and 3 stars freezers are suitable for storing f...

Page 91: ...mps shellfish freshwater and meat products Recommended storage period 1 month Not suitable for freezing fresh food 0 compartment 6 0 C 0 0 C Suitable for fresh meat products pork beef chicken etc and...

Page 92: ...ge compartment Make sure that strong smelling foods are wrapped or covered and stored away from foods such as butter milk and cream which can be tainted by strong odours Cool hot foods down before pla...

Page 93: ...r fresh fruit and vegetables Take care not to store the following at temperatures of less than 7 C for long periods Citrus fruit melons aborigines pineapple papaya curettes passion fruit cucumber pepp...

Page 94: ...naise Packing frozen food To prevent food from losing its flavour or drying out place food in airtight packaging 1 Place food in packaging 2 Remove air 3 Seal the wrapping 4 Label packaging with conte...

Page 95: ...nce 7 you do not store warm or hot food in the appliance 5 Cleaning and maintenance DANGER Never touch the power plug the power switch or other electrical components with wet or damp hands RISK OF ELE...

Page 96: ...detergent for stubborn stains 2 Use clear water to rinse 3 Dry the cleaned surfaces with a cloth INTERNAL CLEANING 1 Clean the shelves and the inside with warm water and a mild detergent 2 Use clear w...

Page 97: ...ected in a container underneath the compressor The water evaporates in this container 4 The drain must not be blocked 5 Clean the drain carefully with a pipe cleaner FREEZER The freezing compartment o...

Page 98: ...e fuse is switched off 4 Check the fuse box 5 The voltage is too low 5 Compare the data on the model plate with the data of your energy supplier THE COMPRESSOR DOES NOT WORK AT ALL 1 Incorrect energy...

Page 99: ...spout located underneath the top of the compressor depot may not be properly positioned to direct water into this pan or the water spout is blocked 1 You may need to pull the refrigerator away from t...

Page 100: ...temperature falls below a certain level the appliance will operate with high power to reach the preset temperature CONDENSED WATER IN ON THE APPLIANCE may be generated inside or outside the appliance...

Page 101: ...mpartment c freeze all food which is suitable to be frozen IF YOU WANT TO MOVE THE APPLIANCE 1 Secure all removable parts and the contents of the appliance Pack them separately if necessary 2 Transpor...

Page 102: ...ght Fridge yes 1 5 W LED Internal light Freezer no Glass shelves in the fridge 3 Crisper incl break proof glass cover 1 Door trays in the fridge 4 Freezer drawers 3 Adjustable supporting feet yes 2 in...

Page 103: ...and the plug immediately Remove the door completely so children are not able to get into the appliance as this endangers their lives 5 Dispose of any paper and cardboard into the corresponding contain...

Page 104: ...ed condition if they do not influence the utility value of the product 3 damage caused by handling errors or false operation 4 damage caused by aggressive environmental conditions chemicals detergents...

Page 105: ...inden alle Informationen zum Kundendienst auf der Einlage in dieser Bedienungsanleitung Aftersales service information on the leaflet inside this instruction manual nderungen vorbehalten Subject to al...

Reviews: