background image

8

Attach Power

Connect the cable to included power adapter. Plug the power adapter 
to  a  wall  outlet,  or  plug  cable  to  computer  USB  port  directly.  F2D 
Super Plus turns off itself after 30 minutes of idle time. 

Use Built-in Memory

F2D Super Plus has built-in memory that stores about 35 ~ 40 digital 
images. After power on, a "No card" icon will appear on the viewer 
for 3 seconds if an external memory card is not inserted. 

1.

2.

Getting Started

Use Optional SD/SDHC Memory Card

Insert a SD/SDHC memory card (Max. 32 GB) 

before

 powering on 

the F2D Super Plus. 

Do not use SDXC or MicroSD memory


card 

with card adapter

 on F2D Super Plus. It could freeze the device. 

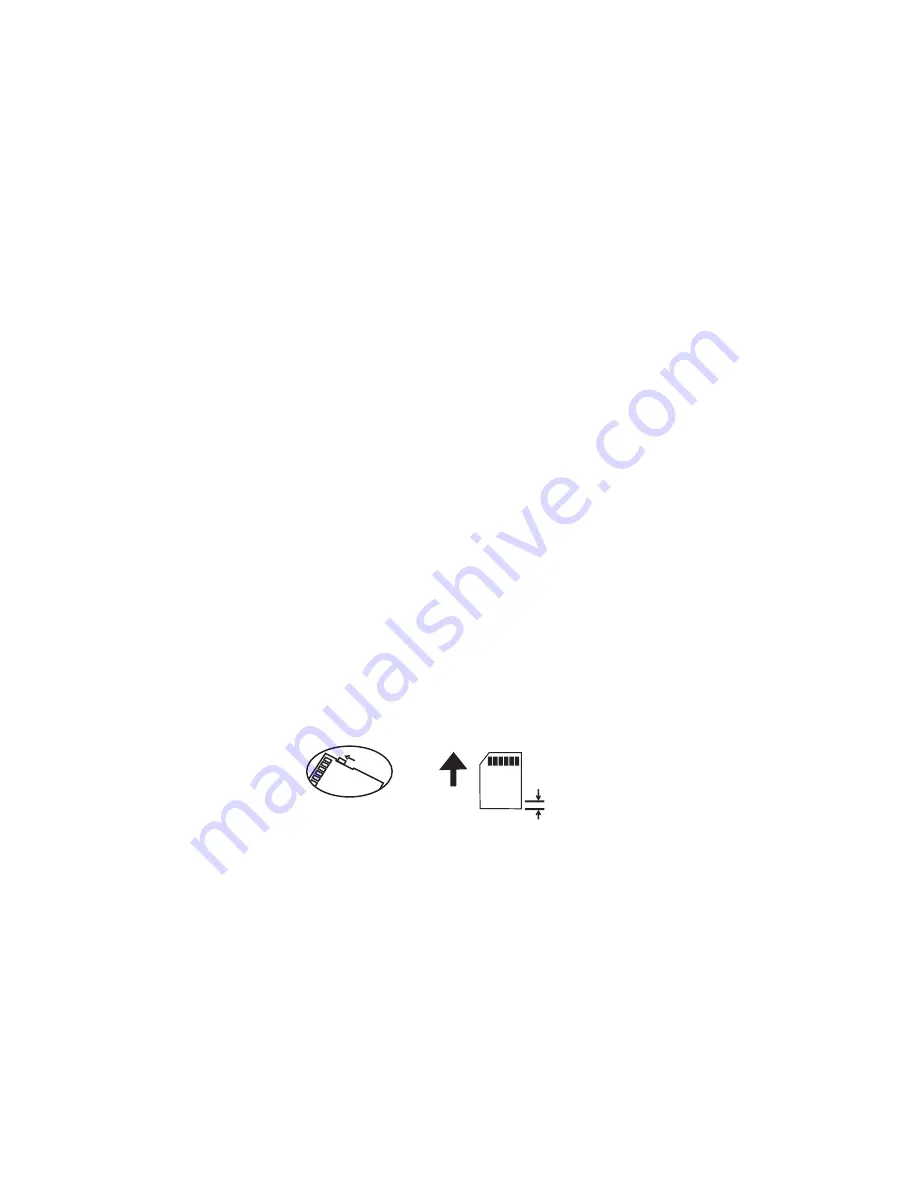
Ensure the card is unlocked, gently insert it with 

gold fingers facing 

up  until  it  clicks.

  Power  off  the  F2D  Super  Plus  before  removing 

the  memory  card.  Eject  the  card  by  gently  pushing  in  the  card, 
instead of pulling out directly.

3.

9

Unloc

k

Unlock the card

Gold contacts face up

Push in until clicks &

1/8" remains

1/8"

A  new  memory  card  or  an  used  camera  card  should  be  formatted 
before using with the F2D Super Plus. Refer to item 4.
Each  1  GB  of  SD/SDHC  memory  holds  about  500-700  digital   
images.  The maximum accepting capacity of a SD/SDHC Memory 
Card


is 

32 GB

, otherwise it will freeze the F2D Super Plus.

Format/Delete All Internal Memory or SD/SDHC Card

This function formats/deletes all files stored in the internal memory if 
SD/SDHC memory card is not inserted. With external memory card 
inserted,  the  function  of  "Delete  All"  would  erase  all  files  on  the 
inserted  card.  Caution,  any  and  all  existing  files  would  be  deleted 
after the procedure of "

Delete All"

. Make a backup if it's needed. 

1. Insert SD/SDHC memory card if needed. 
2. Turn power on, press 

Right

 key to select 

Delete All 

then press 

OK

.

3. Press 

Left

 key to highlight 

YES 

then press 

OK

.

4.

Summary of Contents for F2D Super Plus

Page 1: ...g Accessories 5 Functions of Keys 6 Connect F2D Super Plus to TV Screen 7 Getting Started 8 1 Attach Power 8 2 Use Built in Memory 8 3 Use Optional SD SDHC Memory Card 8 4 Format Delete All Internal Memory or the SD SDHC Card 9 5 Mode Selection 10 6 Set Film Type 11 7 Select Proper Adapter or and Insert 11 8 Insert Proper Adapter into Slot 14 9 Prepare Film and Feed the Film into Adapter 15 ...

Page 2: ...rve them forever Wolverine has created a simple to use device to convert your film into high mega pixel digital images in seconds No computer or software is needed Plug the F2D Super Plus into an outlet or an USB port all images are saved to memory or optional SD SDHC memory card The F2D Super Plus can be connected with your Windows PCs or Mac computer system to upload converted and saved digital ...

Page 3: ... void the warranty Warranty will be voided if the device is mishandled Please take care in handling the device Wolverine Data is not responsible for 3 consequential damages including loss of data Always back up all data For full warranty statement see the end of this manual Wolverine Data has no obligation to repair replace or issue refunds without a Return Merchandise Authorization RMA number and...

Page 4: ...pside down E mail or write to our technical support staff at support wolverinedata com or our address 9939 Muirlands Blvd Irvine CA 92618 5 Package Contents F2D Super Plus converter 35 mm slide adapter 1 35 mm negative adapter 2 Super 8 film insert 3 110 negative insert 4 USB power adapter USB cable cleaning brush user manual Ordering Accessories Please call us at 949 458 9888 or visit Wolverine D...

Page 5: ... Convert Mode Left Mirror Right Flip Functions of Keys 7 Connect F2D Super Plus to TV Screen to View Images on TV If your TV set equipped with RCA composite ports that accept video in signal you can view converted images on TV screen instead from the F2D Super Plus viewer Change your TV set INPUT to appropriate source Plug the 3 5 mm end of the RCA cable to TV OUT port located at the back of F2D S...

Page 6: ... card Eject the card by gently pushing in the card instead of pulling out directly 3 9 Unlock Unlock the card Gold contacts face up Push in until clicks 1 8 remains 1 8 A new memory card or an used camera card should be formatted before using with the F2D Super Plus Refer to item 4 Each 1 GB of SD SDHC memory holds about 500 700 digital images The maximum accepting capacity of a SD SDHC Memory Car...

Page 7: ... image files to PC or Mac Language Sets menu in English or Japanese 11 6 Set Film Type Ensure the Film Type setting is correct or you will see X ray like image on the viewer The film type setting will remain unchanged even when F2D Super Plus is powered off 1 At Film Type menu press OK Enter key 2 Press Left or Right key to highlight Color Negatives or Slides Positive or Black White then press OK ...

Page 8: ...Positive Super 8 110 126KPK 135 Black White 110 126KPK 135 Format Film Width 16 mm 26 mm 35 mm 8 mm 16 mm 26 mm 35 mm 16 mm 26 mm 35 mm Negative Adapter 2 Negative Adapter 2 Negative Adapter 2 Negative Adapter 2 Negative Adapter 2 Negative Adapter 2 Negative Adapter 2 110 Insert 4 Slide Adapter 1 Slide Adapter 1 Slide Adapter 1 Super 8 Insert 3 110 Slide Insert Adapter to Use Insert to Use Film Ty...

Page 9: ...roper direction it would be stuck inside the F2D Super Plus If the adapter was stuck please call us or go to our 15 web site for the solution on video refer to item 4 how to release a stuck slide adapter if inserted upside down refer to page 4 Use fine soft cloth or canned air not included to wipe or blow off any dust on the film before feeding them into the Adapter Gently feed the film from the r...

Page 10: ...eed and push each slide until image align properly on the viewer Feed in slide one by one 2 17 Negative 1 Put Negative Adapter into F2D Super Plus 2 Feed negative film and check the image from the viewer 10 Edit Image Orientation At Convert Mode press Mirror key to mirror the image left to right or Flip key to flip the image upside down Or you can also rotate the images 90 degrees while viewing at...

Page 11: ...ode EV 0 0 135 Film Type Save Cancel Home 19 12 Convert Film to Digital File 1 At Convert Mode press Convert key to convert image to digital 2 Press OK key to save the converted digital image to memory Or press Left or Right key to select Cancel not saved 3 Feed another slide or push the negative film to left side to convert the next film Note If a red rectangle FULL icon appears in the center of ...

Page 12: ...ally Press OK Enter key one more time to go to Edit menu In the Edit menu highlight Exit then press OK Enter key to resume Playback 1 2 3 4 21 Rotate 90 Rotate 90 Exit Edit menu resume Playback mode Delete Save edited image Go to Home Menu Exit Playback Playback Edit Menu After the image is edited select Save icon to save edited image The edited image will replace the original image in memory High...

Page 13: ...l card reader to upload converted image files It s a better practice to upload files to different folders each time to avoid files superseding MAC system iPHOTO will pop out If not launch iPHOTO and import the files Windows PC system A Microsoft Wizard Window will pop out Follow the steps to copy picture files to your PC All converted image files will be named in alpha numerical order such as PICT...

Page 14: ...ited warranty term is one year beginning on the date of invoice as further described in the following text Damage due to shipping the product is covered under this limited warranty Otherwise this limited warranty does not cover damage due to external causes including accident abuse misuse problems with electrical power servicing not authorized by Wolverine Data usage not in accordance with product...

Page 15: ...dress and telephone number d Write the RMA number on the outside shipping packaging NOTE Wolverine Data uses new and reconditioned parts made by various manufacturers in performing limited warranty repairs and building replacement products If Wolverine Data repairs or replaces a product its limited warranty term is not extended 27 Warranty Exclusions Normal Wear and Tear Periodic maintenance repai...

Page 16: ...tal special or consequential damages of any kind or loss of revenue or profits loss of business loss of information or data software or application with the ability or inability to use the product accessories or software to the full extent these damages may be disclaimed by law Some states or jurisdictions do not allow the exclusion or limitation of incidental or consequential damages so the above...

Reviews: