Quick Installation Guide
Outdoor Pre-Paired
Long Range Wireless Point-to-
Point Bridge Kit
WA212BP-2 Series
https://westwardsales.com/womaster
・
Overview
The
WA212BP-2
is a high performance, 802.11n compliant, IP55
waterproof outdoor wireless
Pre-Paired
Point-to-Point Bridge with
wireless connectivity reaching up to 2km. Standard are highly
sensitive, high power, and high gain 2T2R MIMO antennas that bring
data rate up to 300Mbps. The dual Ethernet ports support a full
Routing/Layer 3 feature set
– that allows a degree of management,
functionality, and performance our competitors cannot match. One
Ethernet port receives PoE power input, and the other Ethernet port
delivers PoE power output. WA212BP is an ideal entry-level high-
speed long-range wireless communication solution for outdoor, harsh,
and security applications.
Model Name
Description
WA212BP-2-U
Pre-Paired Industrial Wireless (2 units) 802.11n
AP/Client/Bridge, IP55, Embedded 11dBi
antenna, 2 Ethernet ports, 24V Passive PoE with
US plug
MK-POLE
1ea. Adjustment L-Mount kit with U-ring holder for
pole 70mm diameter for pole mounting
・
Package Checklist
2 x Product Units
2 x 24VDC PoE Injector
2 x Power cord (EU or US)
4 x UV Resistant Nylon Cable Tie for Pole Mounting
2 x Adjustment L-Mount kits for Pole Mounting (Optional)
1 x Quick Installation Guide
・
Installation
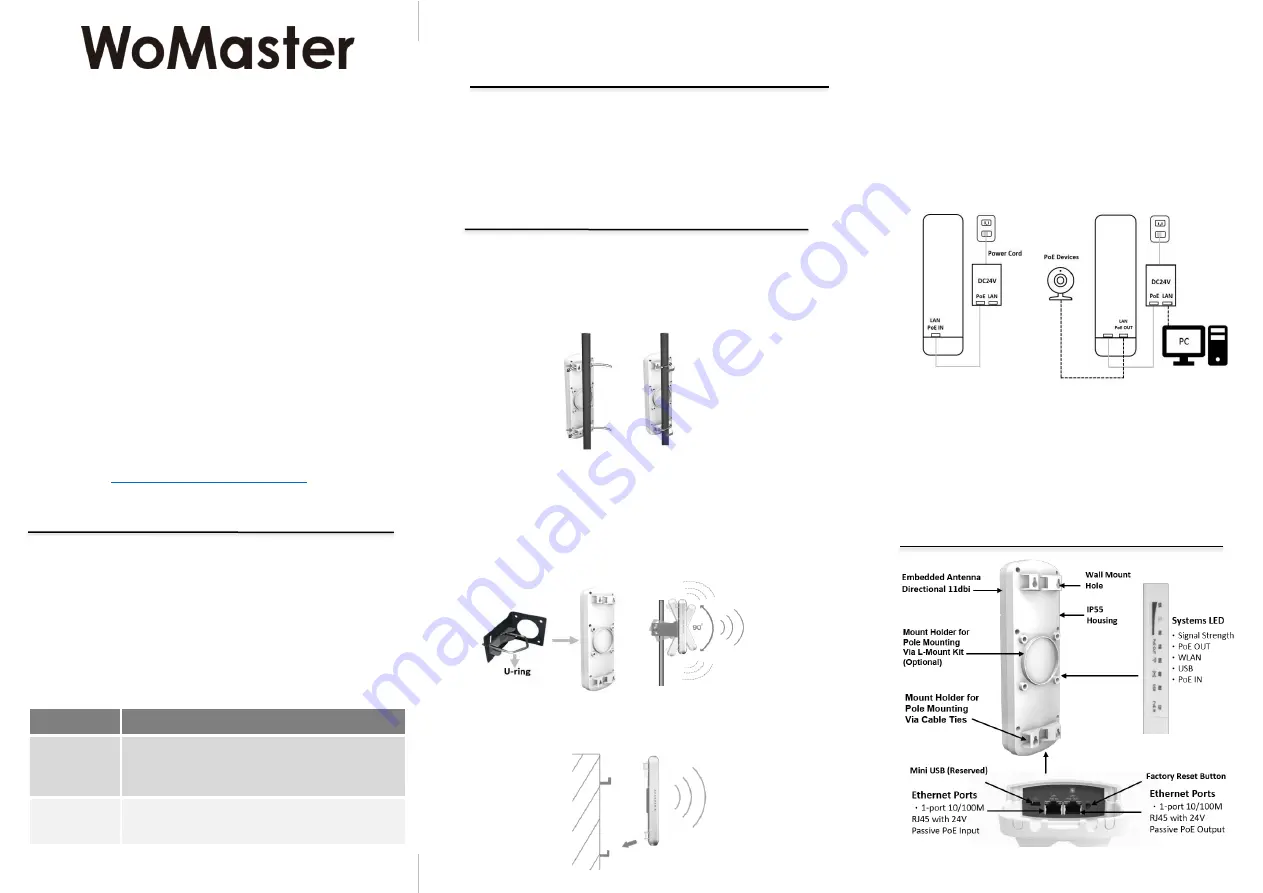
Mount the Bridges on a Pole by using Cable Tie
1) Place cable ties through the slots on back of the
Bridge/AP.
2)
Adjust the direction of the Bridge/AP for the best signal.
3)
Attach the cable tie tightly to the pole and ensure the Bridge/AP
will not fall.
Mount the Bridges on a Pole by using L-Mount kits
(Optional)
1)
Use 4 screws to assemble the L-shaped mounting bracket on the
back of the Bridge/AP.
2)
Attach the Bridge/AP on the pole by using U-ring.
3)
You can adjust the angle of the Bridge/AP up and down 45
degrees.
Mount the Bridges on a Wall
There are four wall mount holes on the back of the Bridge/AP, hang
the Bridge/AP on wall through it.
Establish the Connection
1.
The bottom of the Bridge/AP is a movable cover. Grab
the cover and pull it back harder to take it out.
2.
Plug a standard Ethernet cable into the
RJ45 PoE IN
LAN port
.
3.
Slide the cover back and press down the lock button to
seal the bottom of the Access Point.
Wiring the Power Input
1.
Connect power cord to the PoE injector.
2.
Install Ethernet cable between
PoE IN LAN port
of
the Bridge/AP and PoE port of PoE injector.
3.
Connect the power plug to a power socket. The
Bridge/AP will be powered up immediately.
Connecting to the Units
1.
Install Ethernet cable between LAN port of PoE
injector and PC/NB, whenever proceeding WebGUI
configuration.
2.
Plug the Ethernet cable into
PoE OUT LAN port
, if
you need to connect a PoE device.
3.
For a Point-to-Point Bridge to be successful, you must
make sure that the two Bridge/APs are placed face to
face.
・
Appearance


