Sawmill Alignment
Blade Wheel Alignment
Sawmill Alignment
WMdoc072619
7-14
7
1.
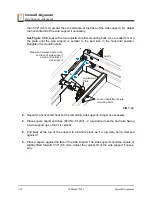
Use the blade guide alignment tool to check the vertical alignment of each blade wheel.
Attach the tool to the blade near the inner blade guide mount. Be sure the tool does not
rest on a tooth or burr, and is lying flat against the bottom of the blade.
See Figure 7-12.
2.
Move the saw carriage so the front end of the tool is positioned over the first bed rail.
Measure from the bottom of the tool to the top surface of the bed rail.
3.
Move the saw carriage so the rear of the tool is positioned over the bed rail. Again, mea-
sure from the bottom of the tool to the bed rail.
4.
If the two measurements differ by more than 1/16" (1.5 mm), adjust the vertical tilt of the
drive-side blade wheel.
See Figure 7-13.
Use the vertical adjustment screws to adjust the drive-side blade wheel.
To tilt the wheel down, loosen the top adjustment screw one quarter turn. Loosen the jam
nut on the bottom adjustment screw and tighten the screw. Tighten the top and bottom
jam nuts.
To tilt the wheel up, loosen the bottom adjustment screw one quarter turn. Loosen the jam
FIG. 7-12
SM0069B
Clip tool to blade


