Sawmill Alignment
Blade Guide Installation
7
7-21
WMdoc072619
Sawmill Alignment
8.
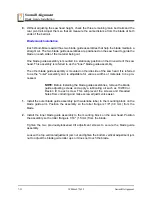
Without adjusting the saw head height, check the three remaining main bed rails and the
rear pivot rail. Adjust them so that all measure the same distance from the blade at both
ends of the bed rail.
Blade Guide Installation
Each Wood-Mizer sawmill has two blade guide assemblies that help the blade maintain a
straight cut. The two blade guide assemblies are positioned on the saw head to guide the
blade on each side of the material being cut.
One blade guide assembly is mounted in a stationary position on the drive side of the saw
head. This assembly is referred to as the "inner" blade guide assembly.
The other blade guide assembly is mounted on the idle side of the saw head. It is referred
to as the "outer" assembly and is adjustable for various widths of materials to be pro-
cessed.
NOTE:
Before installing the blade guide assemblies, remove the blade
guide adjusting screws and apply a lubricating oil such as 10W30 or
Dexron III to each screw. This will prevent the screws and threaded
holes from corroding and make screw adjustments easier.
1.
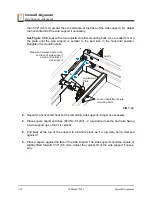
Install the outer blade guide assembly (with waterlube tube) to the mounting block on the
blade guide arm. Position the assembly so the roller flange is 1/8" (3.0 mm) from the
blade.
2.
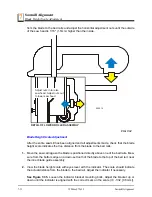
Install the inner blade guide assembly to the mounting block on the saw head. Position
the assembly so the roller flange is 1/16" (1.5 mm) from the blade.
Tighten the two previously-loosened tilt adjustment screws to secure the blade guide
assembly.
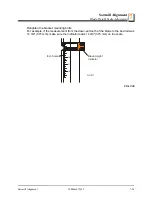
Loosen the top vertical adjustment jam nut and tighten the bottom vertical adjustment jam
nut to adjust the blade guide roller up so it does not touch the blade.


