background image

R

WOODBRIDGE 

WOODBRIDGE 

WOODBRIDGE 

WOODBRIDGE 

R

WOODBRIDGE 

WOODBRIDGE 

WOODBRIDGE 

WOODBRIDGE 

R

WOODBRIDGE 

WOODBRIDGE 

WOODBRIDGE 

WOODBRIDGE 

R

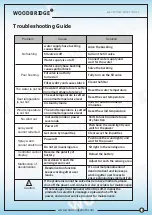
WOODBRIDGE 

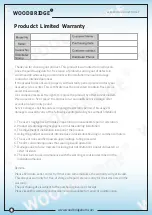
WOODBRIDGE 

WOODBRIDGE 

WOODBRIDGE 

R

WOODBRIDGE 

WOODBRIDGE 

WOODBRIDGE 

WOODBRIDGE 

R

WOODBRIDGE 

WOODBRIDGE 

WOODBRIDGE 

WOODBRIDGE 

www.woodbridgebath.com

7

R

WOODBRIDGE 

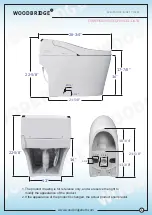
ELECTRONIC  BIDET  TOILET

12"

Rough-in

Standard

2-3/8"

31-1/2"

15-3/4"

15-3/4"

19-5/8"

9-7/8"

13-3/4"

Recommended location for
remote control mounting
(Left or Right)

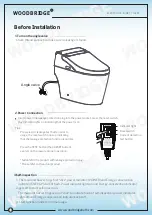
Connect the water inlet and angle valve of the
 toilet with the matching hose and tighten it

Installation Option

(Recommended height)

20-7/8"

22-5/8"

17-7/8"

16"

1-3/4"

Ø1/4"

9-7/8"

13-3/4"

Floor

11-3/4" ~ 19-5/8"

          Water Outlet

Angle valve mounting)

STANDARD
INSTALLATION

Wall Power
Outlet(GFCI)

12-1/2"

          Water Outlet

Angle valve mounting)

Wall Power
Outlet(GFCI)

NO SHOW INSTALLATION

Floor

(Recommended height)

4"

3"

3"

9"

angle valve 

new hose

water inlet

11-3/4" ~ 19-5/8"

Summary of Contents for B0960S

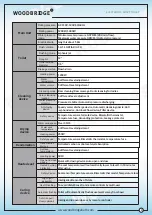
Page 1: ...E 2015 Uniform Plumbing Code UPC 2018 International Plumbing Code IPC 2018 International Residential Code IPC CSA B45 5 IAPMO Z124 2017 Plastic Plumbing Fixtures Compliance with the following codes st...

Page 2: ...y damages in connection with this product during installation or use of this product This products must be installed by a fully insured and licensed plumber only Installation of any our product by any...

Page 3: ...product the power plug must be switched off and water supply be shut off WARNING To reduce the risk of burns electrocution re or injury to persons 1 Close supervision is necessary when this product is...

Page 4: ...be lnstalled in the place where is not easily got wet 3 This product should be used with AC 110V 120V 50 60Hz electrical current only load current is at least 15A P ower plug must be equipped with gr...

Page 5: ...ssure 0 8MPa Hydrostatic pressure Rough in Outlet outside diameter Drainage method Down drain Heating power Water temperature 6 different level adjustment Water volume 5 different level adjustment Cle...

Page 6: ...t to change without notice Pls measure toilet on site before installation Please note that installer s must be certify or warranty will be voided Measurements herein supersede all others published pri...

Page 7: ...22 5 8 22 5 8 17 7 8 16 28 3 4 1 3 4 1 4 13 2 3 8 2 1 2 21 5 8 10 1 4 11 3 8 21 5 8 2 1 8 3 3 4 16 1 The product drawing is for reference only and we reserve the right to modify the appearance of the...

Page 8: ...and angle valve of the toilet with the matching hose and tighten it Installation Option Recommended height 20 7 8 22 5 8 17 7 8 16 1 3 4 1 4 9 7 8 13 3 4 Floor 11 3 4 19 5 8 Water Outlet Angle valve m...

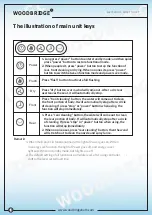
Page 9: ...ush button Full ush button Deodorization window Remote sensing window Main unit disassembly button Power indicator Energy saving indicator Power button Flush button Drying button Front cleaning button...

Page 10: ...n on wall according to dimension of toilet 10 off center is preferred Align cardboard with the centerline of drain outlet Outline with pencil or tape according to cardboard Please mark the position of...

Page 11: ...clean the drain outlet Please make sure ceramic toilet outlet sits perfectly on drain outlet Apply Silicone caulking to the edge of toilet base wipe away any excess ELECTRONIC BIDET TOILET Screw Decor...

Page 12: ...indicator keeps off 2 Power Connection Insert power line leakage protection plug into the power socket press the reset switch plug indicator lights on indicating that the power is on Tips Press electr...

Page 13: ...soft damp cloth 3 Safety self inspection After cleaning re connect the toilet with the power supply 1 Nozzle self cleaning Press nozzle cleaning button and nozzle will move forward and self clean 2 Sp...

Page 14: ...2 Water failure Barrel Operation panel Newspaper Electricity and water supply cut off Manually press button of full half ush to perform the toilet ushing Put around 8L water into a barrel and ush the...

Page 15: ...e power button again and electricity indicator will turn on Remarks When replacing the battery the automatic function and timing function will be cancelled and need to be reset When the product is lef...

Page 16: ...of body It will automatically stop after a circle of cleaning If press stop or power button when using the function will stop immediately 1 Press rear cleaning button the water will come out to clean...

Page 17: ...sensing area Push back the wand lightly and wait for the power Clear away the impurities Shift to function mode to use dry function Reset the wind temperature water supply hose buckling causes block...

Page 18: ...of the following events including but without limitation 1 The user s negligence or mistake in operation unreasonable repair or alteration 2 Product are damaged by negligence or mistake during instal...

Page 19: ...www woodbridgebath com...

Page 20: ...www woodbridgebath com Customer Service Phone 562 229 0088 Monday Friday 9 AM 5 PM Paci c Time Or Email help woodbridgebath com Thank you for using WoodBridge products...

Reviews: