Set Nail Heads
3
Install-3300-120423
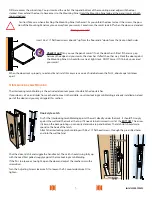
Caution! Firmly attach the track to the structural header!
Sheetrock and many decorative materials do not provide adequate sup-
port
Important: Power Screw Drivers:
Check the length of your #2 Phillips Bit. It needs to extend at least 1¼” past the chuck.
Any shorter and the chuck may tear up the track or the screw won’t seat. It falls into the frustrating category when you
have to order a new track.
Confirm the proper orientation of the door. See the door stacking illustrations at the top of Page 2. Position the track to ensure: it
can be securely attached to the header and the Mounting system can be securely attached to the wall or doorjamb.
Check it out! Move the door back and forth along the track looking for smooth operation. Most frequent problems in-
clude wheels sideways or debris in the track.
After the track has been secured, drive the alignment pins across the joints with a hammer and the edge of
a screwdriver.
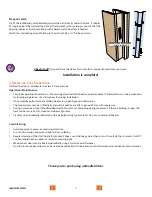
Stack the door to one end of the track (either side of the opening is OK) and attach the
other end of the track to the header. Use #8 x 1½” pan or truss head screws through the
exposed holes at the end of the track. Seat the head of the screw firmly against the track.
If the screws didn’t go into a solid part of the header (soft stuff like sheetrock or acousti-
cal tile doesn’t count) at least ¾”, now would be a good time to go to the hardware store
and get longer #8 pan or truss head screws.
Transfer the door to the attached end of the track. Finish attaching the track with #8 x
1½” pan or truss head screws.
Attach the Sweep Moldings snugly against the Track with 8d (2½”) finish nails. Set the nail heads
slightly below the surface.


