W
all/J
amb
Mark Wall/Jamb at the
plywood’s edge near the
top and bottom of the door
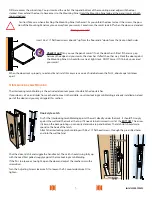
Flush Mount
Post Mount
Offset screws
Mounting Panel
Flaps
(1 each side)
L
C
1”
Wall/Jamb Surface
4
Install-3300-120423
This next section is most critical. Improperly installing the wall/jamb Mount results in the majority of trouble calls to Woodfold.
Repeat after me:
I will read this section. I will read this section.
3.
W
all
or
J
amb
m
ountIng
s
ystems
If your door is single ended (SE) or a pair (see the top of Page 2) you need to read this Section.
If yours is a double ended (DE) door, forget the warning above and skip ahead to Section 4.
It is important! Make the marks while the door is in its stacked position or the door will
not close properly.
The door mounting panel comes from the factory pre-attached to a piece of plywood. Do Not Remove
the plywood.
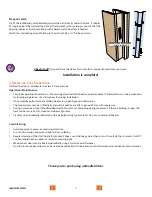
Push the door to the side that will be fastened permanently to the wall. Let the door form its own
plumb (hang free) and carefully mark the wall with a pencil at the edge of the mounting panel/plywood
near the top and bottom of the door.
Flush Mounting
Find the 2
1⁄
8” x 1¼” post in the shipping package. Attach it to the wall/
jamb surface 1” below and centered on the track. Use the provided
#8 x 2½” flat head screws through the pre-drilled holes in the post.
Ensure the post is plumb!
Post Mounting
Push the door over the post. The post will snugly fit between the mounting panel flaps. Screw
the mounting panel flaps to the post using the provided #6 x 1½ flat head screws. Place a screw
about 6” from the top and bottom of the post and 2 additional screws equal distances between
the first 2 screws. Repeat anchoring the 2nd flap being sure to slightly offset the screws so they
won’ t meet in the middle of the post.


