1
ATTACH PLATE & TRACKS
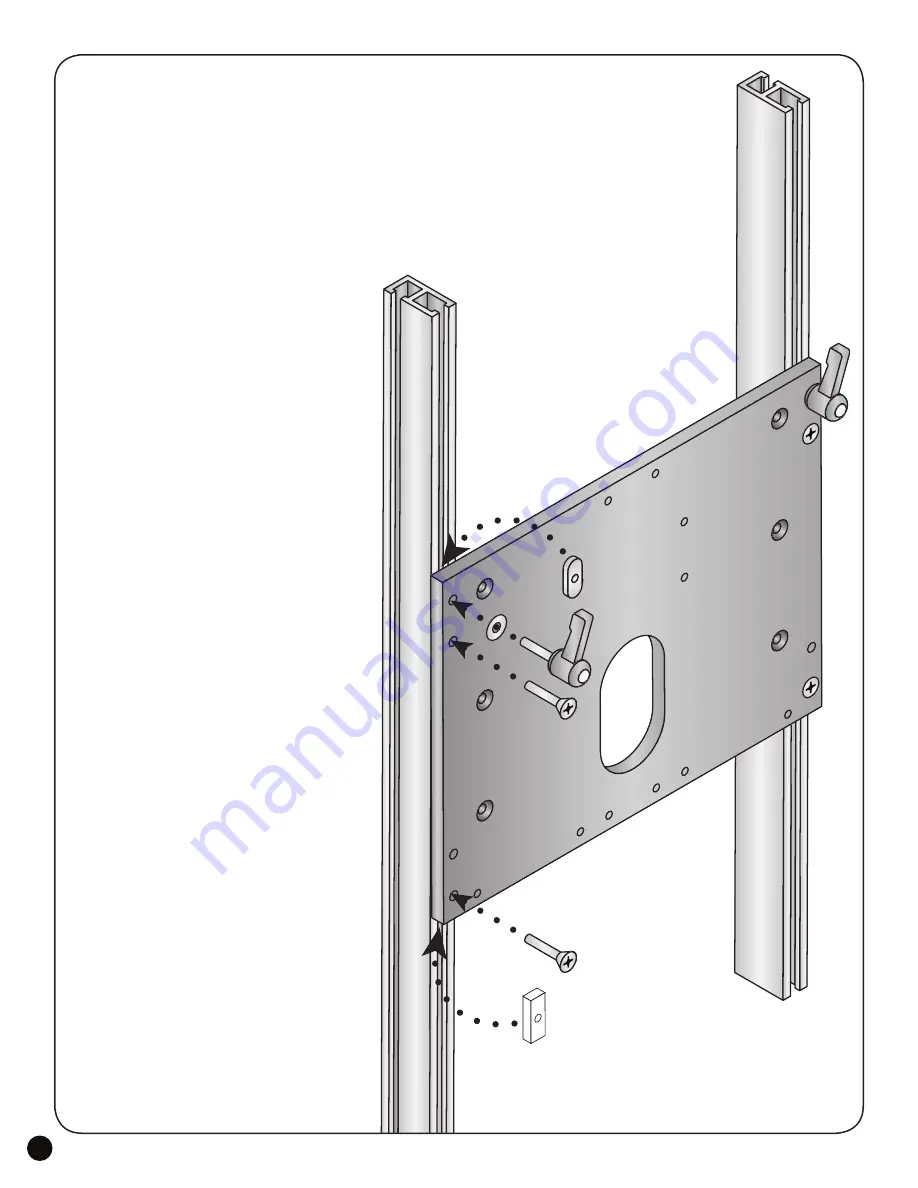
The router plate
(6000PA)
has ribs on both
short sides that guide the plate in the tracks. The
router plate can be mounted in one of two ways:
If the bit opening in the router plate is placed
at the top, the router will tilt down and the bit
will tilt up. If you place the bit opening in the
router plate at the bottom, as shown in drawings,
the router will tilt up and the bit will tilt down.
Decide which way you want to tilt the router/bit.
On two ratchet handles
(5859)
,
insert
a washer
(WS002)
on the stud, insert the
studs thru the top two corners of the router
plate and start an oval nut
(5760B - smooth
side first)
on the ends of the studs.
Install four 1” screws
(MF015)
thru the four
countersunk holes in the router plate and start a
track guide
(6000G - chamfered side first)
on
the ends of the screws. The hole gets tighter as
you tighten the screw in the track guide, reducing
any chance of vibration loosening the screw.
Slide a 24” Double Track
(4024)
on
the oval nut and two track guides on each
short side of the router plate. Position the
Double Tracks so the 1-1/2” wide smooth
sides are facing each other and the T-slot
sides are facing out away from each other.
The rib on each side of the router plate
should be in the T-slot of the track. Loosely snug
all four 1” screws until the track won’t slide,
then loosen the screws until it slides smoothly
but not loosely. There should be some tension
on the track. Center the router plate on the
Double Tracks and tighten the ratchet handles.
6000G x4
MF015 x4
5859 x2
WS002 x2
5760B x2
60
00
PA
: A
ng
le-
Ea
se
Ro
ute
r P
lat
e
Ce
nte
red
on
Do
ub
le
Tra
cks
40
24
x2
- D
ou
ble
Tr
ack
s


