6
IV.2 Testing Interface
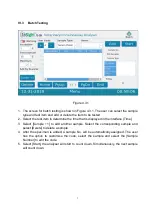
Figure 4.2.1
1.
Click [Test] option on the main home screen and Figure 4.2.1 will display.
2.
Insert ID chip in the ID Port on the side of the analyser and select “Read ID Card”
before using a new lot of test cartridges.
3.
After the ID chip is recognised, select sample type and manually input sample number
if required.
4.
Select [Detail] to input more detailed patient information (patient name, age).
5.
Select [Standard Test] or [Instant Test] after inputting patient information. Standard
Test means the analyser will countdown the reaction time, then analyse the cartridge
and report results. This option is recommended for routine testing. Instant Test means
the user needs to use a timer to countdown the reaction time before putting the
cartridge in the analyser. Once the timer has completed, the user inserts the cartridge
into the analyser to analyse the cartridge and report results. This option is
recommended for multiple sample batch testing.
6.
Prepare sample according to each test kit insert. Then apply sample to the test
cartridge. If Standard Test selected, insert the test cartridge into the cartridge port. If
Instant Test selected, start the timer and leave the cartridge on the bench.
7.
When patient information has been inputted, the user can select [Test] option to start
the analysis.
8.
After each test, the result will be displayed on the screen and will automatically print
on the internal thermal printer.


