33
WOODS
MAINTENANCE
TRANSAXLES
Inattention to proper safety, operation, or
maintenance procedures could result in personal
injury, or damage to the equipment. Woods
recommends returning the machine to your
authorized Woods dealer for service or repair.
Perform transaxle maintenance with the engine off,
spark plug wires disconnected and PTO disengaged.
TRANSAXLE FLUID CHANGE
Change the transaxle fluid every 200 hours of
operation. It is essential that the exterior of the
transaxle be free of debris, prior to fluid maintenance.
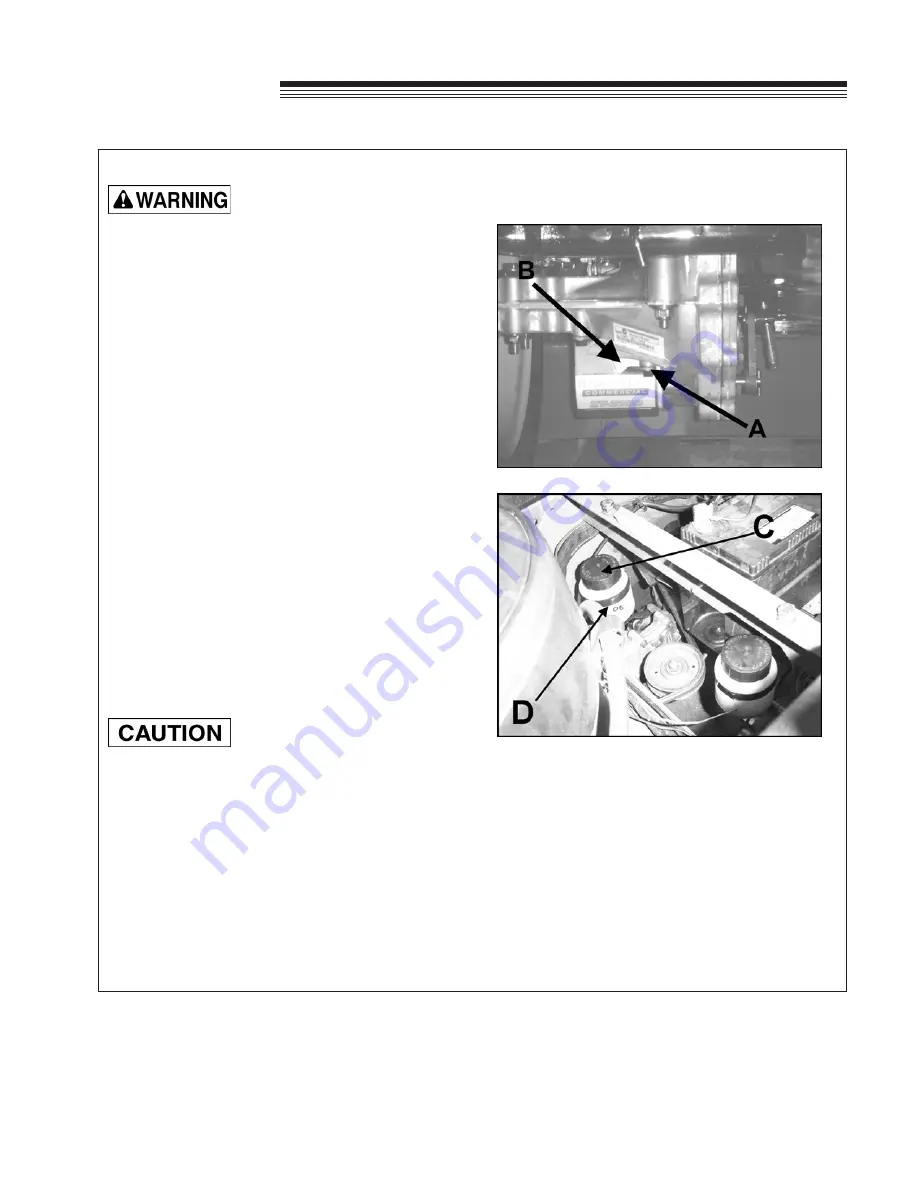
1. Remove the three 1/4" filter guard screws and
filter guard
A
. Remove the oil filter
B
from the
transaxle and discard. Dispose of used oil in ac-
cordance with local requirements.
2. Wipe the filter base surface off and apply a film
of new oil to the gasket of the new replacement
filter. Install the new filter by hand, turn 3/4 to
one full turn after the filter gasket contacts the
filter base surface.
3. Re-install the filter guard and torque the three
screws to 65 in. lbs. each.
4. Remove cap
C
, fill the transaxles through the
expansion tank
D
with approximately 2 quarts of
SAE 20W-50 engine oil PER TRANSAXLE.
Do not overfill! If you overfill the transaxle while the unit
is "cold", it may overflow as it reaches normal operating
temperatures. The oil level should not be above the
manufacturer's suggestions. This will allow the space
needed for the oil to expand as it warms up.
5. After starting engine, check the fluid level and
continue to add oil to overflow tank
D
to fill line
on tank.
6. Purge the transaxles, following the purging pro-
cedures on Page 29.
Summary of Contents for 872311G
Page 15: ...15 WOODS LABELS...
Page 17: ...17 WOODS LABELS...
Page 40: ......
Page 41: ...41 WOODS PARTS SECTION PARTS SECTION...
Page 44: ...44 WOODS 15 24 17 45 45 42 FIGURE 2 TRANSAXLE ASSY...
Page 52: ...52 WOODS FIGURE 6 CASTER ASSEMBLY...
Page 56: ...56 WOODS FIGURE 8 STEERING...
Page 58: ...58 WOODS FIGURE 9 PARKING BRAKE...
Page 66: ...66 WOODS FIGURE 13 BELTS CUTTERDECK...
Page 70: ...70 WOODS FIGURE 16 ACCESSORIES SUSPENSION SEAT 4 3 1 1 2 6 7 5...


