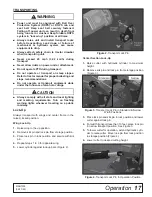
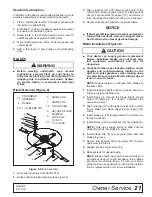
background image

6  Safety

MAN1339 

(05/17/22)

Also, available from the Association of Equipment Manufacturers:

A large variety of training materials (ideal for groups) are available for a nominal 

charge from AEM. Following is a partial list:

Training Package for Rotary Mowers/Cutters-English

Contains: DVD & VHS (English)

Guidebook for Rotary Mowers/Cutters (English)

AEM Industrial/Agricultural Mower Safety Manual (English)

AEM Agricultural Tractor Safety Manual (English)

Training Package for Rotary Mowers/Cutters-English/Spanish

Contains: DVD & VHS (English/Spanish)

Guidebook for Rotary Mowers/Cutters (English/Spanish)

AEM Industrial/Agricultural Mower Safety Manual (English/Spanish)

AEM Agricultural Tractor Safety Manual (English/Spanish)

AEM training packages are available through:

AEM at: 

www.aem.org

or

Universal Lithographers, Inc.

Email: aem@ulilitho.com

800-369-2310 tel

866-541-1668 fax

Summary of Contents for BATWING BW10.71

Page 1: ...OPERATOR S MANUAL OPERATOR S MANUAL Rev 5 17 2022 MAN1339 BATWING ROTARY CUTTER BW15 71 BW15 71Q BW10 71 BW10 71Q...

Page 2: ...eaning and upkeep Lubricate the unit as specified Observe all safety information in this manual and safety decals on the equipment For service your authorized Woods dealer has trained mechanics genuin...

Page 3: ...SERVICING TIRES SAFELY 23 CLEANING 23 TROUBLESHOOTING 24 DEALER SERVICE 25 DEALER SERVICE 25 GEARBOX MAINTENANCE 25 GEARBOX REPAIR 26 SPLITTER GEARBOX REPAIR 28 CROSSBAR REMOVAL 30 CROSSBAR INSTALLATI...

Page 4: ...rs of dependable performance These instructions have been compiled from extensive field experience and engineering data Some information may be general in nature due to unknown and vary ing operating...

Page 5: ...r free at TheAEMStore https youtu be uEWXsDqhDq0 It reinforces the proper procedures to follow while operating your mowing equipment The video does not replace the information contained in the Operato...

Page 6: ...s English AEM Industrial Agricultural Mower Safety Manual English AEM Agricultural Tractor Safety Manual English Training Package for Rotary Mowers Cutters English Spanish Contains DVD VHS English Spa...

Page 7: ...ulic sys tem by operating all hydraulic functions several times Do this before putting into service or al lowing anyone to approach the equipment Make sure all hydraulic hoses fittings and valves are...

Page 8: ...ine or incorrect operating length and can result in personal injury or death TRANSPORTATION Power unit must be equipped with Roll Over Protection System ROPS or ROPS cab and seat belt Keep seat belt s...

Page 9: ...ating in reverse Do not operate or transport on steep slopes Do not stop start or change directions sudden ly on slopes Watch for hidden hazards on the terrain during operation Stop power unit and equ...

Page 10: ...y Decals section for location Make sure shields and guards are proper ly installed and in good condition Replace if damaged Never perform cleaning service or maintenance with engine running Do not dis...

Page 11: ...cals can be ordered free from your Woods dealer To locate your nearest dealer check the Dealer Locator at www WoodsEquipment com or in the United States and Canada call 1 800 319 6637 1 13 9 5 or 6 14...

Page 12: ...shield before operating equipment DANGER 1004114 DO NOT EXCEED PTO SPEED OF WARNING 15922 n PTO speeds higher than 1000 RPM can cause equipment failure and personal injury 1000 n Tractor PTO master sh...

Page 13: ...9 05 17 22 20 mile h SAFETY INSTRUCTIONAL DECALS ATTENTION BECOME ALERT YOUR SAFETY IS INVOLVED Replace Immediately If Damaged 10 PN 33347 16 PN 15502 12 PN 1045604 13 PN 1003751 15 PN 18964 18 PN 611...

Page 14: ...er unit and equipment immediately upon striking an obstruction Turn off engine remove key inspect and repair any damage be fore resuming operation Always wear relatively tight and belted clothing to a...

Page 15: ...drive installed 1 To check for potential excessive turn angle discon nect the driveline from tractor 2 Start engine and turn as far right or left as possible 3 Shut engine off and try to connect CV dr...

Page 16: ...blade speed and to produce a clean cut Under certain conditions tractor tires may roll down some grass and prevent cutting at the same height as the surrounding area When this occurs reduce your grou...

Page 17: ...ng and marking requirements Turn on flashing warning lights whenever traveling on a public roadway Lock Up Always transport with wings and center frame in the raised locked position Wing Lock Up 1 Rai...

Page 18: ...ication information Make sure the PTO slip joint is lubricated and that the gearbox fluid levels are correct Set tractor PTO at correct RPM for your equipment Lubricate all grease fitting locations Ma...

Page 19: ...or or filter mask where appropriate BLOCKING METHOD To minimize the potential hazards of working under neath the cutter follow these procedures Before performing any service or maintenance lower equip...

Page 20: ...pstick Check gearbox oil level daily for evidence of leakage and contact your dealer if leak age occurs Check vent plug periodically and clean if it does not relieve pressure Driveline Lubrication 1 L...

Page 21: ...replacement blades Substitute blades may not meet orig inal equipment specifications and may be dangerous Crossbar rotation has clockwise rotation on left gearbox and counterclockwise rotation on the...

Page 22: ...hrottle and slowly engage PTO and allow clutches to slip for 5 seconds Disengage PTO and turn off tractor engine 4 If clutches slip freely completely loosen nuts 12 5 If clutch does not slip freely di...

Page 23: ...y Use a safety cage if available Check wheels for low pressure cuts bubbles dam aged rims or missing lug bolts and nuts Never remove split rim assembly hardware A with the tire inflated Figure 9 Split...

Page 24: ...speed Lower cutting height Note Set height so blades do not frequently hit ground Recut at 90 to first pass Excessive side skid wear Running with skids continuously on ground Raise cutting height or a...

Page 25: ...s shafts and a housing is not cost effec tive Purchasing a complete gearbox is more economical 2 Inspect gearbox for leakage and bad bearings Leakage is a very serious problem and must be cor rected i...

Page 26: ...front of housing 2 8 Remove input bearing 7 by using a punch and hammer from outside of housing 9 Support housing in vise in a horizontal position 10 The castle nut 15 cotter pin 25 and hub are alread...

Page 27: ...nput oil seal 19 using tube of correct di ameter Be careful not to damage seal lip 18 Press oil cap 20 on to cover the rear of housing using a tube of the correct diameter 19 Place top cover 22 on top...

Page 28: ...place shaft from gearbox 17 Inspect housing and caps for cracks or other damage Assembly 1 Clean housing pay specific attention to areas where gaskets are installed 2 Wash housing and all components t...

Page 29: ...top cover Reinstallation on Cutter NOTE Gearbox is heavy do not attempt to move it without mechanical assistance 1 Place gearbox on cutter and secure into position using four cap screws and lock washe...

Page 30: ...is with bolts 2 and nuts 3 Place pad 4 in nut and thread puller screw 6 into nut from bottom Tighten until pad is solid against gearbox shaft For best results strike head of puller screw with a hammer...

Page 31: ...NT REPAIR Figure 16 U Joint Exploded View U Joint Disassembly 1 Remove external snap rings from yokes in four loca tions as shown in Figure 17 Figure 17 2 With snap rings removed support drive in vise...

Page 32: ...ning yoke 5 Move both yokes in all directions to check for free movement If movement is restricted rap on yokes sharply with a hammer to relieve any tension Repeat until both yokes move in all directi...

Page 33: ...is securely blocked or placed in lowest position and system pressure is released by operating valve levers Always wear relatively tight and belted clothing to avoid getting caught in moving parts Wear...

Page 34: ...SINGLE ROW CHAIN AS INSTALLED FROM FACTORY DOUBLE ROW CHAIN KIT IS AN ADDITION TO STANDARD SINGLE ROW CHAIN SHOWN 1 Raise unit to full height and install transport lock pin See page 17 Refer to page 1...

Page 35: ...proper procedures to be used when mounting dismounting and stor ing equipment Make customer aware of optional equipment available so that customer can make proper choices as required Instruct custome...

Page 36: ...WING CENTER GEARBOX ASSEMBLY 44 SPLITTER GEARBOX ASSEMBLY 45 DRIVE ASSEMBLY CENTER DECK 46 WING 47 540 RPM 1000 RPM FRONT 48 5 BOLT WHEEL TIRE ASSEMBLY 49 LIGHT KIT ASSEMBLY 50 CHAIN SHIELDING REAR 51...

Page 37: ...X REPAIR 1 35 1 1 1 18 1044390 1 SKID SHOE RT 19 1044391 1 SKID SHOE LT 20 1045034RP 2 BLADE PIN W GREASE FITTING 21 1045078 1 DRV 2JT FXD 2400A 1 75 20 3 4CL 22 1863 2 WASHER FLAT 1 REF PART QTY DESC...

Page 38: ...4 90 EL 1 16 RSTR 14 10475 1 3 1 2X8 HYD CYLWBRETHR 15 11817 1 HOSE 25ID X 25NPT X230 REF PART QTY DESCRIPTION 16 11975 1 1 2 NPT VENT PLUG 17 33647 2 PIPE 1 SCH 40 X 0 75 18 52201 2 HOSE 25 ID X 25...

Page 39: ...AIR CCW 1 1 35 W BAG 10 620976RP 1 SKID RIGHT 11 620977RP 1 SKID LEFT 12 631415RP 1 CROSSBAR 13 1002048 1 CLUTCH SHIELD 3 96 5 64 BC REF PART QTY DESCRIPTION 14 1028824RP 2 SPACER 5 16 15 1045034RP 2...

Page 40: ...12 11900 1 NUT LOCK 1 2 NC FLANGE 13 14069 1 HHCS 1 2 NC X 3 1 4 14 14350 2 NUT HEX FLNG LOCK 3 8 NC 15 W70065 2 NUT HEX FLNG 1 4 NC SRTD 16 W301104 2 BOLT CRG 3 8 NC X 1 1 2 ZP ITEMS INCLUDED WITH 5...

Page 41: ...R 25 630706 4 WA PIN 1 0 X 3 81 26 1039950 2 ADJUSTABLE LINK TRUNNION 27 1044895 2 PIN 1 25 X 9 13 28 1044844 3 WA PIN 1 0 X 4 15 29 3489 2 HHCS 1 2 NC X 3 GR5 ZP 30 19710 2 SPR CMP3 25 69 9 52200 31...

Page 42: ...42 Parts MAN1339 05 17 22 TONGUE ASSEMBLY 23 6 37 3 2 26 42 7 38 1 31 28 CD9248 5 39 36 10 40 4 17 16 15 9 19 13 14 35 34 12 41 11 27 40 25 24 24 29 32 8 8 20 22 30 21 33...

Page 43: ...30 1 PIN 50 X 7 63 20 1045704 1 WA HITCH 21 1045818 1 LUG STOP 22 W11267 1 D315 ETC PINTLE RING 23 1637 2 BOLT HEX 1 2 NC X 3 50 GR5 24 1863 2 WASHER FLAT 1 25 2370 1 WSHR 1 62 X 3 X 18 26 4616 1 HHCS...

Page 44: ...60 14 1 Spacer 50 x 60 x 25 1045886 1045886 1045886 1045886 15 2 Snap ring hole D85 DIN472 1045887 1045887 1045887 1045887 16 1 Plug external 3 8 GAS 27326 27326 27326 27326 17 2 Plug 1 2 GAS 1045877...

Page 45: ...4 1031175 1031175 4 Oil seal 45mm x 85mm x 10mm 5 1002494 1002494 6 Snap ring 85 mm dia 6 57471 57471 6 Shim 7 1031176 1031178 2 Pinion gear 8 1031177 1031177 2 Shaft 1 3 4 20 spline wing 9 1031178 1...

Page 46: ...spline includes items 6 through 17 6 1016489 1 Flange yoke 7 57432 4 Friction disc 8 1016490 1 Hub 1 3 4 20 spline includes item 9 9 1016498 1 Lock assembly 10 57443 1 Drive plate 11 1016491 1 Drive...

Page 47: ...g 12 1045586 1 Inner guard half includes items 8 9 11 13 1045584 1 Outer profile sleeve includes items 14 15 14 33347 1 Decal danger guard missing 15 40779 1 Grease fitting 16 40751 1 Inboard yoke REF...

Page 48: ...NSS NSS NSS 2 Spring pin 10 x 90 mm 7 NSS NSS NSS 1 Inner profile 8 NSS NSS NSS 1 Outer profile 9 NSS NSS NSS 1 Inboard yoke 10 NSS NSS NSS 1 Yoke 1 3 4 20 Spline 11 NSS NSS NSS 1 Inner yoke 12 NSS NS...

Page 49: ...1 Grease fitting 15 35317 5 Nut lug 1 2 NF 16 1017088 1 15 rim for pneumatic tire 5 bolt OR 16 1017040 1 6 00 x 9 Solid tire rim hardware 5 bolt OR REF PART QTY DESCRIPTION 16 1039976 1 25 x 8 14 Sev...

Page 50: ...NESS 16 FT MAIN 2 1040275 1 LED AG COMBO LAMP LH 3 1040276 1 LED AG COMBO LAMP RH 4 1040277 1 AG ENHANCER MODULE 5 1045073 1 HARNESS WIRE 3 FT REAR 2 PCS 6 62521 8 NUT LOCK 1 4 NC FLANGE 7 71851 4 BOL...

Page 51: ...6 chain 7 link 2 96 4 38381 5 16 chain 9 link 2 5 1016952 5 16 chain 13 link 50 6 16148 Bolt crg 5 16 NC x 3 4 ZP 8 7 1045655 Nut HFN 5 16 NC Dri Loc patch 8 8 1041087 Screw button head 1 4 NC x 1 0 p...

Page 52: ...5827RP 2 Front center outer radius retainer 25 1044861RP 2 Straight winglet retainer 26 1045075RP 2 Curved winglet retainer 27 1045039RP 2 Front wing straight chain retainer 28 1044839RP 2 Front wing...

Page 53: ...eal kit includes items 2A 2F 2A 2 Cap o ring 2B 1 Pistol seal 2C 1 Rod o ring 2D 1 Cap seal 2E 1 Wiper seal 2F 2 Backup seal 3 N S 1 Cylinder housing rod end 4 N S 1 Piston 5 N S 1 Jam nut 6 N S 4 Cyl...

Page 54: ...6 NS 4 Cylinder tie rid 7 11893 1 1 2 x 1 4 pipe reducer bushing 8 NS 1 Cylinder butt end 9 923 1 4 1 4 x 1 3 4 cotter pin 10 1631 2 1 x 3 5 8 clevis pin REF CENTER 3 5 X 8 PART QTY DESCRIPTION 11 119...

Page 55: ...1 2 Segment 3 1 1 1 4 Segment 4 1 1 Segment 5 1 3 4 Segment REF PART QTY DESCRIPTION A 8811 1 Crossbar puller complete 1 19914RP 2 Crossbar puller clevis 2 3097 4 5 8 NC x 4 1 2 HHCS GR5 3 230 4 5 8 N...

Page 56: ...TICE light kit 5 1045084RP 1 Plate weight box 6 1045088RP 1 WA weight box hinge 7 1045090RP 4 Plate weight box inner 8 1045091RP 1 Plate weight box outer 9 1045095RP 1 WA weight box mount 10 1045624 1...

Page 57: ...unt N S Not serviced 4 7 16 15 14 10 9 2 13 12 CD8791B 1 5 1 5 9 5 1 6 3 11 6 CENTER OF CYLINDER LUG CD6947A Winch Kit Installation 1 Locate and drill one 9 16 hole in each wing as shown Assemble item...

Page 58: ...r dia gram page 20 to take pressure from tires 2 Remove wheel assembly from right spring arm hub assembly from center frame 3 Remove axle hub from right spring arm 4 Install drive type grease fitting...

Page 59: ...0 x 1 13 14 1045884RP 2 Lug shred baffle 15 19162KT 3 Blade 50 x 4 x 25 flat double edge blade kit optional for low horsepower shredding Installation Instructions 1 Install suppled shred kit blades as...

Page 60: ...given to specifications used on hardware defined by SAE J1701 MAR 99 J1701M JUL 96 SAE SERIES TORQUE CHART SAE Bolt Head Identification SAE Grade 2 No Dashes SAE Grade 5 3 Radial Dashes SAE Grade 8 6...

Page 61: ...6 11 8 8 6 11 8 6 x 1 0 8 x 1 25 13 mm 20 15 27 20 21 16 29 22 8 x 1 0 10 x 1 5 16 mm 39 29 54 40 41 30 57 42 10 x 1 25 12 x 1 75 18 mm 68 50 94 70 75 55 103 76 12 x 1 25 14 x 2 0 21 mm 109 80 151 111...

Page 62: ...Standard Pipe Tapered Male CV Constant Velocity CCW Counter Clockwise CW Clockwise F Female FT Full Thread GA Gauge GR 5 etc Grade 5 etc HHCS Hex Head Cap Screw HT Heat Treated JIC Joint Industry Cou...

Page 63: ...2 Specifications 4 Table of Contents 3 Warranty Product 65 Replacement Parts 64 OPERATION Connecting Cutter to Tractor 14 Cutting Height Adjustment 15 CV Driveline Turning Limits 15 Hydraulic Connect...

Page 64: ...e returned to WOODS with proof of purchase within thirty 30 days after such defect or noncompliance is discovered or should have been discovered routed through the dealer and distributor from whom the...

Page 65: ...er this Warranty is limited to at WOODS option the repair or replacement free of charge of the product if WOODS in its sole discretion deems it to be defective or in noncompliance with this Warranty T...

Page 66: ...m 2022 Woods Equipment Company All rights reserved Woods and the Woods logo are trademarks of Woods Equipment Company All other trademarks trade names or service marks not owned by Woods Equipment Com...

Reviews: