Dealer Service
25
MAN1289 (10/18/2019)
adjust output bearings to a rolling torque of 9 to 12
In-lbs.
NOTE:
Be sure output gaskets (10 and 11) are in
place. Apply grease to output seal (16) lip for easy
installation.
8.
Place ball bearing (21) at back of housing and
press in socket using a round tube of the correct
diameter and a hand press until fully seated.
9.
Insert input shaft (5) part way through housing and
slide gear (3) and retaining ring (6) over input shaft
(5). Keep gear (3) and retaining ring (6) loose.
10.
Insert input shaft (5) into roller bearing (21) until
seated against each other.
11.
Slide gear (3) forward and attach retaining ring (6)
in groove closest to front of input shaft (5). Slide
gear (3) back against retaining ring (6).
12.
Check that the gear backlash is between 0.006"
and 0.016". You should not have to adjust the
backlash.
13.
Slide gear spacer (7) and ball bearing (20) on input
shaft (5) and secure with retaining rings (6) and (8).
14.
Slide input seal (4) onto input shaft (5) and press
into housing flush with front using a tube of correct
diameter. Be careful not to damage seal lip.
15.
Check gearbox housing for leaks by plugging all
holes except one. Apply 4 psi compressed air and
immerse the gearbox in water to verify that there
are no leaks.
Remove gearbox from water and dry off with com-
pressed air. Add SAE 80W or 90W EP oil until it runs
out of side level hole. Tighten all plugs.
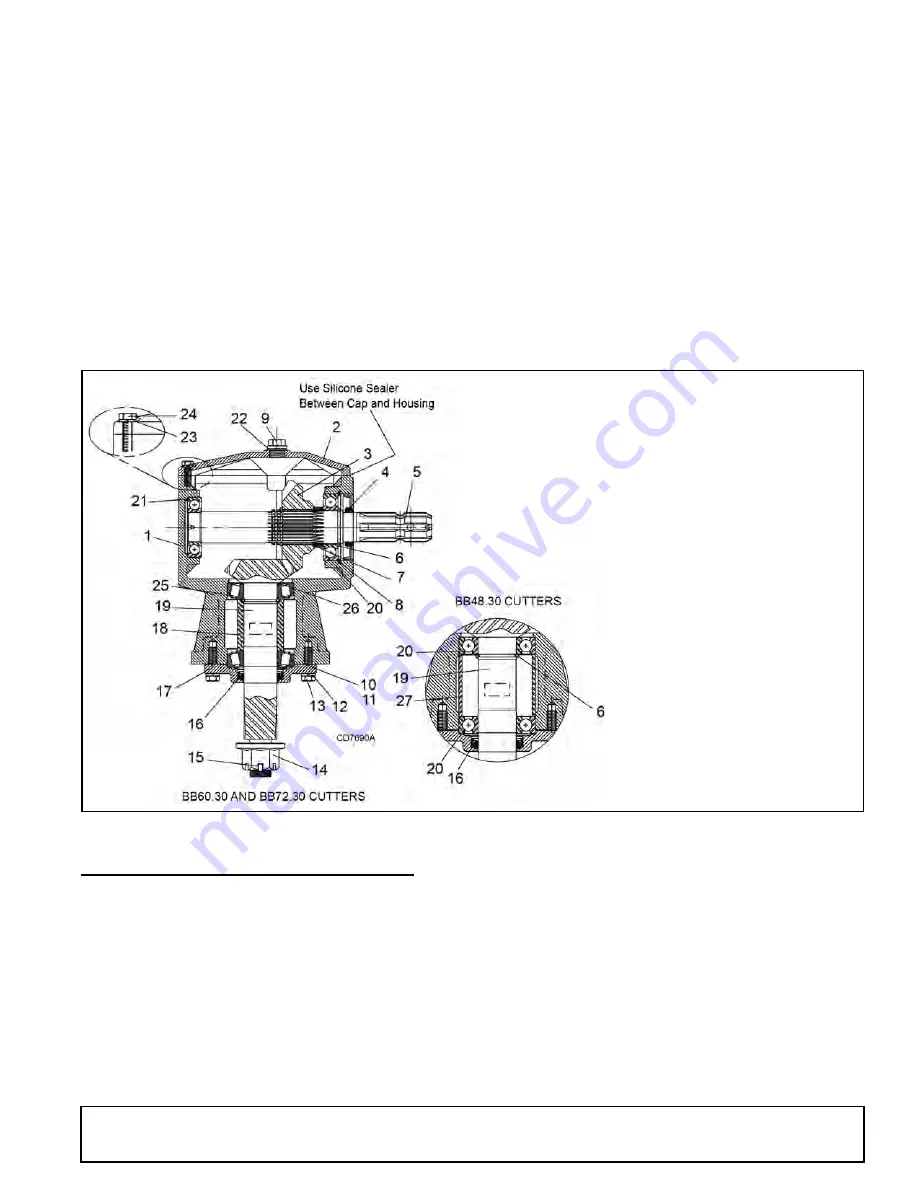
Figure 17
. BB48.30, BB60.30, BB72.30 Gearbox Assembly
SPINDLE GEARBOX REPAIR - BB84.40
(Figure 18)
NOTE:
Replacing gears, shafts, bearings, and seals
may not be cost effective. Purchasing a complete gear-
box may be more economical.
Remove Gearbox from Cutter
1.
Disconnect and remove the driveline from the
gearbox.
2.
Remove vent plug (3) and siphon gear lube from
housing through this opening.
3.
Remove cotter pin, washer, and nut from vertical
shaft and remove crossbar. Hydraulic jack will not
operate if tipped more than 90-degrees. Use care
to prevent bending crossbar during removal. See
page 27.
4.
Remove the four bolts that attach gearbox to cutter
and remove gearbox. Gearbox is heavy; do not
attempt to move without mechanical assistance.
Disassemble Gearbox
1.
Remove 3/8" plug from side of gearbox and pour
out gear oil.
2.
Remove oil cap (24) (to be replaced).
1.
Housing
2.
Inspection cover
3.
22 Tooth gear
4.
Input seal
5.
Input shaft
6.
Retaining ring
7.
Gear spacer
8.
Retaining ring
9.
Vent Plug and Washer
10.
Output gasket (0.30)
11.
Output gasket (0.13)
12.
Lock washer
13.
M10 x 1.5 x 25 Cap screw
14.
1" - 14 Slotted flange nut
15.
Cotter pin
16.
Output seal
17.
Output cap
18.
Output bearing spacer
19.
Output shaft & pinion
20.
Ball bearing
21.
Ball bearing
22.
Sealing washer
23.
M8 Lock washer
24.
M8 x 1.5 x 25 Cap screw
25.
Bearing Cup and Cone
26.
Shim Kit
27.
Output Bearing Spacer


