30
Dealer Service
MAN1313 (3/3/2021)
13.
Slide spacer (12) over input shaft (3) and press
bearing onto input shaft (3), using a round tube of
the correct diameter and a hand press.
14.
Slide shim (13) over input shaft (3) and secure with
snap ring (10).
15.
Check input shaft end float by moving the input
shaft (3) by hand. If end float is higher than 0.012”,
insert shim between input shaft (3) and rear
bearing (7). Repeat until end float is less than
0.012”. Check rotational torque by hand. The
torque should be less than 2.2 lbs-inch.
16.
Check that the gear backlash is between 0.006”
and 0.016”. You should not have to adjust the
backlash.
17.
Press in input oil seal (19), using tube of correct
diameter. Be careful not to damage seal lip.
18.
Press oil cap (20) on to cover the rear of housing,
using a tube of the correct diameter.
19.
Check gearbox housing for leaks by plugging all
holes except one. Apply 4 psi compressed air and
immerse the gearbox in water to verify that there
are no leaks..
20.
Remove gearbox from water and dry off with
compressed air. Add SAE 80W or 90W EP oil until
it runs out of side level hole. Tighten all plugs.
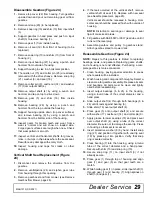
Install Gearbox (Figure 24)
IMPORTANT:
Gearbox is heavy; do not attempt to
move without mechanical assistance.
1.
Install drive sheave (48) and key (71) on gearbox
output shaft.
2.
Install sleeve (49), washer (50), and castle nut (52)
on gearbox output shaft. Torque castle nut to 170
lb-ft. Install cotter pin (51) through castle nut and
gearbox output shaft.
3.
Slide gearbox onto gearbox stand. When gearbox
is installed on mower, dimension A (from the top of
mower deck to the center line of the drive pulley)
must be 2-3/4” (±1/8”).
This is a critical
dimension and must be carefully adjusted for
proper belt life.
Add or subtract shim washers
under idler sheave to align with drive sheave. See
Figure 25.
4.
Install carriage bolts (25) and new flange lock nuts
(8) through gearbox base. Torque nuts to 175 lb-ft.
5.
Install belt into drive sheave groove and route
around backside idler on idler arm. See Figure 17.
6.
Grasp belt with both hands between the left spindle
sheave and the idler arm. Pull on belt to rotate idler
arm and slip belt over left spindle sheave. Carefully
release belt, ensuring proper seat in left spindle
sheave groove. Ensure belt is properly seated in all
sheave grooves.
7.
Reinstall belt shields and retain with thumb screws.
8.
Install drive shield (35) over gearbox input shaft.
9.
Install flange head cap screws (36) through drive
shield and into gearbox housing. Carefully snug
hardware.
10.
Use SAE 80W or 90W gear lube to fill gearbox.
11.
Reinstall vent/dipstick (24) and reconnect driveline
to gearbox input shaft.
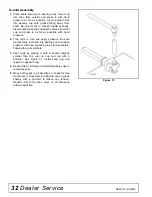
Figure 25
. Drive Sheave Installation
FILL GEARBOX
1.
Make sure vent/dipstick hole is clear. Fill gearbox
half-full with high quality gear oil that has a
viscosity index of 80W or 90W and an API service
rating of GL-4 or GL-5.
2.
Pour in one pint of gear oil. Wait five minutes, then
add additional gear oil until it just comes out of
gearbox side hole. Gearbox holds approximately 4
pints.
3.
Allow an additional five minutes for the oil to flow
through bearings, then make sure oil level is at
bottom side hole. Replace side plug. Install vent
plug.
UNIVERSAL JOINT REPAIR
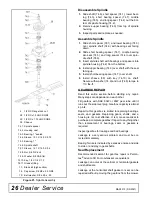
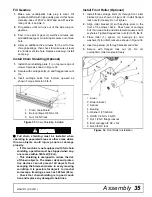
Figure 26
. U-Joint Exploded View
1. Yoke
2. Cup and bearings
3. Snap ring
4. Journal cross

