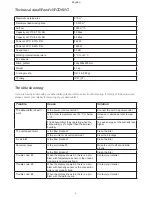
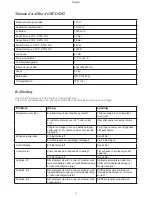
background image

4

Thank you

Thank you for choosing a Wood’s 

dehumidifier. You are one of more 

than 300.000 people who have cho-

sen a Wood’s dehumidifier to prevent 

damages from excessive moisture 

and mould. Originating in Canada 

in 1950, Wood’s has more than 60 

years experience of developing and 

manufacturing dehumidifiers. When 

choosing a Wood’s dehumidifier 

you’ll get a unit with great quality, 

high capacity and that will extract the 

most litres per consumed kWh.

Wood’s WCD6HG  

The Wood’s WCD6HG is a very 

powerful and sturdy dehumidifier, 

suitable for both professional and 

domestic use. The WCD6HG can be 

used in many different areas, such 

as building sites, basements, laundry 

rooms and other large areas. 

Workings of your  
dehumidifier

The Wood’s WCD6HG is a compres-

sor dehumidifier. As the air is drawn 

through the dehumidifier by the fan, 

the air passes over the compressor 

cooled copper coils. The coils cool 

down the water vapour, separating 

the water from the air.

The water drips down from the coils 

and is drained away with the water 

hose. Left is the dry air that is exhau-

sted in the room. As the dehumidifier 

condensates the water vapour, heat 

energy is released. That is why a 

compressor dehumidifier will exhaust 

warm, dry air that is extra beneficial 

for drying clothes, laundry, wood etc.

A compressor dehumidifier is the 

most energy efficient way to remove 

excess moist and bad odour. Keep 

the relative humidity level between 

50% and 60% to maintain a safe and 

healthy indoor environment.  

1. Security warnings

Please read these security  

warnings before using the unit:

1. Unplug the unit from its power 

supply before cleaning, storage or 

maintenance of its filter.

2. Always keep a safe distance from 

water sources.

3. Do not let the machine near heat 

equipment or inflammable or dang-

erous goods

4. Do not put fingers or other  

objects into air inlet or air outlet.

5. Do not stand on the machine.

6. Always drain the water  

according to the instructions.

7.If the power cable is damaged, it 

must be replaced by qualified  

personnel.

2. Installation and  
placement

Wood’s dehumidifiers are easy to 

move around, but bare in mind the 

following.

•  The dehumidifier should not be 

placed near radiators or other 

heat sources or exposed to direct 

sunlight, as it will reduce its perfor-

mance.

•  Keep at least 25cm distance from 

walls and other obstructions to 

maximize the air flow.

•  For optimum performance, place 

the dehumidifier in the middle of 

the room.

•  Make sure that the air flow from the 

inlet and outlet isn’t blocked

Installation:

1. Place the dehumidifier on a flat 

and solid ground, preferably in the 

middle of the room.

2. Connect the included water hose 

to the connection on the side of the 

unit. Please see the section about 

water drainage.    

3. Close all windows and ventilators 

in the room. Otherwise, moist air 

from the outside will continue to flow 

into the room.

4. Connect the dehumidifier to a 

grounded power outlet.

3. Using the WCD6HG

Hygrostat controlled

The unit will run only when the 

ambient humidity exceeds your set 

value. 

Automatic restart 

In the event of a power failure, the 

unit will continue to work according to 

your latest settings once the power 

returns. 

Automatic defrost

The unit has a hot gas defrost sys-

tem and can be used in colder areas, 

without ice forming on the cooling 

coils. The unit will defrost automa-

tically when needed and resume to 

work when the defrost is completed. 

When defrosting, the compressor and 

fan shuts off and the defrost symbol 

is shown on the control panel. 

Low temperature function

If the temperature drops below 0°C, 

the unit automatically shuts off to 

prevent ice forming on the cooling 

coils. The unit will restart when the 

temperature rises.

A. Operating instructions

1.Starting the dehumidifier 

Press the ON/OFF key to start and 

stop the unit. When the unit is turned 

on, the ambient humidity level is 

shown in the display.

2. Set humidity 

Press the ADD and MINUS keys to 

increase or decrease the desired 

humidity in 5% intervals. 

The set value is shown in the display 

for a few seconds. After, the display 

returns to show the ambient humidity 

level.

3. Set timer

Press the TIME/PUMP key once 

to set the timer for automatic start. 

Press the key again to set the timer 

for automatic shut off. 

Set desired time in 1-hour intervals 

with the ADD and MINUS keys. 

When set, the time for start and stop 

are shown in the display.  

English

Summary of Contents for WCD6HG

Page 1: ...Wood s dehumidifierWCD6HG Users manual...

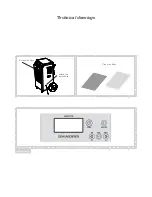
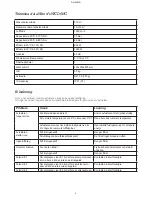
Page 2: ...Technical drawings Control panel Access the filter Attach the water hose Clean the filter...

Page 3: ...anual in a safe place for future reference and product warranty www woodseurope com Users manualWood s dehumidifierWCD6HG Table of contents 2 Technical drawings 4 English 7 Swedish 10 Danish 13 Norweg...

Page 4: ...sy to move around but bare in mind the following The dehumidifier should not be placed near radiators or other heat sources or exposed to direct sunlight as it will reduce its perfor mance Keep at lea...

Page 5: ...The air filter The air filter prevents dust and dirt from entering the machine prolong ing its life expectancy It is very important that the filter is cleaned regularly otherwise the dehumidifier mig...

Page 6: ...or the connec tion wire is not properly fixed Contact your retailer Trouble code E2 When the display shows E2 there is a pro blem with humidity sensor or the connection wire is not properly fixed Con...

Page 7: ...s avfuktare r enkla att flytta runt men t nk p f ljande Avfuktaren ska inte placeras n ra element eller andra v rmek llor d det kan s nka avfuktaren kapacitet H ll minst 25cm avst nd fr n v gg ar och...

Page 8: ...llt vatten pumpats ut Pumpa ut vattnet manuellt f re f rva ring eller flytt av avfuktaren 5 Luftfiltret Luftfiltret f rhindrar damm och smuts fr n att ta sig in i avfuktaren och f rl nger dess livsl n...

Page 9: ...et fel p temperatursen sorn eller s r den inte korrekt ikopplad Kontakta din terf rs ljare Felkod E2 Om displayen visar E2 r det fel p fuktsensorn eller s r den inte korrekt ikopplad Kontakta din terf...

Page 10: ...r heden af varmeapparater eller an dre varmekilder eller uds ttes for direkte sollys da dette vil reducere enhedens ydeevne Hold en afstand p mindst 25 cm fra v gge og andre forhindringer for at maks...

Page 11: ...ing eller flytning af enheden 5 Luftfiltret Luftfiltret forl nger enhedens levetid ved at forhindrer st v og snavs i at tr nge ind i maskinen Det er meget vigtigt at filtret renses regelm ssigt ellers...

Page 12: ...ift temperaturf leren eller kon troll r at forbindelsesledninger er monteret korrekt Fejlkode E2 N r displayet viser E2 er der et problem med fugtighedsf leren eller en forbindelsesledning er ikke ord...

Page 13: ...flytte rundt men merk deg f lgende Luftavfukteren b r ikke plasseres n r radiatorer eller andre varmekil der eller bli utsatt for direkte sollys det vil redusere maskinens effekt Plasser minst 25 cm f...

Page 14: ...ftfilteret forhindrer st v og skitt fra komme inn i maskinen og dermed forlenge dens forventede levetid Det er meget viktig at filteret er rengjort regelmessig ellers kan luftavfukteren miste kapasi t...

Page 15: ...g Skift temperatursensoren eller sjekk at kabelen er festet godt nok Feilkode E2 N r displayet viser E2 er det et problem med fuktighetssensoren eller at kabelen er ikke festet tilstrekkelig Skift fuk...

Page 16: ...tzen 2 Platzierung und Installation Wood s Entfeuchter sind sehr trans portierfreundlich aber beachten Sie folgendes Der Entfeuchter sollte nicht in der N he eines Radiators oder einer anderen W rmequ...

Page 17: ...wegen 5 Der Luftfilter Der Luftfilter verhindert dass Staub und Dreckpartikel in die Maschine gelangen und verl ngert dadurch die Lebenserwartung Ihres Luftentfeuch ters Wichtig Bitte reinigen Sie den...

Page 18: ...en Sie ob das Verbinduns kabel richtig fixiert ist Fehlermeldung E2 Wenn das Display E2 anzeigt gibt es ein Pro blem mit dem Feuchtesensor oder das Verbin dungskabel ist nicht richtig angeschlossen We...

Page 19: ...Les d shumidificateurs Wood s sont faciles d placer mais en respectant les consignes suivantes Le d shumidificateur ne doit pas tre plac pr s des radiateurs ou autres sources de chaleur ou bien expos...

Page 20: ...uis s arr ter Refaire l op ration jusqu ce que toute l eau soit vacu e Il est important d vacuer l eau ma nuellement avant l entreposage ou le d placement de l appareil 5 Le filtre air Le filtre air e...

Page 21: ...u fil de connexion Trouble code E2 Le code E2 s affiche sur l cran Lorsque le code E2 apparait sur l affichage c est qu il y a un probl me avec la sonde d humidit ou bien que le fil de connexion n est...

Page 22: ...st omdat hierdoor het prestatievermogen vermindert Het helpt als u een radiator of een ventilator met verwarming gebruikt om de temperatuur boven de 5 C te houden Het ontvochtigingsapparaat moet tenmi...

Page 23: ...oer het water hand matig af en maak het filter schoon Berg het apparaat in een doos op of bedekt het om te voorkomen dat er zich stof in ophoopt Rol het elektrici teitssnoer op en berg het in de ruimt...

Page 24: ...Ijsvorming op de koelslangen Verwijder het luchtfilter aan de achterkant van het ontvochtigingsapparaat en con troleer of zich daar geen stof of pluisjes bevinden die de luchtstroom door de machine he...

Page 25: ...uiente en cuenta El deshumidificador no tiene que ser colocado cerca de radiadores o fuentes expuestas directamente a la luz del sol lo que podr a reducir su rendimiento Dejar un m nimo de 25 cm entre...

Page 26: ...rar en el deshumidifica dor lo que prolonga su esperanza de vida Es muy importante que el filtro de aire sea limpiado con fre cuencia En el caso contrario el deshumidificador podr a per der eficacia y...

Page 27: ...con el sensor de temperatura o la conexi n Cambiar el sensor de humedad o comprobar su conexi n Codigo de error E2 Cuando el panel de control indica E2 hay un problema con el sensor de humedad o la c...

Page 28: ...pozycjonowanie Osuszacze Wood s s atwe do pr zemieszczania ale nale y wzi pod uwag e Urz dzenia nie nale y ustawia w pobli u grzejnik w czy innych r de ciep a lub wystawia na dzia anie promieni s one...

Page 29: ...a wody b dzie dzia a na 20 sekund przed zatrzymaniem Powtar zaj ca procedur a woda zostanie spuszczona do ko ca Spu ci wod r cznie przed d ugotr wa ym magazynowaniem lub prze noszeniem urz dzenia 5 Fi...

Page 30: ...b z pr zewodem zasilania kt ry nie jest prawid owo pod czony Zmie czujnik temperatury lub sprawd czy przew d jest prawid owo pod czony Kod b du E2 Gdy na wy wietlaczu pojawi E2 jest problem z czujniki...

Page 31: ...arinkimas Wood s oro sausintuvai yra lengvai kilnojami ta iau prisiminkite kad prietaisas netur t b ti statomas alia radiatori ar kit ilumos al tini Taip pat jis yra pa eid iamas tiesiogin s saul s vi...

Page 32: ...vanden reikia i leisti rankiniu b du 5 Oro filtras Oro filtras apsaugo nuo dulki ir ne varum patekimo prietais prail gina jo veikim Labai svarbu kad filtras b t reguliariai valomas kitaip oro sausintu...

Page 33: ...idas yra tinkamai statytas Problemos kodas E2 Ekrane pasirodo E2 esant problemai su dr gm s davikliu arba jungties laidas n ra tinkamai statytas Pakeiskite dr gm s davikl arba patikrinkite ar jungties...

Page 34: ...adz tu novietot blak m radiatoriem vai citiem siltuma avotiem vai novietot tie os saules staros jo tas samazi na iek rtas veiktsp ju Iek rtu novietojiet vismaz 25cm prom no sien m un citiem r iem lai...

Page 35: ...uzglab t iek rtu vai to p rvietot 5 Gaisa filtrs Gaisa filtrs aiztur putek u un net rumu iek anu iek rt t dej di paildzinot t s dz ves ciklu Ir oti svar gi ka gaisa filtrs tiek t r ts regul ri cit d...

Page 36: ...eizi nofiks ts Probl mas kods E2 Kad uz displeja atspogu ojas E2 or probl ma ar mitruma sensoru vai piesl guma vads nav pareizi nofiks ts Nomainiet mitruma sensoru vai p r baudiet ka savienojums ar va...

Page 37: ...atoarele Wood s sunt u or de transportat v rug m s lua i n considerare urm toarele Dezumidificatorul nu trebuie ampla sat n apropierea radiatoarelor sau n apropierea unei surse de c ldur sau a luminii...

Page 38: ...e termen lung a dezu midificatorului 5 Filtrul de aer Filtrul de aer stopeaz p trunderea prafului n unitate prelungind n acest fel via a dezumidificatorului Este foarte important s cur a i filtrul dez...

Page 39: ...sau conexiunea acestuia este ntrerupt Inlocui i senzorul de temperatur sau verifica i cablul de alimentare Eroare E2 Atunci c nd unitatea afi eaz E1 exist o problem cu senzorul de umiditate sau conex...

Page 40: ...recycl avec les d chets domestiques courants Ce symbole de poubelle figurant sur un produit ou le manuel indique que le produit concern doit tre recycl s par ment Cela permet de r duire l impact de pr...

Page 41: ......

Page 42: ......

Page 43: ......

Page 44: ...Contact Wood s is marketed and distributed by TES Scandinavia AB Kroksl tts fabriker 30 431 37 M lndal Sweden 46 0 31 761 36 10 www woodseurope com info woods se...

Reviews: