background image

-16-

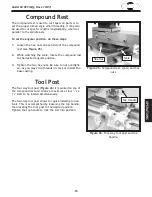
Df[\cD('00D]^J`eZ\('&'. 

FG

<

I

8

K@FEJ

Dflek`e^:_lZbfi

=XZ\gcXk\

=`^li\/%

Spindle.

Clean, de-burr, and oil threads 

and all mating surfaces shown.

=`^li\.%

Inserting chuck keys to loosen or 

tighten the chuck onto the spindle.

The three-jaw scroll chuck will automatically self-center 
the workpiece. It has hardened steel external jaws 
that hold the workpiece on the outside diameter of the 
part. An extra set of jaws is included for holding larger 
workpieces on the inside diameter of the part. 

The four-jaw chuck has hardened steel jaws that must be 
independently adjusted to center the workpiece. Each jaw 
can be removed from the chuck body and reversed for 
clamping odd-shaped workpieces. 

If either chuck cannot hold your workpiece, the cast-iron 
faceplate has slots for T-bolts that hold standard or cus-
tom clamping fixtures. With the correct clamping hard-
ware, this faceplate will hold non-cylindrical parts such as 
castings.

Both chucks and the faceplate are removed and installed 
the same way.

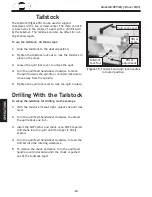
Kfi\dfm\Xe[`ejkXcck_\Z_lZbfi]XZ\gcXk\#[fk_\j\
jk\gj1

(%

DISCONNECT POWER TO THE LATHE!

)%

Lay a piece of plywood over the bedways to protect 
the precision-ground way surfaces.

*

.  Use a 5mm hex wrench to remove the two cap 

screws and the chuck locks (

=`^li\-

).

+

.  Insert the chuck keys as shown in 

=`^li\.

, hold the 

spindle, and loosen the chuck.

Efk\1

K_\Z_lZbcffj\ej`ek_\Zflek\iZcfZbn`j\

[`i\Zk`fe%

,

.  Support the chuck from falling off of the spindle; 

unscrew and remove the chuck. 

-

.  Clean, inspect, deburr, and lightly oil all threads and 

mating surfaces (

=`^li\/

). 

.

.  Install the faceplate or the other chuck in the 

reverse order of the previous steps.

=`^li\-%

Cap screw, chuck lock and lock 

hole.

Cap Screw

Spindle Lock Hole

Chuck Lock

Summary of Contents for SHOP FOX M1099

Page 1: ...ENG I 7GJ6GN 7N LDD9HID8 CI GC6I DC6A C8 G K H 9 B6N IG L6GC C CD EDGI DC D I H B6CJ6A B6N 7 G EGD9J8 9 C 6CN H 6E DG DGB L I DJI I LG II C 6EEGDK6A D LDD9HID8 CI GC6I DC6A C8 Eg ciZY c 8 cV BD9 A B M 7 C8 IDE A6I 8G DLC G H B6CJ6A DG BD9 AH B6CJ 68IJG 9 H C8 ...

Page 2: ...m Z j Zlkk e jXe e i e e kffc ek i kp Xe k_ ljX f g ijfeXc gifk Zk m hl gd ek K_ dXel XZkli i n cc efk Y _ c c XYc fi ealip fi gifg ikp XdX ifd e c eZ dgifg i kiX e e dXZ_ e df ZXk fej fi d jlj Jfd ljk Zi Xk Yp gfn i jXe e jXn e i e e i cc e Xe fk_ i ZfejkilZk fe XZk m k j ZfekX ej Z_ d ZXcj befne kf k_ JkXk f Xc fie X kf ZXlj ZXeZ i Y ik_ Zkj fi fk_ i i gif lZk m _Xid Jfd oXdgc j f k_ j Z_ d ZXcj...

Page 3: ...ate 19 Tailstock 20 Drilling With the Tailstock 20 Cutting Shallow Tapers with Tailstock 21 Aligning Tailstock 22 Centers 23 Steady Rest 24 Follow Rest 24 Compound Rest 25 Tool Post 25 Manual Feed Handwheels 26 Determining Correct Spindle RPM 27 Spindle RPM 28 Power Feed Rate 29 Inch Threads 30 Metric Threads 31 D8 EK E8E Basic Maintenance 32 General Lubrication 32 Belt Adjustment or Replacement 3...

Page 4: ...rmation for safety setup operation maintenance and service of this product We stand behind our machines In the event that questions arise about your machine please contact Woodstock International Technical Support at 360 734 3482 or send e mail to k Z_ jlggfik7j_fg fo Y q Our knowledgeable staff will help you troubleshoot problems and process warranty claims If you need the latest edition of this ...

Page 5: ... 3 Df c D 00 D J eZ EKIF L K FE 02 0 6 23 2 1 7 KN Q V XZ Z Z Q Z _Z Q Z K Z Z z Z z Z Z V VZ z Z Q N V Z Q _ _ Z ...

Page 6: ... 4 Df c D 00 D J eZ EKIF L K FE Q _ _ Q Q Q Z _ Z _ K K Z N K V _ V Z Z Z V Z K Z z V z N z Z V _ Q K Q z Q z _ z _ z Z Z Z Z Z ...

Page 7: ... U T S R Q P O N M L K J I H G F E D C B A C Chip Tray D Thread Dial E Half Nut Lever F Cross Feed Handwheel G Carriage Feed Handwheel H Lead Screw I Threading Dial Alpha J Gearbox Oil Level Sight Glass K Threading Dial Numeric L Change Gear and Belt Safety Cover I 8 Xe le ijkXe k_ j ek i ejkilZk fe dXelXc Y fi lj e k_ dXZ_ e J i flj g ijfeXc ealip dXp fZZli jX kp Xe fg iXk feXc e fidXk fe j efk l...

Page 8: ...ip footwear to avoid accidental slips which could cause a loss of workpiece control 8I E GIFK K FE Always wear hearing protection when operating or observing loud machinery Extended exposure to this noise without hearing protection can cause permanent hearing loss D EK8C 8C IKE JJ Be mentally alert when running machinery Never operate under the influence of drugs or alcohol when tired or when dist...

Page 9: ...ry or accidental contact with cutting tool may occur if machine is tipped Machine may be damaged JK89C D8 E Unexpected movement during operations greatly increases the risk of injury and loss of control Verify machines are stable secure and mobile bases if used are locked before starting FI E D8 E IP Do not force machine It will do the job safer and better at the rate for which it was designed 8NB...

Page 10: ...imes its own diameter Always turn long stock at slow speeds J8 C 8I8E J Workpieces that crash into other components on the lathe may throw dan gerous projectiles in all directions leading to impact injury and damaged equipment Before starting the spindle make sure the workpiece has adequate clearance by hand rotating it through its entire range of motion Also check the tool and tool post clearance...

Page 11: ... full load current rating is the amperage a machine draws at 100 of the rated output power On machines with multiple motors this is the amperage drawn by the largest motor or sum of all motors and electrical devices that might operate at one time during normal operations lcc CfX lii ek IXk e Xk M 8dgj K_ dXZ_ e dljk Y gifg icp j k lg Y fi k j jX kf fg iXk F EFK Zfee Zk k_ j dXZ_ e kf k_ gfn i jfli...

Page 12: ...CEPTACLE li 1 NEMA 5 15 plug receptacle fi M fee Zk fe We do not recommend using an extension cord with this machine Extension cords cause voltage drop which may damage electrical components and shorten motor life Voltage drop increases with longer extension cords and the gauge smaller gauge sizes higher gauge numbers indicate smaller sizes Any extension cord used with this machine must contain a ...

Page 13: ... Three Jaw Chuck Internal Jaw Set 1 D Three Jaw Chuck Key 1 E Four Jaw Chuck Key 1 F Oil Bottle 1 G Cross Feed Handle 1 H Carriage Feed Handle 1 I Dead Centers MT 3 MT 4 1 EA J Change Gear Set all other change gears installed Change Gear 36 tooth 1 Change Gear 40 tooth 1 Change Gear 44 tooth 1 Change Gear 45 tooth 1 Change Gear 46 tooth 1 Change Gear 48 tooth 1 Change Gear 52 tooth 1 Change Gear 6...

Page 14: ...cfj e Xe cfZb e Xcc ekiXeZ j n_ e pfl Xi XnXp E M I Xccfn lekiX e m j kfij e pfli j_fg n_ e Xjj dYc e X aljk e fi fg iXk e hl gd ek c Xe e DXZ_ e The bed and other unpainted parts of your lathe are coated with a waxy grease that protects them from corrosion during shipment Clean this grease off with a solvent cleaner or citrus based degreaser DO NOT use chlorine based solvents such as brake parts ...

Page 15: ...k 1 Pfl dXp _Xm kf jc _kcp ifkXk k_ Z_lZb Yp _Xe kf e X k_ Xij Push the green power button then turn the motor direction dial to FWD The top of the chuck should now be turning toward you Push the emergency stop button The lathe should stop If not disconnect power and refer to KiflYc j_ffk e on GX Return the motor direction dial to STOP reset the emergency stop button restart the lathe and let the ...

Page 16: ...the next highest RPM and then run the lathe for 10 minutes Repeat Jk g 0 for the rest of the speeds progres sively increasing the speed Change the lubricant in the headstock with Mobil DTE Oil or an equivalent and re lubricate the lathe Refer to e iXc ClYi ZXk fe on GX for steps and locations ...

Page 17: ...his section are written with the understanding that the operator has the necessary knowledge and skills to operate this machine Xk Xep k d pfl Xi og i eZ e Zlck j g i fid e Xep fg iXk fe jkfg lj e k_ dXZ_ e If you are an inexperienced operator we strongly recom mend that you read books trade articles or seek train ing from an experienced lathe operator before perform ing any unfamiliar operations ...

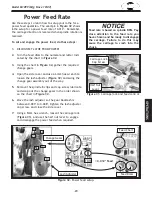
Page 18: ...late has slots for T bolts that hold standard or cus tom clamping fixtures With the correct clamping hard ware this faceplate will hold non cylindrical parts such as castings Both chucks and the faceplate are removed and installed the same way Kf i dfm Xe ejkXcc k_ Z_lZb fi XZ gcXk f k_ j jk gj1 DISCONNECT POWER TO THE LATHE Lay a piece of plywood over the bedways to protect the precision ground w...

Page 19: ...urfaces Set the old jaws aside in a safe place free of mois ture and abrasives Rotate the chuck key clockwise until you see the tip of the scroll gear lead thread just begin to enter jaw guide 1 see li Insert jaw 1 into jaw guide 1 and hold the jaw against the scroll gear Rotate the chuck key clockwise one turn to engage the tip of the scroll gear lead thread into the jaw To verify the jaw is enga...

Page 20: ...irst jaw continue tightening the opposing jaw Frequently check the dead center alignment to make sure you have not wandered off your index point due to applying too much pressure to a single jaw After the workpiece is held in place back the tailstock away and rotate the chuck by hand The center point will move if the workpiece is out of center Make fine adjustments by slightly loosening one jaw an...

Page 21: ...is applied to hold the workpiece in place Efk 1 g e e fe k_ nfibg Z jfd X k feXc jlggfik dXp Y e Secure the workpiece with a minimum of three inde pendent clamping devices Failure to follow this step may lead to deadly injury to yourself or bystanders Take into account rotation and the cutting forces applied to the workpiece when clamping to the face plate DXb jli pfli ZcXdg e Xggc ZXk fe n cc efk...

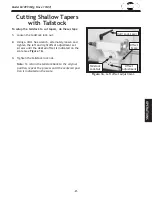
Page 22: ...counterclockwise to move away from the spindle Tighten the quill lock lever to lock the quill in place Kf j klg k_ kX cjkfZb fi i cc e f k_ j jk gj1 With the tailstock locknut tight unlock the quill lock lever Turn the quill feed handwheel clockwise to extend the quill about one inch Insert the MT 3 arbor and chuck or an MT 3 tapered drill shank into the quill until the taper is firmly seated Turn...

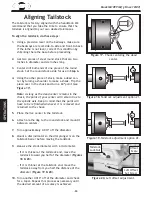
Page 23: ...X cjkfZb kf Zlk kXg ij f k_ j jk gj1 Loosen the tailstock lock nut Using a 4mm hex wrench alternately loosen and tighten the left and right offset adjustment set screws until the desired offset is indicated on the scale see li Tighten the tailstock lock nut Efk 1 Kf i klie k_ kX cjkfZb YXZb kf k_ fi eXc gfj k fe i g Xk k_ gifZ jj lek c k_ Z ek i gfj k fe j e ZXk fe k_ jZXc ...

Page 24: ...ek i i dX ej e k_ Z_lZb k_ gf ek f pfli Z ek i n cc i dX e kil kf k_ jg e c Xo j B g e d e k_Xk k_ gf ek n cc _Xm kf Y i e j_ n_ e m i k j i dfm Xe i klie kf k_ Z_lZb Place the live center in the tailstock Attach a lathe dog to the round stock and mount it between centers Turn approximately 0 010 off the diameter Mount a dial indicator so the dial plunger is on the tailstock barrel before moving t...

Page 25: ...e Lock the quill into place once the dead center and the workpiece rotate together The quill may need to be adjusted during operation To remove the dead center retract the quill until the dead center pops free Kf ejkXcc Xe DK X Z ek i e k_ jg e c f k_ j jk gj1 DISCONNECT POWER TO THE LATHE Remove the chuck from the spindle Install the MT 4 dead center in the spindle Attach the faceplate to the spi...

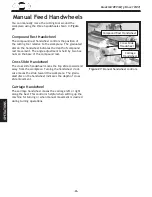
Page 26: ...inger lock nuts Lubricate the finger tips with an anti seize lubricant during operation After prolonged use the fingers will show wear Either mill or file the tips for a new contact surface li Steady rest Finger Adjustment Knob Steady Rest Lock Nut Finger Lock Nut li Follow rest Adjustment Knob Finger Carriage Cap Screw Finger Lock Nut Jk X p I jk fccfn I jk The follow rest in li is mounted on the...

Page 27: ...esired angular position Tighten the two hex nuts Be sure to not overtight en as you may strip threads or crack or distort the base casting Kffc Gfjk The four way tool post li is mounted on top of the compound rest and allows a maximum of four 3 8 x 3 8 tools to be loaded simultaneously The four way tool post allows for quick indexing to new tools This is accomplished by loosening the top handle th...

Page 28: ...of the compound rest ifjj Jc Xe n_ c The cross slide handwheel moves the top slide toward and away from the workpiece Turning the handwheel clock wise moves the slide toward the workpiece The gradu ated dial on the handwheel indicates the depth of cross slide movement Xii X Xe n_ c The carriage handwheel moves the carriage left or right along the bed This control is helpful when setting up the mac...

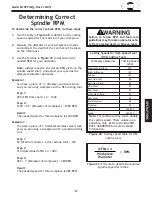
Page 29: ...of 1 diameter stainless steel stock and you are using a workpiece with a carbide cutting tool Jk g 1 60 SFM from chart x 2 for carbide tool 120 Jk g 1 120 determined SFM x 4 480 Jk g 1 480 1 Diameter of workpiece 480 RPM I jlck1 The needed speed for this workpiece is 480 RPM k id e e fii Zk Jg e c IGD li Cutting speed table for HSS cutting tools lkk e Jg j fi _ Jg Jk c JJ lkk e Kffcj Workpiece Mat...

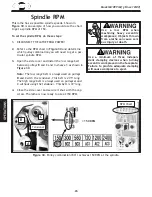
Page 30: ... shown in li Efk 1 K_ cfn iXe Y ck j XcnXpj lj fe glcc pj 9 Xe n k_ k_ k ej fe i K_ j Y ck j cfe K_ _ _ iXe Y ck j XcnXpj lj fe glcc pj 8 Xe n k_flk lj e k_ k ej fe i K_ j Y ck j cfe Close the side cover and secure it shut with the cap screw The lathe is now ready to use at 150 RPM Lj X d e dld f k_i e g e ek ZcXdg e m Z j n_ e klie e ZZ eki Z nfibg Z j fe k_ XZ gcXk X cli kf gifm X hlXk ZcXdg e n...

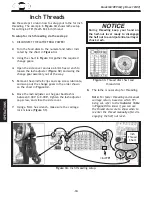
Page 31: ... Open the side cover and use a 6mm hex wrench to loosen the lash adjuster li and swing the change gear assembly out of the way Remove the spindle E clips and cap screw lubricate and swap out the change gears in the order shown on the chart in li Move the lash adjuster so the gear backlash is between 0 003 to 0 008 tighten the lash adjuster cap screw and close the side cover Using a 5mm hex wrench ...

Page 32: ...ange gear assembly out of the way Remove the spindle E clips and cap screw lubricate and swap out the change gears in the order shown on the chart in li Move the lash adjuster so the gear backlash is between 0 003 to 0 008 tighten the lash adjuster cap screw and close the side cover Using a 5mm hex wrench make sure the carriage lock is loose li li Thread dial chart and thread dial li e k_i X e b g...

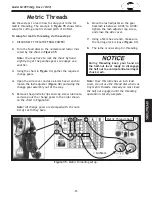
Page 33: ...embly out of the way Remove the spindle E clips and cap screw lubricate and swap out the change gears in the order shown on the chart in li Efk 1 8cc Z_Xe Xij Xi jkXdg n k_ k_ eld Y i f k k_ k_ p _Xm D ki Z K_i X j Efk 1 J eZ k_ j cXk_ _Xj Xe eZ_ c X jZi n f efk lj k_ k_i X Xc n_ e Zlk k e d ki Z k_i X j ejk X pfl dljk c Xm k_ _Xc elk e X lek c k_ k_i X e fg iXk fe j kfkXccp Zfdgc k li Metric thre...

Page 34: ...at 3 4 full as shown by the sight glass li After break in change the oil in the gearbox with Mobil DTE Heavy Medium or an equivalent grade of oil then again after three months After that change the oil at the same time on an annual basis or more frequently if extreme machine use requires it For daily lubrication use a manual oil gun with a general 10W machine oil to lubricate the 11 ball oilers Re...

Page 35: ... 33 Df c D 00 D J eZ D8 EK E8E li Leadscrew and tailstock ball oilers li 0 Apron and carriage ball oilers ...

Page 36: ...8 and and reinstall the new one If the low range belt li needs to be replaced use the 17mm wrench to loosen the tensioner pulley arm that holds the pulley and replace the belt on pulleys 9 and Hold the ten sioner pulley against the new belt so the belt is tight and tighten the tensioner pulley in place EK8E C D EK 8Q8I jZfee Zk k_ j cXk_ ifd gfn i Xe nX k lek c Xcc jg ee e gXikj _Xm Zfd kf X Zfdgc...

Page 37: ...n the cut 1 Excessive depth of cut 2 RPM or feed rate wrong for operation 3 Dull cutters 4 Belt is slipping 5 Belt is at fault 1 Decrease depth of cut 2 Refer to RPM feed rate chart for appropriate rates 3 Sharpen or replace cutters 4 Remove grease or oil on belt or pulleys tighten belt tensioner against low range belt 5 Replace belt Gear change levers will not shift into posi tion 1 Gears not ali...

Page 38: ...ment 1 Tighten gib screw s 2 Tighten handwheel fasteners 3 Tighten any loose fasteners on lead screw mecha nism Cross slide com pound rest or carriage feed handwheel is hard to move 1 Gibs are loaded up with shavings or grime 2 Gib screws are too tight 3 Backlash setting too tight cross slide only 4 Bedways are dry 1 Remove gibs clean ways dovetails lubricate and readjust gibs 2 Loosen gib screw s...

Page 39: ... Xe i lZ j k_ c f k_ Zifjj jc ifjj Jc 9XZbcXj_ 8 aljkd ek Y 8 aljkd ekj When adjusting gibs li j Xe the goal is to remove sloppiness in the ways without causing the slides or half nut to bind Loose gibs will cause a poor finish on the workpiece and wear the slide Tight gibs will damage the slide lead screw and half nut The cross slide gib is a tapered piece of iron When the opposing front and rear...

Page 40: ...0 D J eZ J IM c Zki ZXc fdgfe ek fee Zk fej li External motor capacitors li Motor rotary switch and emergency stop switch SA and SB2 li 0 Motor start contactor li Motor rotary switch and ON power switch SA and SB1 ...

Page 41: ... J IM li Motor connection detail li Motor data plate N i e X iXd BD1 DX e k Z fekXZkfi M J9 1 FE Glj_ 9lkkfe Jn kZ_ J9 1 d i eZp Jkfg Glj_ 9lkkfe Jn kZ_ D1 Dfkfi M C E 1 XgXZ kfi 1 XgXZ kfi J81 Dfkfi i Zk fe IfkXip Jn kZ_ ...

Page 42: ... 40 Df c D 00 D J eZ G8IKJ Jg e c Xe i m 9 ck G8IKJ 1 2 5 6 7 8 10 11 13 14 15 16 17 18 19 20 21 22 23 24 25 26 27 28 29 30 31 32 33 34 35 36 37 38 39 40 41 42 43 44 45 46 47 48 49 51 52 53 12 ...

Page 43: ...Y 6 X 6 X 40 14 XM1099014 BALL BEARING 45 X 75 X 20 39 XM1099039 SPACER 15 XM1099015 HEADSTOCK 40 XM1099040 STUD UDE M10 1 5 X 50 27 15 16 XPCAP14M CAP SCREW M8 1 25 X 20 41 XM1099041 PLATE 17 XM1099014 BALL BEARING 45 X 75 X 20 42 XPW04M FLAT WASHER 10MM 18 XPCAP02M CAP SCREW M6 1 X 20 43 XPN02M HEX NUT M10 1 5 19 XM1099019 SPACER 44 XM1099044 SPINDLE SHAFT 20 XM1099020 GEAR 44T PLASTIC 45 XM1099...

Page 44: ... 42 Df c D 00 D J eZ G8IKJ 8gife 101 102 103 104 105 106 107 108 109 110 111 112 113 114 115 116 117 118 119 120 121 122 123 124 125 126 127 128 129 130 131 132 133 134 135 136 137 138 139 140 141 142 ...

Page 45: ...IB 130 XPSS02M SET SCREW M6 1 X 6 110 XPRP76M ROLL PIN 4 X 16 131 XM1099131 COMPRESSION SPRING 111 XPSS34M SET SCREW M5 8 X 16 132 XM1099132 HANDLE 112 XPSS12M SET SCREW M6 1 X 25 133 XM1099133 HANDWHEEL 113 XPN06M HEX NUT M5 8 134 XPRP04M ROLL PIN 4 X 24 114 XPSS04M SET SCREW M6 1 X 12 135 XM1099135 POINTED SET SCR M6 1 X 12 115 XM1099115 LEVER HUB 136 XM1099136 GEAR SHAFT 116 XM1099116 LEVER 137...

Page 46: ... XM1099220 TOOL REST 206 XM1099206 BARREL NUT 221 XM1099221 RUB SPACER 207 XM1099207 DOWEL PIN 222 XM1099222 SLIDE PLATE 208 XM1099208 TOOL POST STUD 223 XM1099223 LEAD SCREW 209 XPW01M FLAT WASHER 8MM 224 XM1099224 LEAD SCREW MOUNT 210 XM1099210 DOWEL PIN 225 XM1099225 GRADUATED DIAL 211 XM1099211 COMPRESSION SPRING 226 XM1099226 HANDWHEEL 212 XM1099212 BULLNOSE CAP SCR M8 1 25 X 30 227 XM1099227...

Page 47: ... 5 306 XM1099306 LEVER BOLT M12 1 75 X 50 319 X1723053 RIVET 2 X 5 307 XM1099307 BARREL NUT 320 XM1099320 BALL OILER 308 XPSS04M SET SCREW M6 1 X 12 321 XM1099321 CLAMPING PLATE 309 XM1099309 GRADUATED DIAL 322 XPN09M HEX NUT M12 1 75 310 XM1099310 POINTER 323 XPB158M HEX BOLT M12 1 75 X 90 311 XM1099311 SPACER 324 XPW06M FLAT WASHER 12MM 312 XM1099312 TAILSTOCK BODY 325 XPSS26M SET SCREW M5 8 X 6...

Page 48: ...PLASH GUARD 402 XM1099402 RACK 410 XM1099410 STUD UDE M10 1 5 X 47 16 12 403 XPCAP33M CAP SCREW M5 8 X 12 411 XPN02M HEX NUT M10 1 5 404 XM1099404 LEAD SCREW 412 XPSS44M SET SCREW M8 1 25 X 40 405 XM1099405 BRACKET 413 XPW01M FLAT WASHER 8MM 406 XM1099406 BALL OILER 414 XPN03M HEX NUT M8 1 25 407 XPCAP02M CAP SCREW M6 1 X 20 415 XM1099415 CHIP PAN 408 XPLN05M LOCK NUT M10 1 5 ...

Page 49: ...99502 FINGER 511 XM1099511 FOLLOW REST CASTING 503 XM1099503 T BOLT M6 1 512 XM1099512 FINGER 504 XPLW03M LOCK WASHER 6MM 513 XM1099503 T BOLT M6 1 505 XPN01M HEX NUT M6 1 514 XM1099514 ADJUSTING SCREW 506 XM1099506 ADJUSTING SCREW 515 XPN01M HEX NUT M6 1 507 XM1099507 CLAMPING PLATE 516 XPLW03M LOCK WASHER 6MM 508 XPB125M HEX BOLT M12 1 75 X 65 517 XPCAP40M CAP SCREW M8 1 25 X 35 509 XPW04M FLAT ...

Page 50: ...1099611 3 S CAPACITOR 150M 125V 603 XPLW03M LOCK WASHER 6MM 611 4 XM1099611 4 R CAPACITOR 20M 400V 604 XM1099604 COVER 611 5 XM1099611 5 CAPACITOR COVER W CAP 607 XM1099607 STRAIN RELIEF NUT 611 6 XM1099611 6 POWER CORD 608 XM1099608 STRAIN RELIEF 612 XPLW03M LOCK WASHER 6MM 610 XPS09M PHLP HD SCR M5 8 X 10 615 XM1099615 STRAIN RELIEF 611 XM1099611 REVERSIBLE MOTOR 110V 616 XM1099616 STRAIN RELIEF...

Page 51: ...T WASHER 6MM 706 XM1099706 SHAFT 725 XPCAP85M CAP SCREW M6 1 X 6 707 XM1099707 KNURLED KEEPER 726 XPLW04M LOCK WASHER 8MM 708 XM1099708 BALL OILER 727 XPCAP12M CAP SCREW M8 1 25 X 40 711 XM1099711 BRACKET 729 XM1099729 GEAR 36T 712 XM1099712 T NUT 730 XM1099730 GEAR 40T 713 XM1099713 SPACER WASHER 731 XM1099731 GEAR 44T 714 XM1099714 SHAFT 732 XM1099732 GEAR 46T 715 XM1099715 BUSHING 733 XM1099733...

Page 52: ...801 802 803 804 806 807 808 809 810 811 812 813 814 815 816 817 818 819 820 821 822 823 824 825 826 828 829 830 831 832 833 834 835 836 837 838 839 840 841 842 843 844 845 846 847 848 849 850 851 852 853 854 805 805 802 827 822 822 820 822 823 ...

Page 53: ...DISK 813 XM1099813 GEAR BOX CASE 840 XPSS01M SET SCREW M6 1 X 10 814 XM1099814 DRAIN PLUG 841 XM1099841 STEEL BALL 815 XM1099815 SHEAR PIN 5 X 20 842 XM1099842 SHIFT HUB 816 XM1099816 COLLAR 843 XPSS01M SET SCREW M6 1 X 10 817 XM1099815 SHEAR PIN 5 X 20 844 XPCAP37M CAP SCREW M6 1 X 50 818 XPCAP26M CAP SCREW M6 1 X 12 845 XPCAP02M CAP SCREW M6 1 X 20 819 XM1099819 FLANGE 846 XM1099846 O RING 820 X...

Page 54: ... 52 Df c D 00 D J eZ G8IKJ ifjj Xe Xii X 901 902 903 904 905 906 907 908 909 910 911 912 913 914 915 916 917 918 919 920V2 921 922 923 924 925 926 927 928 929 930 931 932 933 934 935 936 937 938 939 ...

Page 55: ... X 25 927 XM1099927 CLIP 908 XM1099908 PLATE 928 XPSS25M SET SCREW M6 1 X 20 909 X1723053 RIVET 2 X 5 929 XPN01M HEX NUT M6 1 910 XM1099910 GRADUATED DIAL 930 XPCAP48M CAP SCREW M6 1 X 35 911 XPK105M KEY 3 X 3 X 6 931 XM1099931 WIPER 912 XM1099912 LEAF SPRING 932 XM1099932 WIPER CLAMP 913 XM1099913 HANDWHEEL 933 XPS07M PHLP HD SCR M4 7 X 8 914 XM1099914 SPECIAL HEX NUT 934 XM1099934 WAY COVER 915 ...

Page 56: ...fn e dXZ_ e kf Y fg iXk X X e fekXZk lj Xk fi nnn j_fg fokffcj Zfd kf fi i e n cXY cj REF PART DESCRIPTION REF PART DESCRIPTION 1000 XLABEL 24 DISCONNECT 110V 2W X 3 3H 1005 XLABEL 11 SAFETY GLASSES 2W X 3 3H 1001 XLABEL 09 ENTANGLEMENT HAZARD 2W X 3 3H 1006 XM10991006 CARRIAGE FEED DAMAGE LABEL 1002 XM10991002 MACHINE ID LABEL 1007 XM10991007 MODEL NUMBER LABEL 1003 XM10991003 DO NOT CHANGE GEAR ...

Page 57: ...Df c D 00 D J eZ ...

Page 58: ...TAPE ALONG EDGES PLEASE DO NOT STAPLE FOLD ALONG DOTTED LINE FOLD ALONG DOTTED LINE NFF JKF B EK IE8K FE8C E G F 9FO 0 9 CC E 8D N8 0 0 Place Stamp Here ...

Page 59: ...b ek ieXk feXc eZ j nXiiXekp k_ e k_ fi eXc fne i dljk Y Xi k_ Zfjk f jkfi e Xe i klie e k_ gif lZk K_ j j Nff jkfZb ek ieXk feXc eZ j jfc ni kk e nXiiXekp Xe Xep Xe Xcc nXiiXek j k_Xk dXp Y dgc Yp cXn eZcl e Xep d iZ_XekXY c kp fi ke jj fi Xep gXik ZlcXi gligfj Xi _ i Yp c d k kf k_ liXk fe f k_ j ni kk e nXiiXekp N f efk nXiiXek k_Xk J_fg fo dXZ_ e ip Zfdgc j n k_ k_ gifm j fej f Xep cXn fi XZkj...

Page 60: ... FjVa in BVX cZh VcY Iddah LddYhidX ciZgcVi dcVa cX XVgg Zh i djhVcYh d egdYjXih YZh cZY id bZZi i Z cZZYh d idYVn h lddYldg Zgh VcY bZiValdg Zgh 6h ndjg YZVaZg VWdji i ZhZ cZ egdYjXih ...

Reviews: