background image

-30-

Model M1112 (For Machines Mfd. Since 12/20)

O

PE

R

ATIO

NS

Figure 

40

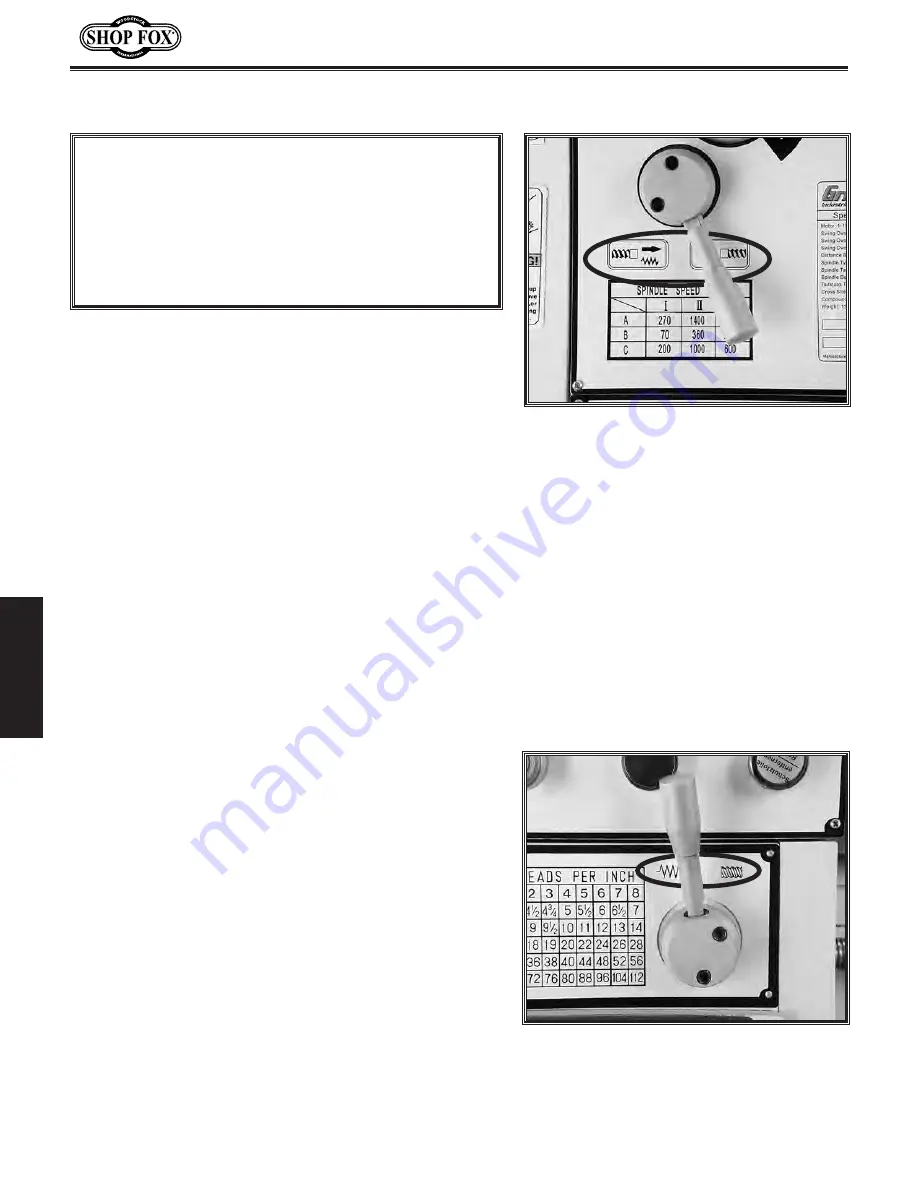
Feed rod lever.

Your lathe can cut left or right while feeding or threading, 

and it can cut across both ways for facing operations. This 

feed direction is controlled by the feed direction lever 

shown in 

Figure 

39.

When the selection lever is positioned as depicted in 

Figure 

39, the carriage will move to the right along 

the bed or the cross feed will travel away from the 

operator. The cross feed and longitudinal feed selection is 

controlled on the apron.

To reverse the direction of the feeding or threading 

operation, stop the lathe, move the feed direction lever 

completely to the right or left.

When the lever is positioned in the middle, no gear ratio 

is selected, and the gear train feeding the apron is in 

neutral.

Feed Direction Lever

NOTICE

NEVER  attempt  to  shift  a  lever  while  the  lathe  is 

running! And when shifting a lever, NEVER force it. If 

the lever will not engage, rotate the chuck by hand 

while  keeping  light  pressure  on  the  lever.  As  the 

chuck  rotates  it  aligns  the  gears  and  the  lever  will 

engage.

Feed Rod Lever

The feed rod can be selected by moving the lever to 

the left as in 

Figure 

40

Use this position for all feed 

operations. 

When the lever is positioned straight up, no drive 

mechanism is selected and the gear train feeding the 

apron is in neutral.

When the lever is moved to the right, no gear ratio 

is selected, and the gear train feeding the apron is in 

neutral.

Figure 

39

Feed direction lever.

Summary of Contents for Shop Fox M1112

Page 1: ...tockint com COPYRIGHT NOVEMBER 2007 BY WOODSTOCK INTERNATIONAL INC REVISED DECEMBER 2020 BL WARNING NO PORTION OF THIS MANUAL MAY BE REPRODUCED IN ANY SHAPE OR FORM WITHOUT THE WRITTEN APPROVAL OF WOODSTOCK INTERNATIONAL INC Printed in China 10091CR OWNER S MANUAL FOR MODELS MANUFACTURED SINCE 12 20 ...

Page 2: ...ng grinding tool integrity and the usage of personal protective equipment The manufacturer will not be held liable for injury or property damage from negligence improper training machine modifications or misuse Some dust created by power sanding sawing grinding drilling and other construction activities contains chemicals known to the State of California to cause cancer birth defects or other repr...

Page 3: ...ction Lever 30 Feed Rod Lever 30 Gearbox Levers 31 Feed Rate Chart 31 Carriage Cross Feed Lever 32 Half Nut Lever and Inch Threading 32 Change Gears Metric Threading 33 Carriage Handwheels 35 Tool Post Holder 35 Tailstock 36 Cutting Shallow Tapers with Tailstock 37 Drilling with Tailstock 37 Model M1112 Lathe Accessories 38 MAINTENANCE 39 General Maintenance 39 General Cleaning 39 General Lubricat...

Page 4: ... knowledgeable staff will help you troubleshoot problems and pro cess warranty claims If you need the latest edition you can download it from http www woodstockint com manuals If you have comments about this manual please contact us at Woodstock International Inc Attn Technical Documentation Manager P O Box 2309 Bellingham WA 98227 Email manuals woodstockint com USE this and other machinery with c...

Page 5: ...oard Box Content Stand Weight 308 lbs Length x Width x Height 31 x 27 x 19 in Electrical Power Requirement 220V Single Phase 60 Hz Prewired Voltage 220V Full Load Current Rating 12A Minimum Circuit Size 15A Connection Type Cord Plug Power Cord Included No Recommended Power Cord S Type 3 Wire 14 AWG 300 VAC Plug Included No Recommended Plug Type 6 15 Switch Type Control Panel w Magnetic Switch Prot...

Page 6: ...ilstock Taper MT 3 Tailstock Barrel Diameter 1 563 in Threading Info Number of Longitudinal Feeds 40 Range of Longitudinal Feeds 0 0011 0 0310 in rev Number of Cross Feeds 40 Range of Cross Feeds 0 0004 0 0105 in rev Number of Inch Threads 40 Range of Inch Threads 4 112 TPI Number of Metric Threads 29 Range of Metric Threads 0 2 4 5 mm Dimensions Bed Width 7 1 4 in Carriage Leadscrew Diameter 0 87...

Page 7: ...stock ISO 9001 Factory No Certified by a Nationally Recognized Testing Laboratory NRTL No Features Easy to Use Lever Controls Full Length Splash Guard On Off Reverse Switch on Carriage Halogen Work Light Ball Bearing Steady Follow Rests Outboard End Support Screws Socket for Tailstock Lock Steel Stand with Extended Base Cast Aluminum Gear Cover Nine Spindle Speeds Ranging from 70 to 1400 RPM Acces...

Page 8: ...s K 3 Jaw Chuck L Steady Rest M Cross Feed Handwheel N Halogen Work Light O Follow Rest P Tool Rest Q Compound Rest Handwheel R Tailstock Spindle and Center S Tailstock Spindle Lock Lever T Tailstock Spindle Handwheel U Back Splash Guard V Tailstock W Leadscrew X Spindle Rotation ON OFF Lever Y Feed Rod Z Chip Tray AA Storage Cabinet BB Stand Mounting Points CC Thread Dial DD Half nut Lever EE Apr...

Page 9: ...s or alcohol when tired or when distracted ELECTRICAL EQUIPMENT INJURY RISKS You can be shocked burned or killed by touching live electrical components or improperly grounded machinery To reduce this risk only allow an electrician or qualified service personnel to do electrical installation or repair work and always disconnect power before accessing or exposing electrical equipment DISCONNECT POWE...

Page 10: ...uce accidental contact with moving parts or flying debris make sure they are properly installed undamaged and working correctly FORCING MACHINERY Do not force machine It will do the job safer and better at the rate for which it was designed NEVER STAND ON MACHINE Serious injury may occur if machine is tipped or if the cutting tool is unintentionally contacted STABLE MACHINE Unexpected movement dur...

Page 11: ...esult of extra force required for operation Always use sharp tooling that is right for the job SANDING POLISHING To reduce risk of entangle ment never wrap emery cloth around rotating workpiece Instead use emery cloth with the aid of a tool or backing board MEASURING WORKPIECE To reduce risk of entan glement never measure rotating workpieces CLOTHING JEWELRY LONG HAIR Tie back long hair remove jew...

Page 12: ... using lathes Figure 2 Never walk away from the lathe with the chuck key inserted in the chuck Figure 1 Always protect the bed ways and unplug the lathe when retooling the lathe Figure 4 Never use hands to stop or slow the chuck when shutting down the lathe Figure 5 Never wear loose clothing or gloves when working with the lathe ...

Page 13: ...pe 220V 240V 60 Hz Single Phase Circuit Size 15 Amps Plug Receptacle NEMA 6 15 Cord S Type 3 Wire 14 AWG 300 VAC Full Load Current Rating The full load current rating is the amperage a machine draws at 100 of the rated output power On machines with multiple motors this is the amperage drawn by the largest motor or sum of all motors and electrical devices that might operate at one time during norma...

Page 14: ...We do not recommend using an extension cord with this machine Extension cords cause voltage drop which may damage electrical components and shorten motor life Voltage drop increases with longer extension cords and smaller gauge sizes higher gauge numbers indicate smaller sizes Any extension cord used with this machine must contain a ground wire match the required plug and receptacle and meet the f...

Page 15: ...ooth 1 Gear 86 91 Tooth Installed 1 P Hex Wrench Set 2 4 5 6 8 10 mm 1 EA Q Wrenches 9 11 10 12 12 14 17 19mm 1 EA R Handwheel Handles 2 S Dead Center Spindle Sleeve 1 T Arbor B16 to MT 3 1 U Standard Dead Center MT 3 1 V Carbide Tipped Dead Center MT 3 1 W Live Center MT 3 1 X 2 Phillips Standard Screwdrivers 1 EA Y Drill Chuck B16 1 5 13mm 1 Z Drill Chuck Key 1 AA Spider Screws 4 BB Camlock Stud...

Page 16: ...se as required to make the ways level at all four corner locations as indicated with a machinist s level 8 Fully tighten the six hex bolts to secure the lathe to the cabinet base 9 For best results recheck the ways in 24 hours to make sure the ways are still level and have not twisted and re shim as required 10 Install the backsplash with four M6 1 x 10 Phillips head screws and flat washers Uncrat...

Page 17: ...ease that protects them from corrosion during shipment Clean this grease off with a solvent cleaner or citrus based degreaser DO NOT use chlorine based solvents such as brake parts cleaner lacquer thinner or acetone if you happen to splash some onto a painted surface you will ruin the finish Machine Placement Figure 11 Minimum wall clearances MAKE your shop child safe Ensure that your workplace is...

Page 18: ... the reset button on the control panel is pushed in to avoid unexpected start ups 2 T1 6 T3 22NC 4 T2 1 L1 5 L3 21NC GSC1 1801 KM1 3 L2 A1 A2 26 30 31 32 33 E 25 24 23 22 21 2 T1 6 T3 4 T2 1 L1 5 L3 GSC1 1801 KM2 3 L2 Ground 20 21 110V 20 22 220V 20 23 230V 20 24 240V 20 25 380V 20 26 400V A1 L N N U1 N N L L L L 0 0 1 PE PE 0 7 U2 U2 U2 Z1 Z1 Z1 Z2 Z2 Z2 10 6 PE PE Z2 Z1 U2 U1 PE L N Transform Co...

Page 19: ... is operating and make sure both the half nut lever and the feed lever are disengaged before you start the lathe Otherwise the lathe will feed the apron into the chuck or tailstock causing severe lathe damage Figure 14 Apron controls Feed Lever is Horizontal Disengaged Half nut Lever is Pulled Up Disengaged Spindle Rotation ON OFF Lever Lubricating Lathe The headstock quick change gearbox and apro...

Page 20: ... the emergency stop button If the lathe does not stop turn the lathe OFF with the spindle rotation ON OFF lever and disconnect the lathe from power Refer to Troubleshooting on Page 42 for correction 10 Return the spindle rotation ON OFF lever to STOP reset the emergency stop button restart the lathe and let the lathe run for a minimum of 10 minutes in both directions 11 Turn the lathe OFF and move...

Page 21: ...e over in the chuck and turn a 60 point see Figure 16 As long as it remains in the chuck the point of your center will be accurate to the spindle axis Note Keep in mind that the point will have to be refinished whenever it is removed and returned to the chuck 3 Place the live center in your tailstock 4 Attach a lathe dog to the bar stock from Step 1 and mount it between the centers as shown in Fig...

Page 22: ...lstock left adjustment location Adjustment Screw On Both Sides 8 Loosen the tailstock lock lever and adjust the tailstock offset by half the taper by turning the adjustment set screw Figure 20 Turn another 0 010 off of the stock and check for taper Repeat as necessary until the desired amount of accuracy is achieved NOTICE DO NOT forget to lock the tailstock to the ways after each adjustment ...

Page 23: ...operations can be dangerous or deadly if performed incorrectly The instructions in this section are written with the understanding that the operator has the necessary knowledge and skills to operate this machine If at any time you are experiencing difficulties performing any operation stop using the machine If you are an inexperienced operator we strongly recommend that you read books trade articl...

Page 24: ... a piece of plywood across the lathe ways and position it just under the chuck The board should be at least 8 wide and 10 long 3 Turn a cam with the chuck key until the cam line aligns with the spindle line mark shown in Figure 24 4 Turn the other cams in the same way Make sure to support the chuck with one hand as you align the last cam The chuck may come off at this point so be ready to support ...

Page 25: ...huck and spindle timing marks Figure 26 align the marks and the camlock studs in the back of the chuck with the holes on the spindle face and slide the chuck onto the spindle 4 While supporting the weight of the chuck turn one cam with the chuck key until the cam line is between the two V s on the spindle Do not tighten at this time 5 Rotate the spindle and repeat Step 4 on the opposite cam 6 Rota...

Page 26: ...h all three jaws and the workpiece is not off center If the workpiece is off center loosen the jaws and adjust the workpiece If the workpiece is seated correctly tighten the jaws Clamping in an Inside Diameter Clamping on an Outside Diameter Figure 27 Loading a workpiece If the workpiece protrudes more than 2 5 times its own diameter support it with a center and possibly a steady rest Otherwise th...

Page 27: ...lithium grease to the mating surfaces 5 Set the old jaws aside in a safe place free of moisture and abrasives 6 Rotate the chuck key clockwise until you see the tip of the scroll gear lead thread just begin to enter jaw guide 1 see Figure 30 7 Insert jaw 1 into jaw guide 1 and hold the jaw against the scroll gear 8 Rotate the chuck key clockwise one turn to engage the tip of the scroll gear lead t...

Page 28: ...jaw until it just makes contact with the workpiece 5 In an opposing pattern tighten each jaw in small increments After you have adjusted the first jaw continue tightening the opposing jaw Check the dead center alignment frequently to make sure you have not wandered off your index point due to applying too much pressure to a single jaw 6 After the workpiece is held in place back the tailstock away ...

Page 29: ...ree independent clamping devices see Figure 34 Failure to follow this step may lead to deadly injury to yourself or bystanders Take into account rotation and the cutting forces applied to the workpiece when clamping to the faceplate Make sure your clamping application will not fail Note Depending on the workpiece some additional support or counter balance may be needed 2 Slide the tailstock to the...

Page 30: ...enter insert the end of the center into the tailstock bore until it seats Once the workpiece is installed the force of a mounted workpiece will fully seat the taper When using a live center the tailstock barrel should protrude about 1 2 and not more than 3 see Figure 35 To remove the live center back the tailstock barrel all the way into the tailstock casting The live center will pop out Be sure t...

Page 31: ...until the bearings make contact and support the workpiece Do not over tighten the fingers or they will cause deflection in the workpiece 3 Oil the finger bearings and the rolling surfaces while in use to assist in friction free support Steady Rest The follow rest is normally used with small diameter stock to prevent the workpiece from springing under pressure from the turning tool The follow rest ...

Page 32: ...ly to the right or left When the lever is positioned in the middle no gear ratio is selected and the gear train feeding the apron is in neutral Feed Direction Lever NOTICE NEVER attempt to shift a lever while the lathe is running And when shifting a lever NEVER force it If the lever will not engage rotate the chuck by hand while keeping light pressure on the lever As the chuck rotates it aligns th...

Page 33: ...ed and is in neutral Feed Rate Chart The two levers Figure 41 at the bottom of the headstock change the feed rate or the number of threads cut per inch The left hand lever engages in alpha positions A B C D and E and the right hand lever engages in numeric positions 1 2 3 4 5 6 7 and 8 Use the feed rate chart shown in Figure 42 to position the quick change gearbox levers Gearbox Levers NOTICE NEVE...

Page 34: ...as been returned the thread dial tells you when to re engage the half nut and resume threading Figure 44 When the cap screw is loosened the thread dial housing pivots so its gear can be engaged or disengaged from the lead screw When engaged the dial will turn when the lead screw and spindle are turning When the half nut lever is engaged the dial stops turning By carefully engaging the half nut as ...

Page 35: ...o the indicator mark engage the half nut Begin your second pass Repeat this process until the desired depth of cut is achieved Figure 46 Standard thread chart This lathe can cut 29 different metric threads but gear changes are required to cut all of the listed metric threads These gear changes take place on the left hand end of the machine Figure 47 The chart is divided into 3 main columns startin...

Page 36: ... and tighten the fasteners to hold the gears on the shafts 11 Slide the appropriate middle gear against gear G until they mesh with 0 002 to 0 004 backlash and tighten the cap screw 12 Rotate the appropriate middle gear against gear F until they mesh with 0 002 to 0 004 backlash and tighten the cap screw Example If the desired metric pitch is 1 25mm move the quick change levers to positions 1 and ...

Page 37: ... slide handwheel Figure 50 controls the position of the cutting tool relative to the workpiece This slide is adjustable to any angle The graduated dial is adjustable using the same method as the dial on the cross slide Angle adjustment is locked by hex nuts on the base of the top slide Carriage Handwheels Figure 51 shows the quick change tool post and holder Cutting tools can be secured and remove...

Page 38: ...tock barrel in place Side Lock Lever Torque Tightening This removable lever locks the tailstock in place on the lathe bed The socket that it fits into will accept a 1 2 drive torque wrench For repeating very accurate vertical alignment positioning time after time remove the side lock lever Figure 52 and use an inch pound torque wrench fitted with a 3 8 to 1 2 drive adapter to lock the tailstock in...

Page 39: ...process until the centered position is indicated on the scale Figure 53 Right offset adjustment Offset Adjustment Scale Drilling with Tailstock To install a tapered drill chuck do these steps 1 With the tailstock locked unlock the quill lock lever 2 Turn the quill feed handle clockwise to extend the quill about one inch and insert a tapered drill arbor or a tapered drill shank into the quill until...

Page 40: ...is MT 3 Live Center Set offers seven interchange able tips High quality needle bearings prolong tool life and special tool steel body and tips are precision ground Supplied in wooden box The Model M1066 Shop Fox Heavy duty Triple Bearing Live Center This Triple Bearing Live Center is hardened to a 61 65 Rockwell rat ing and has a unique head driving mechanism that eliminates dust chips and coolant...

Page 41: ...month of operation and then at six month intervals We recommend using Mobil Vactra 2 Oil or an ISO 68 equivalent The apron reservoir holds 1 pint of oil Cross Slide and Compound Slide The ball oilers on the slides Figure 54 should be oiled the same as the saddle Headstock The oil in the headstock should be changed immediately after break in Then every six months depending on usage Change the heads...

Page 42: ... Rod Be sure to clean and lubricate the leadscrew feed rod and switch control rod Figure 57 The lead screw and feed rod have a bearing on the tailstock end support that will require one to two squirts of oil before every use Tailstock The tailstock Figure 58 is fitted with two ball oilers Apply oil each week or after every five uses depending on the frequency of operation Be sure to clean the tail...

Page 43: ...lant and insert the clear plastic drain tube back into the tank Failure to follow lubrication guidelines will lead to rapid deterioration of lathe components NOTICE Figure 59 Coolant pump and reservoir BIOLOGICAL and POISON HAZARD The reservoir on this machine is designed to store coolant During storage coolant can grow dangerous microbes or collect toxic heavy metals making the coolant a biologic...

Page 44: ...ect fuses or circuit breakers Machine is loud belt slips when cutting Overheats or bogs down in the cut 1 Excessive depth of cut 2 RPM or feed rate wrong for operation 3 Dull cutters 4 Belt is slipping 5 Belt is at fault 1 Decrease depth of cut 2 Refer to RPM feed rate chart for appropriate rates 3 Sharpen or replace cutters 4 Remove grease or oil on belt or pulleys tighten belt tensioner against ...

Page 45: ... out of adjust ment 1 Tighten gib screw s 2 Tighten handwheel fasteners 3 Tighten any loose fasteners on lead screw mecha nism Cross slide com pound rest or carriage feed handwheel is hard to move 1 Gibs are loaded up with shavings or grime 2 Gib screws are too tight 3 Backlash setting too tight cross slide only 4 Bedways are dry 1 Remove gibs clean ways dovetails lubricate and readjust gibs 2 Loo...

Page 46: ...loosening the screw closest to the operator and then tightening the opposite screw the slide will become looser Conversely loosening the screw farthest away from the operator and tightening the closer screw will tighten the gib Do not over tighten Move the cross slide and adjust the gib until you feel a slight drag Compound Gib The compound gib Figure 61 is adjusted by the same method as the gibs ...

Page 47: ...enly When tightening the jam nuts hold the set screw in position with a hex wrench Half Nut Adjustment If the half nut threads do not fully mesh with the leadscrew the quality of the workpiece threads may suffer If the half nut clamps the leadscrew too tightly rapid half nut wear and a non release or delayed half nut release condition could occur which can cause chuck and carriage crash It is far ...

Page 48: ...these steps 1 DISCONNECT LATHE FROM POWER 2 Open the change gear access door 3 Loosen four motor mount bolts Figure 64 and replace the belts as a matched set if required 4 With one hand push and hold the motor in the downward position so the belts are tight 5 While holding the motor down and keeping the belts tight tighten the motor mount bolts 6 Close the access door and lock it shut ...

Page 49: ...n the outer spanner lock nut Figure 67 by turning it counterclockwise then remove it 6 Loosen the inner spanner nut one turn Note You may have to tap on the outboard spindle tube as explained in Step 7 to help unload the spindle and break the spanner nut loose This lathe is shipped from the factory with the spindle bearing preload adjusted If the spindle ever develops a bit of end play and the wor...

Page 50: ...earings seat properly in the tapered bearing races When the dial indicator needle stops moving there will not be any spindle end play nor bearing preload It is essential that you find this point without tightening the spanner nut too much and inadvertently preloading the spindle bearings Since it can take great effort to turn the inner spanner nut you may find it difficult to know if you have gone...

Page 51: ...the bearings are correctly preloaded do these steps 1 Make sure all safety precautions have been taken and set up steps are complete to make the lathe fully operational 2 Install the chuck and tighten the jaws 3 Set the spindle speed to its highest setting 4 Connect the lathe to power and turn the lathe spindle ON 5 Let the lathe run for 20 minutes 6 Turn the spindle OFF disconnect lathe from powe...

Page 52: ... but it may not match your machine Always use the wiring diagram inside the motor junction box CAPACITORS INVERTERS Some capacitors and power inverters store an electrical charge for up to 10 minutes after being disconnected from the power source To reduce the risk of being shocked wait at least this long before working on capacitors CIRCUIT REQUIREMENTS You MUST follow the requirements at the beg...

Page 53: ... T1 6 T3 22NC 4 T2 1 L1 5 L3 21NC GSC1 1801 KM2 3 L2 A1 A2 L 6 U2 Z1 Z2 9 9 Contactor 13NO JZC3 40d 33NO 43NO 23NO 14NO 34NO 44NO 24NO KA0 A1 2 2 3 5 Contactor 11 11 5A 24V 24V 5A 0 4 1 1 PE PE PE 11 Rd Br Bl Bk Lt Bl Pk Rd Tq Wt Rd Bk Bl Bl Br Rd Bk Bl Bk Yg Yg Yg Yg Bk Bk Bk Bk Bk Bk Rd Rd Rd Rd Rd Rd Bk Bk Bk Bk Bk Bk Bk Bk Bk Bk Bk Bk Wt Wt Rd Bk L L WARNING ACCIDENTAL INJURY HAZARD Disconnect...

Page 54: ...ystem Transformer Pump Thermal Overload Relay Motor Thermal Overload Relay Control System 2A 110V Fuse Work Lamp 5A 24V Fuse KM2 Motor Direction B Contactor KM1 Motor Direction A Contactor Pump Contactor Motor Inch Jog Contactor Ground Block 12 Post Junction Block 24 Post Junction Block ...

Page 55: ...op Button Inch Jog Button Pump Switch Power Button CONTROL PANEL INCH JOG BUTTON POWER LAMP X1 X2 POWER BUTTON 1 2 2 0 2 4 3 6 5 0 PUMP SWITCH Pk Tq Lt Bl Rd Rd Rd Bl Wt Br Bk EMERGENCY STOP BUTTON PE Ground Yl Gn 13 Rd 2 Bl Power Lamp To Main Electrical Box Page 51 STOP Read Page 50 Before Wiring ...

Page 56: ...ICE Figure 73 Spindle motor wiring Ground SPINDLE MOTOR Run Capacitor 20MFD 450VAC Start Capacitor 150MFD 265VAC PE Z2 U1 U2 Z1 Bl Br Rd Bk Rd Rd Rd Rd Rd Rd Rd Rd Yl Yl Yl Bk Bk Bk Yl Gn To Main Electrical Box Page 51 STOP Read Page 50 Before Wiring ...

Page 57: ...odel M1112 For Machines Mfd Since 12 20 SERVICE Figure 74 Spindle ON OFF switch SPINDLE ON OFF SWITCH C NO NO NC NC C Rd 7 5 6 4 Yg Rd Bl Bk Br To Main Electrical Box Page 51 STOP Read Page 50 Before Wiring ...

Page 58: ...M1112 For Machines Mfd Since 12 20 SERVICE Figure 75 Pump wiring Ground PUMP MOTOR Start Capacitor 2MFD 450VAC Yl Gn Gn Gn Rd Rd Bl Bk Rd Rd PE N1 L1 To Main Electrical Box Page 51 STOP Read Page 50 Before Wiring ...

Page 59: ...SERVICE Hot Hot Ground 6 15 Plug As recommended 220 VAC G 1 0 Wt Rd WORK LAMP PLUG WIRING Plug not included Bl Bk Yl Gn Bl Rd Figure 76 Work lamp wiring To Main Electrical Box Page 51 To Main Electrical Box Page 51 STOP Read Page 50 Before Wiring ...

Page 60: ...6 1087 1088 1089 1083 1084 1093 1092 1080 1090 1087 1018 1017 1094 1087 1095 1096 1099 1000 1098 1001 1002 1003 1004 1005 1006 1008 1009 1010 1007 1015 1011 1012 1013 1010 1014 1008 1016 1041 1042 1043 1044 1051 1053 1052 1050 1049 1048 1047 1046 1045 1091 1019 1019 1 Headstock Shifters Change Gears ...

Page 61: ...FTING ARM 1012 XM11121012 HANDLE 1082 XM11121082 SHIFTING FORK 1013 XM11121013 INFORMATION PLATE 1083 XM11121083 SET SCREW M8 1 25 X 16 1014 XM11121014 COMPRESSION SPRING 1084 XM11121084 HEX NUT M8 1 25 1015 XM11121015 HANDLE HUB 1085 XM11121085 ROLL PIN 5 X 25 1016 XM11121016 OIL PLUG 1086 XM11121086 GEAR 38T 1017 XM11121017 SET SCREW M6 1 X 10 1087 XM11121087 O RING 11 2 X 2 65 1018 XM11121018 S...

Page 62: ...32 1131 1143 1144 1130 1129 1128 1126 1117 1127 1118 1117 1115 1116 1114 1125 1117 1167 1173 1172 1171 1170 1169 1168 1167 1166 1165 1130 1117 1125 1135 1164 1163 1162 1151 1130 1129 1154 1153 1160 1158 1161 1159 1157 1156 1155 1152 1151 1117 1130 1150 1149 1148 1147 1146 1145 1137 1174 1142 1141 1140 1139 1138 1136 1135 1175 1176 1177 1178 1179 Headstock Gearing Control Panel ...

Page 63: ... XM11121118 CAP SCREW M8 1 25 X 6 1158 XM11121158 GASKET 1119 XM11121119 GEAR 83T 1159 XM11121159 KEY 5 X 5 X 8 1120 XM11121120 O RING 17 8 X 2 4 P18 1160 XM11121160 COVER 1121 XM11121121 SHAFT 1161 XM11121161 CAP SCREW M8 1 25 X 12 1122 XM11121122 INT RETAINING RING 47MM 1162 XM11121162 OIL SEAL 1123 XM11121123 GEAR 40 45T 1163 XM11121163 PULLEY 1124 XM11121124 BALL BEARING 6004ZZ 1164 XM11121164...

Page 64: ...2306 2305 2304 2308 2310 2309 2322 2325 2326 2324 2329 2328 2330 2334 2333 2332 2331 2309 2310 2306 2373 2374 2304 2351 2350 2349 2348 2347 2346 2345 2344 2342 2316 2341 2340 2337 2336 2335 2370 2371 2372 2352 2354 2355 2353 2356 2362 2358 2357 2359 2365 2366 2367 2368 2369 2364 2327 2397 2363 Quick Change Gearbox ...

Page 65: ...0 2318 XM11122318 GEAR 32 16T 2356 XM11122356 ANG CONTACT BEARING 7000 2320 XM11122320 GEAR 32 16T 2357 XM11122357 GEAR 16T 2322 XM11122322 LEVER 2358 XM11122358 GEAR 32T 2324 XM11122324 HEX BOLT M10 1 5 X 30 2359 XM11122359 SHIFT LEVER 2325 XM11122325 BOSS 2362 XM11122362 SHIFT ROD KEY 2326 XM11122326 ROLL PIN 5 X 40 2363 XM11122363 SHIFT ROD 2327 XM11122327 COMPLETE GEARBOX ASSEMBLY 2364 XM11122...

Page 66: ...2453 2452 2451 2450 2449 2451 1 2447 2445 2443 2444 2448 2441 2442 2468 2440 2439 2438 2467 2420 2420 1 2425 2424 2423 2415 2427 2426 2428 2417 2431 2430 2429 2432 2433 2435 2434 2413 2414 2419 2419 1 2418 2405 2406 2408 2410 2409 2411 2412 2436 2437 2465 2401V2 2402V2 2404V2 2403V2 2407V2 2471 2469 2470 Apron Assembly ...

Page 67: ...417 XM11122417 SHAFT 2451 1 XM11122451 1 SPACER 2418 XM11122418 BUSHING 2452 XM11122452 HOUSING 2419 XM11122419 GEAR 25T 2453 XM11122453 THREAD DIAL 2419 1 XM11122419 1 SPACER 2454 XM11122454 HEX NUT M6 1 2420 XM11122420 SHAFT 2455 XM11122455 SET SCREW M6 1 X 16 2420 1 XM11122420 1 GEAR 24T 2456 XM11122456 HALF NUT 2421 XM11122421 WORM GEAR 2457 XM11122457 HALF NUT HOUSING 2422 XM11122422 KEY 5 X ...

Page 68: ... 12 20 PARTS 2514 2512 2511 2513 2511 2515 2502 2503 2508 2509 2504 2505 2506 2507 2510 2518 2526 2521 2519 2521 2520 2525 2524 2523 2522 2501 2528 2543 2544 2530 2531 2529 2542 2535 2537 2536 2534 2533 2535 2539 2540 2541 Saddle Cross Feed ...

Page 69: ...2531 SPANNER NUT 2509 XM11122509 CAP SCREW M8 1 25 X 35 2533 XM11122533 INDICATOR PLATE 2510 XM11122510 SADDLE SCREW 2534 XM11122534 INDICATOR PLATE SCREW 2511 XM11122511 CROSS SLIDE SCREW 2535 XM11122535 THRUST BEARING 8102 2512 XM11122512 CROSS SLIDE 2536 XM11122536 BRACKET 2513 XM11122513 GIB 2537 XM11122537 CAP SCREW M6 1 X 25 2514 XM11122514 BUSHING 2539 XM11122539 LEAD SCREW 2515 XM11122515 ...

Page 70: ...5 SPANNER NUT 2604 XM11122604 HEX NUT M10 1 5 2616 XM11122616 BRACKET 2605 XM11122605 COMPOUND SLIDE SCREW 2617 XM11122617 HANDLE LARGE 2606 XM11122606 COMPOUND SLIDE SCREW 2618 XM11122618 SET SCREW M5 8 X 5 2607 XM11122607 LEAD SCREW NUT 2619 XM11122619 CAP SCREW M6 1 X 15 2608 XM11122608 SET SCREW M6 1 X 8 2620 XM11122620 STEEL BALL 6MM 2609 XM11122609 HEX NUT M6 1 2621 XM11122621 COMPRESSION SP...

Page 71: ...W M10 1 5 X 50 3722 XM11123722 COLLAR 3707 XM11123707 SPECIAL SCREW 3723V2 XM11123723V2 HEX BOLT M12 1 75 X 100 V2 06 08 3708 XM11123708 PIN 3724 XM11123724 BASE SHOE BLOCK 3709 XM11123709 BALL BEARING 8101 3725 XM11123725 FLAT WASHER 12MM 3710 XM11123710 BRACKET 3726 XM11123726 HEX NUT M12 1 75 3711 XM11123711 GRADUATED DIAL 3727 XM11123727 SPECIAL NUT 3712 XM11123712 CAP SCREW M6 1 X 20 3728 XM1...

Page 72: ...achines Mfd Since 12 20 PARTS 3801 3819 3818 3807 3819 3818 3802 3803 3804 3805 3808 3828 3809 3812 3810 3827 3826 3825 3811 3813 3822 3824 3823 3821 3820V2 3806 3806 1 3806 2 3806 3 3806 4 3806 5 3806 6 Bed and Motor Parts ...

Page 73: ...el M1112 For Machines Mfd Since 12 20 PARTS 3838 3837 3820 3821 3836 3830 3818 3819 3835 3833 3818 3819 3834 3829 3828 3838 3837 3820V2 3821 3836 3830 3818 3819 3835 3833 3818 3819 3834 3829 3828 Cabinet Parts ...

Page 74: ...AN COVER 3823 XM11123823 RIVET 2 X 5 3806 2 XM11123806 2 MOTOR FAN 3824 XM11123824 INFORMATION PLATE 3806 3 XM11123806 3 MOTOR JUNCTION BOX 3825 XM11123825 HEX NUT M10 1 5 3806 4 XM11123806 4 MOTOR TERMINAL BLOCK 3826 XM11123826 SPECIAL STUD 3806 5 XM11123806 5 MOTOR CAPACITOR COVER 3827 XM11123827 SPECIAL NUT 3806 6 XM11123806 6 S CAPACITOR 150M 250V 3828 XM11123828 SPACER BLOCK 3807 XM11123807 S...

Page 75: ...6 X 55 4916 XM11124916 EXT RETAINING RING 30MM 4905 XM11124905 SET SCREW M6 1 X 6 4917 XM11124917 CAP SCREW M8 1 25 X 25 4906 XM11124906 COLLAR 4918V2 XM11124918V2 CONNECTION BRACKET V2 12 14 4907V2 XM11124907V2 FEED ROD V2 12 14 4919V2 XM11124919V2 SPINDLE ON OFF SWITCH V2 12 14 4908 XM11124908 KEY 4920 XM11124920 CAP SCREW M4 7 X 6 4909 XM11124909 ROLL PIN 4 X 20 4921 XM11124921 CAP SCREW M6 1 X...

Page 76: ...1125508 PHLP HD SCR M6 1 X 16 5502 XM11125502 COOLANT PUMP ASSEMBLY 5511V2 XM11125511V2 LENS V2 01 15 5503 XM11125503 HEX BOLT M5 8 X 25 5512V2 XM11125512V2 LED BULB 24V 3W BI PIN V2 01 15 5504 XM11125504 FLEX TUBE 5513V2 XM11125513V2 COMPLETE LAMP ASSY V2 01 15 5505 XM11125505 MOUNTING PEDESTAL 5514 XM11125514 FLOW VALVE 5506 XM11125506 COOLANT STANDPIPE 5515 XM11125515 RUBBER DRAIN TUBE 5507 XM1...

Page 77: ...126406 4 JAW CHUCK WRENCH 6431 XM11126431 GEAR 50T 6407 XM11126407 3 JAW CHUCK WRENCH 6432 XM11126432 GEAR 26T 6409 XM11126409 COMBO WRENCH 12 14MM 6433 XM11126433 GEAR 35T 6410 XM11126410 COMBO WRENCH 10 12MM 6434 XM11126434 GEAR 60T 6411 XM11126411 COMBO WRENCH 9 11MM 6435 XM11126435 TAILSTOCK WRENCH 6412 XM11126412 DRILL CHUCK B16 1 5 13MM 6436 XM11126436 3 JAW CHUCK 6413 XM11126413 DRILL CHUCK...

Page 78: ...26502 FUSE HOLDER 2A 6508 XM11126508 TERMINAL BLOCK 12 POLE 6503 XM11126503 CIRCUIT BREAKER 230V 400V 6509 XM11126509 TERMINAL BLOCK 20 POLE 6504 XM11126504 THERMAL RELAY 6510 XM11126510 FUSE HOLDER 5A 24V 6505 XM11126505 CONTACTOR GSC1 1801 6511 XM11126511 ELECTRICAL BOX 6506 XM11126506 CONTACTOR JZC3 40D 6512 XM11126512 GASKET 6502 6505 6501 6511 6512 6507 6508 6509 6506 6510 6504 6503 ...

Page 79: ...27305 FINGER W BEARING 7318 XM11127318 FLAT WASHER 8MM 7306 XM11127306 SET SCREW M6 1 X 8 7319 XM11127319 LOCK KNOB M8 1 25 7307 XM11127307 UPPER STEADY REST CASTING 7327 XM11127327 HEX NUT M6 1 7309 XM11127309 SET SCREW M6 1 X 20 7328 XM11127328 SET SCREW M6 1 X 20 7310 XM11127310 HEX NUT M6 1 7329 XM11127329 FOLLOW REST CASTING 7311 XM11127311 LOWER STEADY REST CASTING 7330 XM11127330 CAP SCREW ...

Page 80: ...SES LABEL 7603 XM11127603 DISCONNECT LABEL 7607 XM11127607 MACHINE ID LABEL Label Placement 7602 7607 7606 7601 7604 7605 7603 7602 7600 Safety labels warn about machine hazards and how to prevent serious personal injury The owner of this machine MUST maintain the original location and readability of all labels on this machine If any label is removed or becomes unreadable REPLACE that label before...

Page 81: ......

Page 82: ......

Page 83: ...he product This is Woodstock International Inc s sole written warranty and any and all warranties that may be implied by law including any merchantability or fitness for any particular purpose are hereby limited to the duration of this written warranty We do not warrant that Shop Fox machinery complies with the provisions of any law acts or electrical codes We do not reimburse for third party repa...

Page 84: ......

Reviews: