background image

HEAVY LIFT!

Straining or crushing 

injury may occur from 

improperly lifting the 

machine or some of its 

parts. To reduce this 

risk, get help from other 

people and use a forklift 

(or other lifting equip-

ment) rated for weight of 

machine.

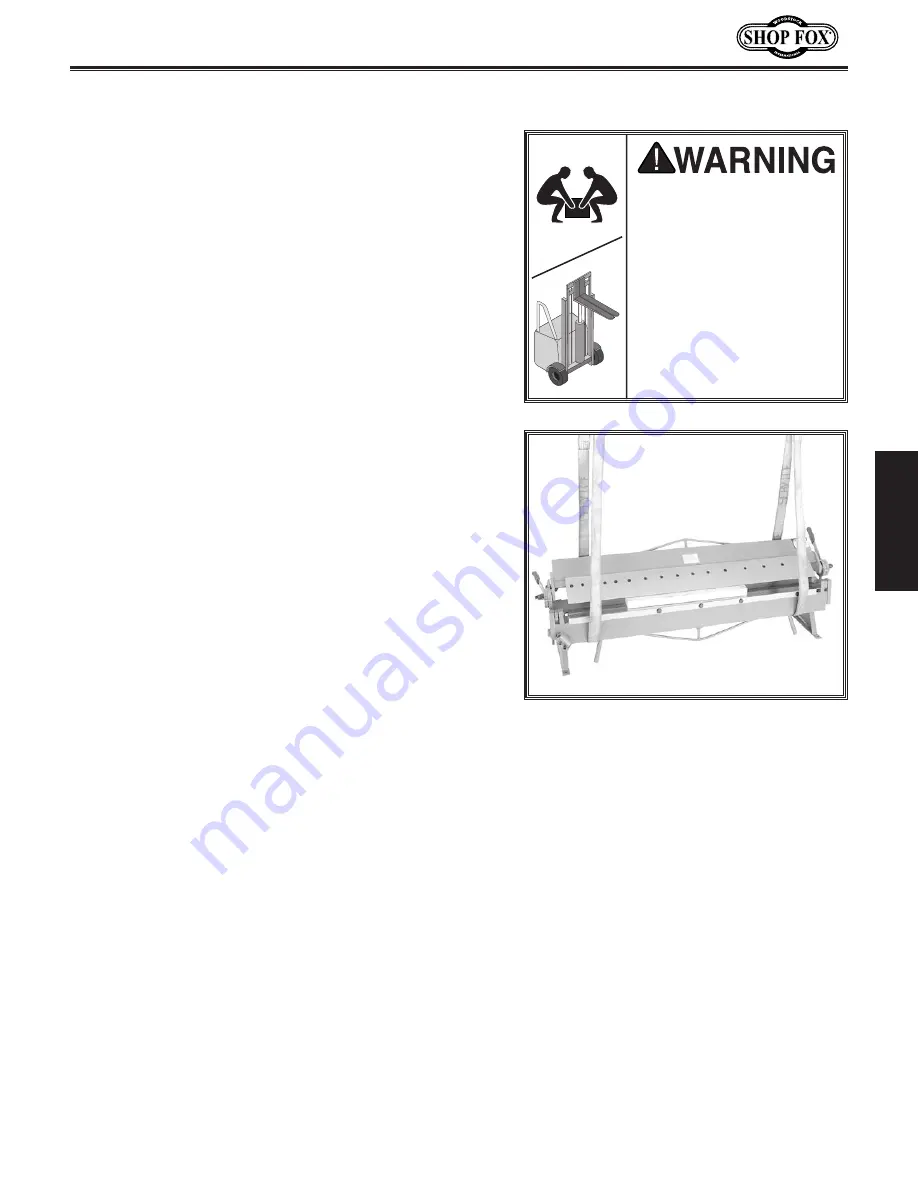
Figure.9..

Example of pan & box brake 

supported by lifting straps and 2x4 to 

secure clamping leaf.

-13-

Model M1118 (For Machines Mfd. Since 09/21)

SE

TU

P

Lifting.&.Placing

Use a forklift to lift the machine off the pallet and onto a 

suitable location.

To.lift.and.place.machine,.do.these.steps:

1..

Using a forklift, move crate to machine work site 

location.

2..

Remove crate top and sides, components inside 

crate, and blocks around machine base.

3..

Remove fasteners securing machine to base.

4..

Secure clamping leaf by inserting a wood 2x4 

between clamping leaf and bending block (see 

Figure.9

).

5..

Use forklift to raise machine, then place onto 

workbench.

6..

Fasten machine to workbench following instructions 

in 

Bench.Mounting.

on 

Page.14

.

Summary of Contents for SHOP FOX M1118

Page 1: ...360 734 3482 Online Technical Support techsupport woodstockint com COPYRIGHT OCTOBER 2021 BY WOODSTOCK INTERNATIONAL INC WARNING NO PORTION OF THIS MANUAL MAY BE REPRODUCED IN ANY SHAPE OR FORM WITHOUT THE WRITTEN APPROVAL OF WOODSTOCK INTERNATIONAL INC 22091KS Printed in China V1 10 21 ...

Page 2: ...ng grinding tool integrity and the usage of personal protective equipment The manufacturer will not be held liable for injury or property damage from negligence improper training machine modifications or misuse Some dust created by power sanding sawing grinding drilling and other construction activities contains chemicals known to the State of California to cause cancer birth defects or other repr...

Page 3: ... 9 Items Needed for Setup 9 Inventory 10 Machine Placement 11 Cleaning Machine 11 Cleaning Fingers 12 Lifting Placing 13 Bench Mounting 14 OPERATIONS 15 General 15 Spacing Fingers 16 Aligning Fingers 16 Adjusting Setback 17 Adjusting Clamping Pressure 18 Basic Bending 19 Bending Allowance 19 Positioning Counterweight 20 ACCESSORIES 21 Pan Box Brake Accessories 21 MAINTENANCE 22 General 22 Cleaning...

Page 4: ...rs of trouble free service Close attention to detail ruggedly built parts and a rigid quality control program assure safe and reliable operation Woodstock International Inc is committed to customer satisfaction Our intent with this manual is to include the basic information for safety setup operation maintenance and service of this product We stand behind our machines In the event that questions a...

Page 5: ...Mild Steel 16 Gauge Maximum Thickness at Full Width Mild Steel 18 Gauge Aluminum 11 Gauge Soft Brass 14 Gauge Annealed Phosphor Bronze 15 Gauge Soft Copper 14 Gauge Hard Copper 15 Gauge Stainless Steel 20 Gauge Brake Range 0 135 deg Minimum Reverse Bend 7 16 in Maximum Height of Pan Box Brake Sides 2 1 2 in Number of Fingers 16 Width of Fingers 2 3 4 in Construction Base Steel Bending Leaf Steel C...

Page 6: ...r Machines Mfd Since 09 21 INTRODUCTION Identification Become familiar with the names and locations of the controls and features shown below to better understand the instructions in this manual Clamping Leaf Clamping Finger 1 of 16 Bending Handles Bending Block Clamping Handles Setback Wheel 1 of 2 Bending Leaf Counterweight ...

Page 7: ...nd positions clamping fingers B Clamping Handle 1 of 2 Use to raise and lower clamping leaf C Clamping Finger 1 of 16 Holds workpiece in place while bending block produces bend Fingers can be individually removed or repositioned to allow clearance for workpiece D Bending Block Pivots with bending leaf to produce bend in workpiece E Clamping Pressure Adjustment Rod 1 of 2 Move up or down to set cla...

Page 8: ...CAL EQUIPMENT INJURY RISKS You can be shocked burned or killed by touching live electrical components or improperly grounded machinery To reduce this risk only allow an electrician or qualified service personnel to do electrical installation or repair work and always disconnect power before accessing or exposing electrical equipment DISCONNECT POWER FIRST Always disconnect machine from power suppl...

Page 9: ...debris make sure they are properly installed undamaged and working correctly FORCING MACHINERY Do not force machine It will do the job safer and better at the rate for which it was designed NEVER STAND ON MACHINE Serious injury may occur if machine is tipped or if the cutting tool is unintentionally contacted STABLE MACHINE Unexpected movement during operation greatly increases risk of injury or l...

Page 10: ...acked components damaged linkage levers or loose fasteners Correct any problems before use LEAVING UNATTENDED To reduce the risk of crushing or amputation injuries with children or visitors lower the clamping leaf when not in use METAL EDGES Sharp edges on sheet metal can produce severe cuts Always wear leather gloves and chamfer de burr sharp sheet metal edges before bending the workpiece with th...

Page 11: ...es during the entire setup process 9 Model M1118 For Machines Mfd Since 09 21 SETUP SETUP Unpacking This machine has been carefully packaged for safe transportation If you notice the machine has been damaged during shipping please contact your authorized Shop Fox dealer immediately Description Qty Forklift 1 Lifting Straps rated for 500 lbs 2 Additional Person 1 Safety Glasses for Each Person 1 Pa...

Page 12: ...m 1 D Hex Wrench 6mm 1 Inventory A B C D The following is a list of items shipped with your machine Before beginning setup lay these items out and inventory them Note If you cannot find an item on this list carefully check around inside the machine and packaging materials Often these items get lost in packaging materials while unpacking or they are pre installed at the factory ...

Page 13: ... Basic steps for removing rust preventative 1 Put on safety glasses 2 Coat the rust preventative with a liberal amount of cleaner degreaser then let it soak for 5 10 minutes 3 Wipe off the surfaces If your cleaner degreaser is effective the rust preventative will wipe off easily If you have a plastic paint scraper scrape off as much as you can first then wipe off the rest with the rag 4 Repeat Ste...

Page 14: ...he back of the machine to raise the clamping leaf then loosen the cap screws and remove the clamping fingers and toe clamps see Figure 8 After all the fingers have been cleaned coat them liberally with a metal protectant see Page 23 and clean the finger guide on the clamping leaf Place the fingers along the guide on the clamping leaf align the toe clamps to catch the bottom of the clamping leaf an...

Page 15: ...SETUP Lifting Placing Use a forklift to lift the machine off the pallet and onto a suitable location To lift and place machine do these steps 1 Using a forklift move crate to machine work site location 2 Remove crate top and sides components inside crate and blocks around machine base 3 Remove fasteners securing machine to base 4 Secure clamping leaf by inserting a wood 2x4 between clamping leaf a...

Page 16: ...rom moving during operation and causing accidental injury or damage The strongest mounting option is a Through Mount see example where holes are drilled all the way through the workbench and hex bolts washers and hex nuts are used to secure the machine in place Another option is a Direct Mount see example where the machine is secured directly to the workbench with lag screws and washers 14 Model M...

Page 17: ...ecessary knowledge and skills to operate this machine If at any time you are experiencing difficulties performing any operation stop using the machine The overview below provides the novice machine operator with a basic understanding of how the machine is used during operation so the machine controls components discussed later in this manual are easier to understand Due to its generic nature this ...

Page 18: ...tch finger widths or space fingers appropriately to match the inside width of your pan or box 3 Align remaining fingers and tighten cap screws Aligning Fingers To help ensure the bend is even along its length the clamping fingers must be parallel with the clamping surface and bending block Tool Needed Qty Hex Wrench 8mm 1 To align clamping fingers do these steps 1 Lower clamping leaf until clampin...

Page 19: ...ack is normally adjusted 11 2 times the thickness of 22 gauge and thinner workpieces and two times the thickness of workpieces thicker than 22 gauge M1118 material gauge capacities are listed in the Machine Specifications on Page 3 Tool Needed Qty Hex Wrench 6mm 1 To adjust setback do these steps 1 Determine setback required for bend 2 Raise clamping fingers about 1 2 off of clamping surface see F...

Page 20: ...clock viewed from right end of brake and 2 o clock viewed from left end of brake position clamping pressure is suitable for workpiece Proceed to Step 4 If clamping handles are not at 10 o clock viewed from right end of brake and 2 o clock viewed from left end of brake position clamping pressure is not suitable for workpiece Proceed to Step 2 2 Loosen adjustment nuts see Figure 16 and turn both set...

Page 21: ...djusting Setback on Page 17 2 Raise clamping leaf 3 Insert workpiece between clamping fingers and clamping surface 4 Align bend mark s on workpiece with fingers then clamp it in place using clamping handles Note If clamping handles do not lock the clamping pressure may need to be adjusted refer to Adjusting Clamping Pressure on Page 18 5 With body square to brake and using both hands lift bending ...

Page 22: ... be placed For example the counterweight would be positioned low in the collar for bending 20 gauge steel and high for bending 12 gauge steel Items Needed Qty Additional Person 1 Hex Wrench 8mm 1 To position counterweight do these steps 1 Loosen 2 cap screws on bending leaf counterweight collar see Figure 17 2 Have an additional person insert counterweight into counterweight collar then tighten 2 ...

Page 23: ... Shop Fox M1041 12 Plate Shear can be mounted for stationary use and features compound lever action for tremendous mechanical advantage Using a plate shear is the fastest way to cut sheet metal plate stock and round stock to size The Shop Fox D4140 Repairman s Taper Reamer features seven flutes for smooth bores removable handle for compact storage and reams holes from 1 8 to 5 8 Reamer measures 5 ...

Page 24: ...in coat of quality metal protectant to all exposed unpainted surfaces to prevent corrosion Cleaning Protecting For optimum performance from this machine this maintenance schedule must be strictly followed Ongoing To minimize your risk of injury and maintain proper machine performance stop operations immediately if you ever observe any of the items below and fix the problem before continuing operat...

Page 25: ...bricant Bending Leaf Pivots Oil Type ISO 32 Equivalent Oil Amount 1 2 Drops Lubrication Frequency Daily or As Needed Use an oil can to add lubricant to the hole shown in Figure 18 one on each side of the brake then raise and lower the bending leaf several times to distribute the lubricant Clamping Leaf Guide Pin Slots Oil Type NLGI 2 Equivalent Oil Amount Thin Coat Lubrication Frequency Weekly or ...

Page 26: ... tops of bending block and bending leaf see Figure 19 to determine if they are out of alignment 2 Loosen 5 hex bolts see Figure 19 that secure bending block to bending leaf just enough to move it up or down 3 Align bending block flush with top of bending leaf and then tighten hex bolts This section covers the most common service adjustments or procedures that may need to be made during the life of...

Page 27: ...Page 3 2 Properly align clamping fingers Page 16 3 Properly align bending block Page 24 4 Properly calculate and adjust setback Page 17 Workpiece moves while bending 1 Machine capacities exceeded 2 Clamping pressure not correctly adjusted 1 Use sheet metal gauge thickness size within machine capacities Page 3 2 Correctly adjust clamping pressure for workpiece thickness Page 18 The following troubl...

Page 28: ...SWIVEL ROD LEFT 25 XM1118025 CAP SCREW M12 1 75 X 20 8 XM1118008 SHAFT SLEEVE 26 XM1118026 CAP SCREW M10 1 5 X 20 9 XM1118009 CONNECTING SHAFT 27 XM1118027 SET SCREW M8 1 25 X 12 10 XM1118010 TENSION ROD 28 XM1118028 UPPER HANDLE COVER 11 XM1118011 CLAMPING FINGER 2 29 XM1118029 LOWER HANDLE COVER 12 XM1118012 CLAMPING FINGER 3 30 XM1118030 HEX NUT M12 1 75 13 XM1118013 CLAMPING FINGER 4 31 XM1118...

Page 29: ...ine to be operated again Contact us at 360 734 3482 or www woodstockint com to order new labels 101 102 103 106 107 104 105 REF PART DESCRIPTION REF PART DESCRIPTION 101 XM1118101 READ MANUAL LABEL 105 XM1118105 LACERATION HAZARD LABEL 102 XM1118102 SAFETY GLASSES LABEL 106 XM1118106 MODEL NUMBER LABEL 103 XM1118103 MACHINE ID LABEL 107 XM1118107 TOUCH UP PAINT SHOP FOX WHITE 104 XM1118104 PINCH H...

Page 30: ......

Page 31: ...ng the product This is Woodstock International Inc s sole written warranty and any and all warranties that may be implied by law including any merchantability or fitness for any particular purpose are hereby limited to the duration of this written warranty We do not warrant that Shop Fox machinery complies with the provisions of any law acts or electrical codes We do not reimburse for third party ...

Page 32: ......

Reviews: