Acknowledgments
Manual Acknowledgment
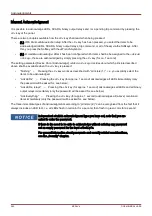
It is possible to acknowledge LEDs, SCADA, binary output relays and / or a pending trip command by pressing the
»C« key at the panel.
There are two principles available how the »C« key shall react when being pressed:
•
(1.)
With intermediate selection step: After the »C« key has been pressed, you select the items to be
acknowledged (LEDs, SCADA, binary output relays, trip command, or all of these) via the Softkeys. After
this, you press the Softkey with the »Wrench-Symbol«.
•
(2.)
Immediate acknowledge: After it has been configured which items shall be be assigned to the »Ack via
»C« key«, these are acknowledged by simply pressing the »C« key (for ca. 1 second).
The setting parameter [Device Para / Acknowledge]
»Ack via »C« key« decides about which principle described
above shall be available when the »C« key is pressed:
•
“Nothing” – Pressing the »C« key works as described with “principle (1.)“, i. e. you explicitly select the
items to be acknowledged.
•
“Ack LEDs” – Pressing the »C« key (for approx. 1 second) acknowledges all LEDs immediately (only
the password will be asked for, see below).
•
“Ack LEDs, relays” – Pressing the »C« key (for approx. 1 second) acknowledges all LEDs and all binary
output relays immediately (only the password will be asked for, see below).
•
“Ack Everything” – Pressing the »C« key (for approx. 1 second) acknowledges all (above) mentioned
items immediately (only the password will be asked for, see below).
The three immediate types of acknowledgments according to “principle (2.)“ can be recognized from the fact that it
always includes an LED test, i. e. all LEDs flash in red color for a second, then flash in green color for a second.
Independent of which acknowledgment type you have set, note that you are
asked to enter the password.
If there is the need to be able to acknowledge without entering any password
set an empty password for the level
»Prot-Lv1«.
For general information about passwords and security-related considerations,
see the „Security“ chapter.
252
MCDLV4
DOK-HB-MCDLV4-2E
Summary of Contents for HighPROtec MCDLV4
Page 3: ...Order Code Order Code 3 MCDLV4 DOK HB MCDLV4 2E...
Page 47: ...Installation and Connection 47 MCDLV4 DOK HB MCDLV4 2E...
Page 164: ...Input Output and LED Settings 164 MCDLV4 DOK HB MCDLV4 2E...
Page 433: ...Parameters 433 MCDLV4 DOK HB MCDLV4 2E...
Page 457: ...Device Parameters 457 MCDLV4 DOK HB MCDLV4 2E...
Page 473: ...Blockings 473 MCDLV4 DOK HB MCDLV4 2E...
Page 988: ...Protective Elements 988 MCDLV4 DOK HB MCDLV4 2E P P Q P Q P Q Q Q P S S...
Page 989: ...Protective Elements 989 MCDLV4 DOK HB MCDLV4 2E Pr Q P Q P Qr...
Page 1023: ...Protective Elements 1023 MCDLV4 DOK HB MCDLV4 2E...

