Manual 26518V2
5009FT Installation/Hardware
Woodward
47
CPU Module (Kernel A/B/C: A2)
System diagnostic routines continuously monitor each CPU for proper operation. If a fault condition is
detected, the fault is annunciated and the CPU is locked out of all voting. If necessary, use the CPU
module’s front panel LEDs to assist in diagnosing a related problem. If all CPU LEDs are turned off (not
illuminated), it is probable that input power is not present and verification should be made. If only one CPU
module has all of its LEDs off, it is probable that the kernel power supply is not functioning.
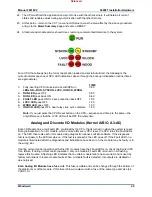
The CPU module has the following indicators and switch:
RESET (Recessed)
—This momentary push-button resets the CPU and I/O modules (Kernel) when
pressed. The CPU performs a boot-up sequence, and then synchronizes to the other Kernels and
functions normally.
RUN LED
—This turns GREEN when the CPU is operating and no faults are present. If this is RED, the
CPU is in Reset mode.
ETH G/Y (Link & TX/RX) LEDs
—Link Active GREEN indicates a valid Ethernet connection to another
device exists. Tx/Rx Active YELLOW when data is transmitted or received.
SYSCON LED
—System Controller GREEN LED –on when the CPU is active and in control of the Kernel
IO
LOW VCC LED
—This red LED turns on when the Kernel power supply’s +5 Vdc output is out of its
specified limits. If this LED is on and remains on after a CPU reset, replace the Kernel power supply.
FAULT LED
—This RED LED actively flashes CPU fault codes as necessary.
STANDBY LED
—NOT USED FOR TMR SYSTEMS
I/OLOCK LED
—This red LED turns on when a major CPU or I/O module hardware fault has been
detected. When a major fault is detected, the fault is annunciated, all discrete outputs are locked in a de-
energized state, and all analog output signals locked to zero current. The reason for a hardware fault can
be viewed through the engineering workstation. After the problem has been corrected, perform a CPU
reset to unlatch the I/O lock logic.
WDOG LED
—This RED LED turns on if the CPU stops executing the application program. After the
problem has been corrected, perform a CPU reset to unlatch the Watchdog LED logic.
CAN LEDs
—CAN communication ports – NOT USED THIS SYSTEM
Table 5-1. Default IP Addresses
KERNEL A
KERNEL B
KERNEL C
ENET1
IP = 172.16.100.47
Subnet = 255.255.0.0
IP = 172.16.100.48
Subnet = 255.255.0.0
IP = 172.16.100.49
Subnet = 255.255.0.0
ENET2
IP = 192.168.128.21
Sub = 255.255.255.0
IP = 192.168.128.22
Sub = 255.255.255.0
IP = 192.168.128.23
Sub = 255.255.255.0
To Replace a CPU module:
1. Read all warnings on pages v and vi of this Volume before replacing any module.
Replacing a CPU
will disable all IO from this kernel.
2. If the control is running and on-line, use the CCT to verify that the other CPUs are running without
faults. Review the Alarm Annunciation page to ensure that no IO channels in the selected Kernel are
needed to operate.
Released
Summary of Contents for MicroNet TMR 5009FT
Page 65: ...Manual 26518V2 5009FT Installation Hardware Woodward 63 Figure 8 4 DSLC Control Released...
Page 67: ...Manual 26518V2 5009FT Installation Hardware Woodward 65 Figure 8 5 Real Power Sensor Released...
Page 70: ...Manual 26518V2 5009FT Installation Hardware Woodward 68 Released...
Page 71: ...Manual 26518V2 5009FT Installation Hardware Woodward 69 Released...
Page 72: ...Manual 26518V2 5009FT Installation Hardware Woodward 70 Released...
Page 73: ...Manual 26518V2 5009FT Installation Hardware Woodward 71 Released...
Page 74: ...Manual 26518V2 5009FT Installation Hardware Woodward 72 Released...
Page 75: ...Manual 26518V2 5009FT Installation Hardware Woodward 73 Released...
Page 76: ...Manual 26518V2 5009FT Installation Hardware Woodward 74 Released...
Page 77: ...Manual 26518V2 5009FT Installation Hardware Woodward 75 Released...
Page 78: ...Manual 26518V2 5009FT Installation Hardware Woodward 76 Released...
Page 79: ...Manual 26518V2 5009FT Installation Hardware Woodward 77 Released...
Page 80: ...Manual 26518V2 5009FT Installation Hardware Woodward 78 Released...
Page 81: ...Manual 26518V2 5009FT Installation Hardware Woodward 79 Released...
Page 82: ...Manual 26518V2 5009FT Installation Hardware Woodward 80 Released...
Page 83: ...Manual 26518V2 5009FT Installation Hardware Woodward 81 Released...
Page 84: ...Manual 26518V2 5009FT Installation Hardware Woodward 82 Released...
Page 85: ...Manual 26518V2 5009FT Installation Hardware Woodward 83 Released...
Page 86: ...Manual 26518V2 5009FT Installation Hardware Woodward 84 Released...
Page 87: ...Manual 26518V2 5009FT Installation Hardware Woodward 85 Released...
Page 88: ...Manual 26518V2 5009FT Installation Hardware Woodward 86 Released...
Page 90: ...Manual 26518V2 5009FT Installation Hardware Woodward 88 Released...
Page 91: ...Manual 26518V2 5009FT Installation Hardware Woodward 89 Released...
Page 92: ...Manual 26518V2 5009FT Installation Hardware Woodward 90 Released...
Page 94: ...Manual 26518V2 5009FT Installation Hardware Woodward 92 Declarations Released...

