background image

SERVICING AND SPARES

6 720 803 599 (2012/06)

42

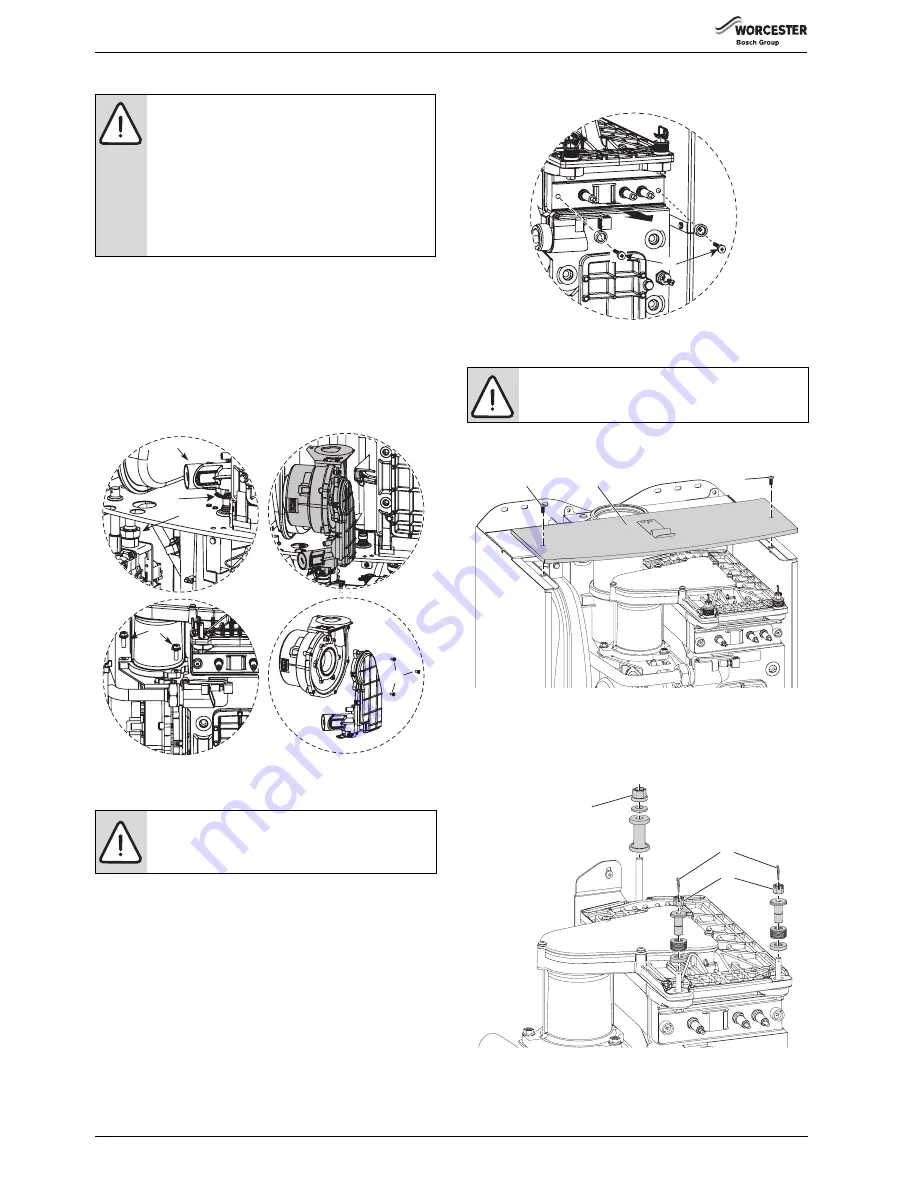
12. FAN ASSEMBLY

B

Remove electrical connector from fan.

B

Remove condensate trap (see page 37).

1. Undo the union connection (A) from the top of the gas valve.

B

Remove wire clip (B) from air/gas adjustment assembly (C) then pull 

gas pipe down.

2. Unscrew two screws (D).
3. Remove fan from boiler.
4. Remove three screws retaining the air/gas adjustment assembly (E).

B

Reassemble with new fan ensuring that seals are correctly fitted.

Fig. 59 Fan assembly removal

13. ELECTRODE ASSEMBLY

B

Disconnect spark electrodes and flame sensor connection.

B

Remove two screws (F).

B

Remove spark/flame electrode assembly (G) from heat exchanger.

B

Inspect the spark/flame electrode assembly and ceramics for signs of 

contamination or damage, replace as necessary.

B

If necessary, clean the spark/flame electrode assembly with a plastic 

scouring pad.

B

Replace electrode gasket and heatshield.

B

Re-assemble with the new gasket and secure with the screws (F) 

removed earlier.

Fig. 60 Electrode assembly

14. AIR/GAS MANIFOLD

1. Remove cover panel (A) by removing screws (B).

B

Check that the boiler is completely isolated from the gas supply.

Fig. 61 Top panel

2. Remove clips (C) and unscrew the two bolts (D).

B

Unscrew and remove the two hexagon screws (E) securing the fan.

B

Slacken fully the rear securing bolt (F).

Fig. 62 Release air/gas manifold

NOTICE: 

Air/Gas ratio

B

After re-assembly the combustion must be checked 

using the procedure in the section “Setting the air/gas 

ratio.”

B

The setting of the gas ratio must be carried out by a 

competent person.

Setting the air/gas ratio must not be attempted unless 

the person carrying out the operation is equipped 

with a combustion analyser conforming to BS 7927 

and is competent in its use.

WARNING: 

Electrode gasket

B

Do not remove the electrode assembly unless a new 

gasket and heatshield are available for re-assembly.

B   

C   

A   

D   

2.

1.

6720647361-37.2W

o

E

8.

3.

4.

WARNING: 

Air/Gas manifold

B

Do not remove the manifold unless a new gasket is 

available for re-assembly.

13

G

F

6720647361-38.1W

o

A

B

6720647361-63.1Wo

B

1.

F

C

D

2.

6720647361-64.1Wo

Summary of Contents for 29CDi GC 47-406-34

Page 1: ...G SYSTEMS AND MAINS FED DOMESTIC HOT WATER 6 720 803 599 2012 06 The appliances are for use with Natural Gas or L P G Cat II type C13 C33 Natural Gas 29CDi GC number 47 406 34 34CDi GC number 47 406 36 38CDi GC number 47 406 38 42CDi GC number 47 406 10 L P G 29CDi GC number 47 406 35 34CDi GC number 47 406 37 38CDi GC number 47 406 39 42CDi GC number 47 406 11 ...

Page 2: ...25 4 6 1 Ø60 100mm Telescopic flue kit 25 4 6 2 Ø60mm Plume management kit 25 4 6 3 Adjusting the standard terminal length 25 4 6 4 Installing the standard flue 26 4 6 5 Flue terminal plume re direction 26 4 7 Condensate connection 27 4 8 Electrical 28 4 9 Position of wired components 29 5 COMMISSIONING 30 5 1 Pre commissioning checks 30 5 2 Filling the system 30 5 3 Starting the appliance 31 5 4 ...

Page 3: ...ss of the ensuing risk if measures to prevent the risk are not taken This symbol indicates important information where there is no risk to people or property Symbol Explanation B Step in an action sequence Æ Cross reference to another part of the document List entry List entry second level Domestic Hot Water Central Heating Hot Water Storage Cylinder Domestic Cold Water Supply Electrical Supply Ga...

Page 4: ...ime installation in an existing property heating systems must conform to current building regulations Part L1a All new heating systems in dwellings must have at least two heating zones Each of these zones will be operated separately by both time and temperature controls The exception to this are single storey open plan dwellings where the living area is more than 70 of the total useable floor area...

Page 5: ... A Wall hung gas fired condensing combi boiler for central heating and domestic hot water B Wall mounting plate C Hanging bracket D Pre plumbing manifold E Hardware pack F Charging Link Assembly G Literature pack H Bottom panel I Trap Siphon Outlet Connection 22 mm Plastic Pipe H A max 360 mm max 760 mm 440mm 6720647361 01 3Wo B C D G F E 6720647631 02 1Wo I ...

Page 6: ...APPLIANCE INFORMATION 6 720 803 599 2012 06 6 2 2 LAYOUT COMPONENTS Fig 3 Boiler components 1 2 3 4 5 6 8 15 9 10 11 13 12 14 16 17 20 23 24 25 26 27 28 29 22 21 18 19 7 6720647361 03 1Wo ...

Page 7: ...PRIMARY SENSOR 28 EXPANSION VESSEL 29 REMOVABLE TOP CASE PANEL FOR SERVICING Table 3 Main boiler components 6720647361 04 2Wo 30 7 31 6 33 9 39 35 36 37 38 40 41 8 42 42 32 34 30 FLOW TURBINE 31 UNUSED PORT 32 RETURN CONNECTION TO BOILER HEAT EXCHANGER 33 AUTO AIR VENT 34 EXPANSION VESSEL CONNECTION 35 FLOW CONNECTION FROM BOILER HEAT EXCHANGER 36 DHW SENSOR 37 CH FLOW CONNECTION TO PRE PLUMBING M...

Page 8: ...low temperature nominal C 90 90 90 90 90 90 90 90 Max permissible operating pressure bar 3 0 3 0 3 0 3 0 3 0 3 0 3 0 3 0 Available pump head at 21 C system temp rise m 2 2 2 2 2 2 2 2 Gas flow rate Max 10 minutes from lighting Natural Gas G20 m3 h 3 3 3 7 4 2 4 4 Propane Gas LPG kg h 2 4 2 7 3 1 3 3 Flue Flue Gas Temp 80 60 C rated min load C 76 58 81 58 83 58 86 58 76 58 81 58 86 58 87 58 Flue Ga...

Page 9: ...ected to a governed meter Liquid Petroleum Gas LPG must be connected to a regulator Installation and connection of the gas supply to the boiler must be in accordance with BS6891 Under no circumstance should the size of the gas supply pipe be less than 22 mm The meter or regulator and pipe work to the meter must be checked preferably by the gas supplier This is to ensure that the equipment is in go...

Page 10: ... shower head can be immersed in water or comes closer than 25mm from the top edge of a bath or shower tray spill over level then an anti siphon device must be fitted to the shower hose Bidets with direct hot and cold mains water can be used with the approval of the local water authority and must be the over rim flushing type with shrouded outlets to prevent the fitting of hand held sprays SEALED P...

Page 11: ... removed using a proprietary condensate pump of a specification recommended by the boiler or condensate pump manufacturer The pump outlet pipe should discharge to a suitable internal foul water discharge point such as an internal soil and vent stack internal kitchen or bathroom waste pipe washing machine waste pipe etc A suitable permanent connection to the foul waste pipe should be used Fig 11 Co...

Page 12: ...ver such as those used to prevent blockage by leaves may offer further protection from wind chill Pipe drainage will be improved if the end is cut at 45 as opposed to a straight cut Fig 13 External disposal CONDENSATE SOAK AWAY The condensate drainage pipe may be run above or below the ground tothesoakaway Theexamplesshownonthispagerunaboveground The soak away must use a 100mm Ø plastic tube with ...

Page 13: ...e after installation then the compartment must be built or lined by a non combustible material BOILER CLEARANCES The diagram opposite shows the minimum space required to install and service the boiler VENTILATION This is a room sealed appliance and does not require any air for combustion from inside the property The requirementsof BS6798 and BS 5440regarding ventilation do not apply with the Green...

Page 14: ... must only be installed outside the shaded area Additional RCD Residual Current Device protection may be required Refer to the latest IEE wiring regulations BATHROOM INSTALLATIONS Fig 17 Bathroom installations Minimum clearance to removable door Minimum clearance required for servicing Height for either 60 100 flue or 80 125 flue Table 8 Minimum clearances 1130 1170mm 960mm 380mm 450mm 170 210mm 6...

Page 15: ... be installed to the valves on the manifold The pipes can be run below the boiler or alternatively up behind the boiler RUNNING PIPES BEHIND THE BOILER If the boiler pipes are to be run behind the appliance ensure that the pipespassclosetothewallasshowninthediagramopposite andwithin the pipe guide Alternatively a pre formed pipe kit can be purchased part number 7 716 192 607 Fig 18 Plumbing manifo...

Page 16: ...tion 2 100mmØ 125mmØ 29CDi 7 000mm 16 000mm 34CDi 7 000mm 16 000mm 38CDi 6 500mm 17 200mm 42CDi 6 000mm 12 500mm Horizontal extended flue with 1x90 bends Flue option 3 100mmØ 125mmØ 29CDi 5 500mm 14 000mm 34CDi 5 500mm 14 000mm 38CDi 5 000mm 15 200mm 42CDi 4 500mm 10 500mm Horizontal extended flue with 2x90 bends Flue option 4 100mmØ 125mmØ 29CDi 4 000mm 12 000mm 34CDi 4 000mm 12 000mm 38CDi 3 500...

Page 17: ...PRE INSTALLATION 6 720 803 599 2012 06 17 350 mm 570 mm 130 mm Min Flat roof 300 mm 500 mm Pitched roof 2 3 4 5 6 10 9 8 7 1 6720643895 12 1Wo ...

Page 18: ...mm below eaves and 75mm below gutters pipe and drains 16 The dimension below eaves balconies and car ports can be reduced to 25mm as long as the flue terminal is extended to clear any overhang External flue joints must be sealed with suitable silicon sealant 17 Flue clearance must be at least 300mm from the ground Terminal guards must br fitted if the flue is less than 2 metres from the groundorif...

Page 19: ...l external corners The air intake clearance can be reduced to 150mm providing the flue exhaust outlet has a 300mm clearance 8 Clearances no less than 200mm from the lowest point of the balcony or overhang 9 1 200mm from an opening in a car port on the same wall e g door or window leading into the dwelling 10 600mm distance to a surface facing a terminal unless it will cause a nuisance BS 5440 Part...

Page 20: ...ing ladder to loft space Two sets of steps should be used Two people should share the lifting of the boiler up to the loft hatch wheretheboilerisenteredintotheloftspacetiltedandslidonitsback into the loft Once the appliance is removed from its packaging check the contents against the packing list A Carton B Wall mounting plate C Hanging bracket D Pre plumbing manifold E Hardware pack F Charging Li...

Page 21: ...pre plumbing manifold B Secure wall mounting plate with hanging bracket with four screws supplied with the boiler Do not fully fasten the lower two screws FLUE OUTLET B Follow the diagram opposite to mark the centre of the flue for rear outlet 1 2 or for side outlet 2 3 B For the 60 100mmØ flue make a 125mm diameter hole through the wall using a core drill or similar For flues using an optional we...

Page 22: ...h the cold water inlet and CH return connections B Insert the Charging Key initially aligning the arrow on the key with the unlock symbol on the Charging Link body Ensure that the key is inserted fully and turn to the lock position Check that the key is secure see diagram 3 below B To fill the system from the cold water inlet turn the white plastic control tap on the Charging Link to the fully out...

Page 23: ...ing base B and place safely away from the working area REMOVING OUTER CASE 8 Loosen but do not remove the 2 screws E securing boiler casing at the bottom of the appliance 9 Pull upwards to release the clip F on top of the boiler and pull the case upwards 10 Remove the outer case 11 Remove the protective packaging G from the electrode assembly A Outer carton B Packaging base C Protective wrapping D...

Page 24: ...d and the system pipes B Connect the gas supply to the boiler gas cock 22mm compression B Connect cold water in and DHW out to the boiler s 15mm compression connectors B Connect the CH flow and CH return pipes to the boiler s 22mm compression connections B Connect the condensate discharge pipework to the boiler s condensate outlet connections 5 Push the lever on the pressure relief connector UP un...

Page 25: ...e used with plume management extension components Fig 27 Ø60mm PLUME MANAGEMENT KIT 7 716 191 086 replaces the plume deflector in the Ø60 100mm telescopic flue terminal 4 6 3 ADJUSTING THE STANDARD TERMINAL LENGTH 1 Extend tube 1 by withdrawing from tube 2 to achieve the flue lengthrequired 350 570mmforthestandardtelescopicflueor570 790mm for the longer telescopic flue Secure with screw provided a...

Page 26: ...to the terminal 2 as shown Fig 31 Flue installation 4 6 5 FLUE TERMINAL PLUME RE DIRECTION The flue discharge can be re directed allowing some plume redirection control alternatively a complete plume management system can be fitted to the flue terminal RE DIRECTING THE FLUE DISCHARGE 1 Using a suitable tool release the clips 1 2 the terminal end and rotate through 180 1 Refit to the terminal ensur...

Page 27: ...diameter plastic pipe It must fall at least 52mm per metre towards the outlet B A 22mm adaptor pipe is contained in the fitting pack Fig 34 Fitting siphon 1 Opening in building 2 Flue discharge 3 Plume deflector 4 Minimum 1500mm from an opening in the building 6720643895 119 1Wo 1 3 4 2 Any external condensate pipe work of excessive runs should be protected with weather resistant insulation to hel...

Page 28: ...l frost thermostat connection ST6 B Connect frost thermostat supply LIVE to terminal FS B Connect frost thermostat SWITCHED LIVE to terminal FR 8 230V room thermostat and or external timer ST10 B Remove link B Connect room thermostat LIVE supply to terminal LS B Connect room thermostat SWITCHED LIVE return to terminal LR B Connect room thermostat NEUTRAL to terminal NS 9 Refit control panel cover ...

Page 29: ...Supply 230V EXTERNAL CONTROLS OPTION WORCESTER 24V CONTROLS OPTION PLUG IN POINT under blanking cover on fascia EMS BUS contacts for FX controls Outside sensor FW 100 Live Supply Live Return Neutral Live Orange Blue Yellow Green Black Colour sequence Blue Black Yellow Grey Orange Orange Orange Orange Grey White Black Red Red 7 8 9 B B 4 2 1 A F Purple White Black FAN Colour sequence EXTERNAL FROST...

Page 30: ... symbol on the charging link body Ensure that the key is inserted fully and turn to the lock position Check that the key is secure 6 To fill the system from the cold water inlet turn the white plastic control tap C on the charging link to the fully out position 7 Once the system has been filled to a pressure of 1bar turn the white control tap C to its closed position 8 Vent all radiators retighten...

Page 31: ...tic air vent Fig 37 Control panel B Press button A and the power on indicator M illuminates BLUE After a few seconds the display C will show the flow temperature 2 Turn the CH temperature control I to maximum The burner on indicator L illuminates GREEN when the burner has lit 3 If the boiler fails to light the BLUE power indicator M and reset button E will flash alternately To reset press and hold...

Page 32: ... pressure with the boiler running at maximum Press the Performance test button J for more than ten seconds and set Central Heating temperature to maximum The Performance test button J will illuminate continually and the display C willalternatebetween andthecentralheatingflow temperature B Check the gas supply working pressure at the gas valve conforms to values shown in Fig 41 or Fig 42 B If press...

Page 33: ...formance test button J will illuminate continually and the display C willalternatebetween andthecentralheatingflow temperature B Where a gas meter is not available e g L P G the CO CO2 must be checked to the units shown in the setting of the air gas ratio refer to section 6 2 B If pressure and gas rate are satisfactory press the Performance test button again and the boiler will return to normal op...

Page 34: ... Hold the panel up against the underside of the boiler and slide towards the rear until it is fully engaged HANDOVER B Complete the Benchmark check list B The fascia cover is opened by pulling the flap D towards you B Set up the controls and show the user how to operate all the controls shown in the User Guide B Iftheapplianceisunusedandexposedtofreezingconditions shutoff all the mains supplies an...

Page 35: ...on 6 A Use the ECO and Holiday buttons to scroll through the menu Refer to Fault Finding for rectification procedures 6 1 1 COMPONENT ACCESS Removing outer case 1 Remove bottom panel by pulling it forward and off 2 Undo but do not remove the two screws A securing boiler casing at the bottom of the appliance 3 Pull upwards to release the clip B on top of the boiler 4 Pull case forward and remove Fi...

Page 36: ...Fan pressure readings Pressures readings in the black area will indicate that the heat exchanger requires attention cleaning There is a special accessory kit available specifically designed for cleaning the heat exchanger Part number 7 719 001 996 Fig 49 Fan pressure test point Thistestistodetermineiftheheatcellrequirescleaning attention B When running in the Performance test mode the boiler will ...

Page 37: ...the screws B B Check that the boiler is completely isolated from the gas supply 2 Remove the clips C and unscrew the two bolts D B Unscrew and remove the two hexagon screws E securing the fan B Slacken fully the rear securing bolt F B Remove the burner cover plate G NOTICE Air Gas ratio B After servicing the CO CO2 must be checked using theprocedureinthesection Settingtheair gasratio on page 38 B ...

Page 38: ...essthanthepressureattheregulatorfor LPG 4 Set the central heating control to minimum This will make the boiler go to minimum power 5 Measure the CO2 it should now be at the figure for minimum output B If not use a 4mm Allen key to adjust the min adjustment on the gas valve until correct B Return to maximum and re check the CO2 B If correct press and hold down the Performance test mode button for t...

Page 39: ...ig 52 Removing outer case MOVING BOILER CONTROL TO SERVICE POSITION 1 Press in the centre of the white plastic clip securing the control panel and slide down to release 2 Pull the control panel forward into the service position Fig 53 Controls to service position CAUTION TURN OFF THE GAS SUPPLY AND ISOLATE THE MAINS SUPPLIES BEFORE STARTING ANY WORK AND OBSERVE ALL RELEVANT SAFETY PRECAUTIONS NOTI...

Page 40: ...ctors from thermostat B Unscrew the sensor 5 FLUE LIMIT THERMOSTAT B Remove electrical connections B Push the flue limit thermostat into the sump B Retrieve the thermostat from the sump well 6 EXPANSION VESSEL B Drain the appliance 6 1 Remove locking screw D 6 2 Undo the union connection E at the bottom of the expansion vessel B Remove expansion vessel from boiler B Set the pressure of the new ves...

Page 41: ... B Remove siphon from the boiler B Fitthenew siphon to the sump and ensure thatcondensate discharge pipe is firmly connected to the outlet pipe work Fig 56 9 ACCESS TO BOILER CONTROL COMPONENTS B Remove 3 screws A and remove cover from control 10 PCB FUSE B Remove fuse B from the PCB and replace B There is a spare fuse clipped into the cover Fig 57 Component and fuse access 11 PCB REMOVAL To gain ...

Page 42: ...ket and secure with the screws F removed earlier Fig 60 Electrode assembly 14 AIR GAS MANIFOLD 1 Remove cover panel A by removing screws B B Check that the boiler is completely isolated from the gas supply Fig 61 Top panel 2 Remove clips C and unscrew the two bolts D B Unscrew and remove the two hexagon screws E securing the fan B Slacken fully the rear securing bolt F Fig 62 Release air gas manif...

Page 43: ...ler B Remove condensate trap see page 41 B Remove fan assembly see page 42 1 Remove plastic nut A from the base of the inner casing Fig 66 Heat exchanger removal 1 2 Remove return pipe at the bottom of heat exchanger Fig 67 Heat exchanger removal 2 3 Remove screw at the top of the heat exchanger C B Unscrew the flow pipe D Fig 68 Heat exchanger removal 3 4 Undo flue connection E from sump F B Pull...

Page 44: ...re any seals that have been disturbed are renewed 19 AUTO AIR VENT B Ensure the appliance has been fully drained 1 Use a screwdriver or similar to rotate the air vent anticlockwise 2 Lift the air vent C out of the housing and remove B To refit follow the above in reverse Fig 72 Auto Air Vent removal 20 DHW TEMPERATURE SENSOR B Ensure the domestic hot water circuit is fully drained B Disconnect the...

Page 45: ...t the electrical connection to the turbine B Remove the spring clip from the housing and move the brass pipe to one side 1 Withdraw the flow sensor and filter from the housing B Using the cartridge tag withdraw the flow restrictor housing B If the regulator housing has become stuck a pair of long nosed pliers may be used to grip the housing B To refit follow the above in reverse B Ensure any seals...

Page 46: ...the gauge B Disconnect the pipe work to the pressure relief valve B Release the locking devices that secure the two copper water pipes leading to the combustion chamber by squeezing the two tabs together and rotating anticlockwise viewed from above 1 Undo the two screws securing the hydraulic block to the chassis located top left top right of the housing 2 Lift the left hand side of the block slig...

Page 47: ...etal clip to the right of the pump head to release the pump housing B Slide the device to the left and then withdraw it from the appliance 1 Remove the spring clip from the pressure relief valve housing 2 Withdraw the pressure relief valve A To refit follow the above in reverse B Ensure any seals that have been disturbed are renewed Fig 79 Plastic protection device removal 29 DHW HEAT EXCHANGER B ...

Page 48: ... H22 463 Pressure gauge 8 718 224 344 0 GC No H02 528 Flow sensor 8 716 115 754 0 GC No H02 529 DHW temperature sensor 8 714 500 081 0 GC No H02 538 Heat exchanger 16 plate 8 716 106 685 0 GC No H02 531 Heat exchanger 20 plate 8 716 108 212 0 GC No H22 465 Control unit 8 737 703 196 0 Bearing plate Fan intake diaphragm 8 715 505 883 0 Diverter valve assembly 8 716 106 845 0 GC No H02 533 Diverter ...

Page 49: ...ay code Description Remedy A1 Pump has run dry or pump has stalled seized Check for water leaks Free the pump or replace A7 Hot water NTC sensor defective Check hot water NTC sensor connecting lead for circuit breaks short circuits A8 Break in communication to TD200 or and RT10 Check electrical connections b1 Code plug not detected Insert code plug correctly test and replace if necessary C6 Fan sp...

Page 50: ... setpoint by 10K Diverter Value in CH position pump ON Gas value OFF Fan overrun 30 seconds Over temperature shut down if water temperature exceeds set value CH setpoint 90 seconds stabilisation period Gas value OFF Pump run 3 minutes Fan run 30 seconds Fan gas modulation to achieve set temperature 35 88 0 C Fan to start speed Spark ignition 4 seconds 5th attempt Stop spark wait 10 seconds Room th...

Page 51: ... DHW position Pump ON 5th attempt Spark ignition 4 seconds Stop spark Wait 10 seconds BURNER LIT IGNITION SEQUENCE see details GREEN FLAME LIGHT ON DEMAND END DEMAND END Fan gas modulation to achieve set temperature 40 60 0 C Over temperature shut down if water temperature is10 0 C above set value Burner shut down if primary temperature 95 0 C Diverter value opens to CH Fan gas modulation to achie...

Page 52: ...2 7 4 PROTECTION FUNCTION Holiday mode set to ON All other demands not active Frost protection active DHW demand active Pump runs for 5 seconds every 24 hours Pump antiseize Run autofroststat function Boiler temperature below 8o C 6720647361 61 1Wo ...

Page 53: ...FAULT FINDING DIAGNOSIS 6 720 803 599 2012 06 53 ...

Page 54: ...ffect the customer s statutory rights If yes and if required by the manufacturer has a water scale reducer been fitted CONDENSING BOILERS ONLY The condensate drain has been installed in accordance with the manufacturer s instructions and or BS5546 BS6798 Yes If the condensate pipe terminates externally has the pipe diameter been increased and weatherproof insulation fitted Yes ...

Page 55: ...eer Name Company Name Telephone No Gas Safe Register No Comments Signature Date Engineer Name Company Name Telephone No Gas Safe Register No Comments Signature Date Engineer Name Company Name Telephone No Gas Safe Register No Comments Signature Date Engineer Name Company Name Telephone No Operative ID No Comments Signature Date Engineer Name Company Name Telephone No Gas Safe Register No Comments ...

Page 56: ... Worcester Bosch Group is a brand name of Bosch Thermotechnology Ltd worcester bosch co uk 6 720 803 599 2012 06 WORCESTER BOSCH GROUP TECHNICAL SUPPORT 0844 892 3366 APPOINTMENTS 0844 892 3000 SPARES 01905 752571 LITERATURE 0844 892 9800 TRAINING 01905 752526 SALES 01905 752640 ...

Reviews: