background image

Commissioning


Greenstar 2000 – 6 721 820 552 (2021/02)

46

6.4

Starting the appliance

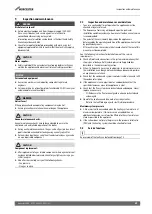
NOTICE

Damage to appliance or system!

Running the appliance:

▶ Never run the appliance when the appliance/system is empty or 

partially filled.

6.4.1

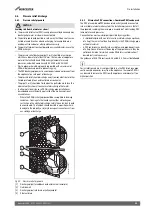
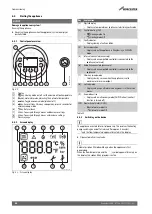
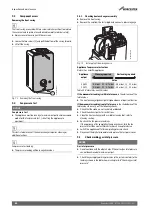
Control panel overview

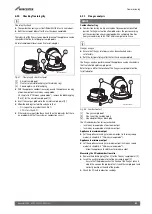
Fig. 60

[1]

Display

[2]

(

key: Heating mode on/off, set the maximum flow temperature

[3]

*

 key: Hot water mode, adjusting the hot water temperature

[4]

eco

 key: Toggle economy mode (pre-heat off)

[5]

ok

 key: Save settings, Chimney sweeper key: press 5 seconds for 

chimney sweep mode

[6]

"

 key: Return/back

[7]

 key: To navigate through menus and decrease settings

[8]

 key: To navigate through menus and increase settings

[9]

Pressure gauge

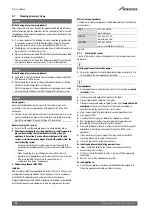
6.4.2

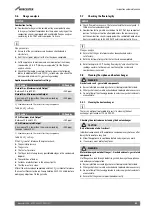
Screen display

Fig. 61 Screen display

Table 23

6.4.3

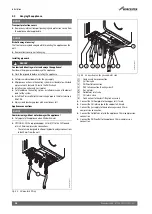
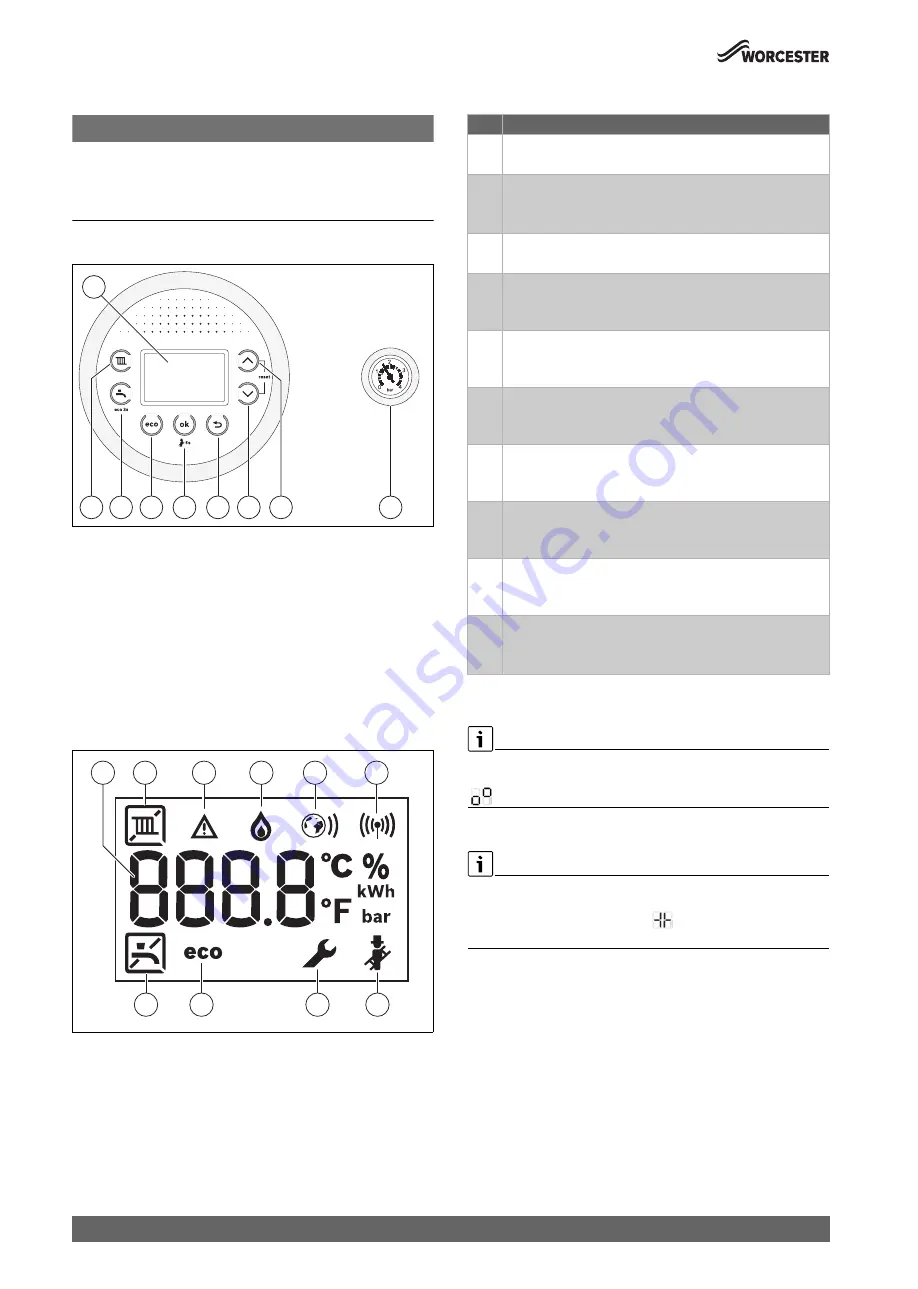
Switching on the device

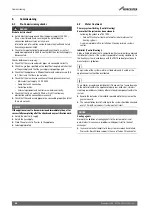
The appliance is vented after initial power-up. This involves the heating 
pump switching on and off at intervals (for approx. 4 minutes).

 and the flow temperature appear alternately in the display.

▶ Open automatic air vent valve.

Automatic siphon fill mode will begin when the appliance is first 
powered-up.
When the flow temperature and the 

 symbol appear alternately on 

the display, the siphon filling program is active.

0010029487-001

1

2

3

4

5

6

7

8

9

0010016015-004

10

9

2

1

3

4

5

6

8

7

Key

Explanation

[1]

Digital display

• Displays a temperature or appliance status/diagnostic code.

[2]

Central heating (CH)

Heating mode On

Heating mode Off

[3]

Fault indicator

• Displays during a fault condition.

[4]

Burner operation

• Displays when the appliance is firing during a CH/DHW 

mode.

[5]

Internet connected (accessory)

• Displays when compatible controller is connected to the 

appliance (not used).

[6]

Radio link connected (accessory)

• Displays when compatible controller is connected to the 

appliance.

[7]

Chimney sweep mode

• Displays during service when the appliance is set to 

maximum or minimum output.

[8]

Service mode

• Displays when a qualified service engineer is in the service 

menus.

[9]

Eco mode active

• Displays when in Economy mode (DHW Pre-heat/comfort 

function is turned off)

[10] Domestic hot water (DHW)

 Hot water mode On

Hot water mode Off
Summary of Contents for GR2300iW C

Page 1: ...6 721 820 552 2021 02 UK IE Installation and Maintenance Instructions Gas fired condensing combi appliance Greenstar 2000 2 1 3 4 0 bar GR2300iW C ...

Page 2: ...Combined PRV condensate 33 4 7 Cleaning primary systems 34 4 7 1 Flushing the system 34 5 Installation 35 5 1 Position the appliance 36 5 1 1 Mounting bracket fixing 36 5 2 Appliance connections 37 5 3 Hanging the appliance 38 5 4 Flue turret adaptor installation 39 5 5 Electrical connection 40 5 5 1 Installer connections 41 5 5 2 Cable preparations 43 5 5 3 External controls Domestic installation...

Page 3: ...emoving the gas valve 69 10 8 Removing the pump 69 10 9 Removing the automatic air vent valve 69 10 10 Removing the motor of the diverter valve 70 10 11 Removing the heat exchanger 70 10 12 Replacing the control unit 71 10 13 Replacing the 230V interface box 71 10 14 Reattaching the casing on the side 72 11 Fault finding and diagnosis 73 11 1 General information 73 11 2 Fault code table 74 11 3 Pu...

Page 4: ...ineer such as a Gas Safe registered engineer including a British Gas engineer Failure to install correctly could lead to prosecution If you are in any doubt contact the Worcester Bosch Group help line 0330 123 3366 Distancelearningandtrainingcoursesareavailable from Worcester The BENCHMARK Commissioning Checklist can be found on page 93 of this Installation manual H Notices for the target group Th...

Page 5: ...tricity supply is safely Isolated and secured to prevent inadvertent re connection Information on safe isolation can be found in the Health and Safety Executive guidance HSG85 Using test equipment approved to GS38 to confirm that the electricity supply is disconnected Refer to the manufacturer s information when installing non Worcester components and systems to the Worcester appliance H Handover ...

Page 6: ...nthevicinityofthe appliance Chemically aggressive substances can corrode the appliance and invalidate any warranty H Fitting and modification Fittingtheapplianceandanycontrolstotheappliance may only be carried out by a competent engineer in accordance with the current Gas Safety Installation and Use Regulations Flue systems must not be modified in any way other than as described in the fitting ins...

Page 7: ... zone the upstairs and downstairs separately compliance with the zone requirements can be achieved by a single room thermostat or programmable room thermostat While the system is drained down it is best practice to fit Thermostatic Radiator Valves TRV s to all radiators except the area where the room thermostat is sited British Standards Where no specific instruction is given reference should be m...

Page 8: ...d as per the intended use statement Operation outside the parameters of the intended use is considered misuse and could cause harm to people and damage to property Accessories should be as per accessories list Minimum operational parameters are included in this document Using the appliance outside of its intended use may also invalidate the manufacturer s guarantee CH Water Salt based artificially...

Page 9: ...e and flue outlet dimensions Table 3 Appliance and flue outlet dimensions Table 4 Pipe dimensions For servicing purposes keep condensate and pressure release valve discharge pipes away from other hydraulic components Appliance type Part number Gas Council number GR2300iW 25 C NG 7 736 902 099 47 800 26 GR2300iW 30 C NG 7 736 902 100 47 800 28 GR2300iW 25 C LPG 7736 902 101 47 800 27 GR2300iW 30 C ...

Page 10: ...ation Greenstar 2000 6 721 820 552 2021 02 10 3 6 Product overview Fig 3 Product overview 0010033590 001 1 25 26 27 28 29 30 31 32 33 34 35 36 37 38 39 40 24 23 2 3 4 5 6 7 8 9 10 11 12 13 14 15 16 17 18 19 20 21 22 ...

Page 11: ...ntrol smart control system Table 7 EasyControl accessories Basic weather compensation sensor Outdoor weather sensor to activate on board simple Weather Compensation Table 8 Control accessories The outdoor weather sensor is supplied with the Sense II It is optional with the Comfort II RF Weather compensation is available with the EasyControl without the need for a physical outdoor sensor however it...

Page 12: ... All other valves should conform to BS 1010 It is best practice to fit Thermostatic Radiator Valves TRV s to all radiators except the area where the room thermostat is sited which must be fitted with lockshield valves that are left open The circulating pump speed is fixed therefore as system circulation can be significantly adjusted or stopped by TRV s or zone valves a system bypass must be instal...

Page 13: ... automatic filling accessory in the applicable menu function If the dissected lines are in area A then no additional expansion is required If the dissected line is in are B then an additional expansion vessel must be installed Fig 4 Fig 5 Curves for the expansion vessel 1 Pre charge pressure 0 5 bar minimum 2 Pre charge pressure 0 75 bar 3 Pre charge pressure 1 0 bar 4 Pre charge pressure 1 2 bar ...

Page 14: ...CD must be employed where additional protection is required that is suitable for a low energy DC modulating pump according to IET wiring regulations External 3 A fuse to BS1362 The appliance must be earthed Cable PVC insulated 0 75mm2 24 x 0 2mm temperature rated to 90 C to BS EN50525 Any additional components that are connected to the appliance with mains electrical supply must not have a separat...

Page 15: ...as pipe work Gas installation pipe work must be designed to ensure the pressure loss between the meter outlet NG table 24 Allowed mbar pressure drop Basic pipe sizing calculation Basic pipe sizing calculation This method is only a guide for more complex design please refer to latest version of BS6891 and training given in ACS Natural Gas NG Discharge rates for copper tube with 1mbar differential p...

Page 16: ...itted a mini expansion vessel 3 should be connected to the mains water inlet pipe 1 between the non return valve 2 and the appliance 4 as shown below Fig 9 Mini expansion vessel location 1 Mains water inlet pipe 2 Non return valve 3 Mini expansion vessel part no 7 716 192 105 4 Appliance 4 3 Appliance location and clearances 4 3 1 Appliance location Follow local regulations for the location within...

Page 17: ...eset the appliance Roof space installations must fully conform to BS 5410 part 1 roof space installations Products in roof spaces must have permanent fixed lighting a permanentfixedretractableladderandafixedfloorareasufficientto allow access for normal use and servicing around the product and between the product and the access hatch We would also recommend that a remote pressure gauge and filling ...

Page 18: ...d below the appliance There must be at least 300mm clear space to either the left hand or right hand side of the appliance This clear space must be from the required clear height above the appliance to floor level This clearance will not apply if the appliance is sited within 300mm of a door way and the door frame is the only obstruction Minimum clearances must be observed to any obstruction surfa...

Page 19: ...em is going to be concealed provision must be made for service and inspection Voids containing concealed flues must have at least one inspection hatch no less than 300mm square Fluejointswithinthevoidmustnotbemorethan1 5metresfromthe edge of the inspection hatch Inspection hatches should be located at changes of direction Ifthisisnotpossible bendsshouldbeviewablefrombothdirections Refertothemanual...

Page 20: ...lue length L adaptor bend included in length calculation 60 100 330 1 050mm 80 125 N A Extended horizontal flue Fig 17 Horizontal flue option Flue length L adaptor bend included in length calculation Maximum flue length as stated in Horizontal maximum flue lengths Horizontal flue with additional 90 elbow Fig 18 Horizontal flue option Flue length L adaptor bend included in length calculation Maximu...

Page 21: ...s stated in Horizontal maximum flue lengths minus 2 x 90 bends equivalent straight flue length as stated in Table 16 Effective length of bends Vertical balanced flue assembly Fig 23 Vertical flue option Flue length L Maximum flue length as stated in Vertical maximum flue lengths Vertical balanced flue with 90 elbow offset Fig 24 Vertical flue option Flue length L Maximumfluelengthasstatedin Vertic...

Page 22: ...0mm pipe The Plume management extension kit contains the components required for such a configuration Plume management bends NOTICE Effective plume management lengths of bends Each bend used has an equivalent straight plume management length Refer to the table 17 Table 17 Effective length of bends For every extra 1 000mm of plume management after the first 500mm the internal 60 100 flue length mus...

Page 23: ...The terminal must be at least 1 500mm from the opening or vent whensitedbelowthewindowor600mmwhensitedtoeitherside or above 7 400mm measured diagonally from a pitched roof or 500mm in regions with heavy snow fall 300mm measured vertically from the air intake to the closest intersection with the roof 8 1 200mm separation measured between a vertical flue and a horizontal flue terminal 9 Forthepurpos...

Page 24: ...KYLIGHT DORMER 1000 600 300 300 300 BELOW GROUND OPEN LIGHT WELL 15 2 2 1 1 1 200 25 100 16 25 100 10 300 600 BOUNDARIES 1 2 1 2 9 100 25 25 100 25 25 100 25 600 600 2000 OPENING OPPOSITE TOP BOUNDARY LINE 3 4 5 11 11 11 7 10 10 10 5 1 200 25 75 25 75 600 600 1000 1200 600 300 300 300 300 300 300 300 300 200 200 300 300 300 25 300 1500 1200 13 0010021442 004 5 300 150 8 300 TOP 17 18 ...

Page 25: ...ce If the terminal section is less than 150mm and has two screws securing it to the elbow the terminal section will not require a supporting bracket 11 300mm above below and either sideof an opening door air vent or opening window 12 Below ground level in an open lightwell The flue must be at least 600mm from the opposing surface and have at least 300mm clearance either side and below The flue ter...

Page 26: ...entric flue terminal positions unless the flue position is specified in figure 30 Plume re direct and plume management terminal positions Terminals must be positioned so to avoid combustion products entering the building Supporttheflueatapproximatelyonemetreintervalsandatachange of direction use suitable brackets and fittings Fig 30 Plume re direct and plume management terminal positions BOUNDARY ...

Page 27: ...anagementkittheairintakemeasurementcanbe reduced to 150mm providing the flue exhaust outlet has a 300mm clearance 11 Below balcony or overhang The air intake clearance can be reduced to 150mm providing the flue exhaust outlet has a 200mm clearance 12 1 200mm between terminals facing each other1 13 Internal externalcorners Theairintakeclearancecanbereduced to 150mm providing the flue exhaust outlet...

Page 28: ... 5 1 Condensate pipework NOTICE General consideration Where a new or replacement appliance is being installed access to an internal gravity discharge point should be one of the factors considered in determining appliance location Condensate pipe connection at the appliance The condensate pipe must have a nominally outside diameter of 22mm plastic pipe Ensure there are no blockages in the pipe run ...

Page 29: ... physicallypossible orwhereverylonginternalrunswouldberequiredto reach a suitable discharge point condensate should be removed using a proprietary condensate pump of a specification recommended by the condensate pump manufacturer The pump outlet should discharge to a suitable gravity discharge outlet The condensate then flows by gravity through the 22mm plastic pipe to the condensate discharge poi...

Page 30: ... be sealed to the building fabric on the internal and external face using a suitable building material The external pipeshould takethe shortest andleastexposed route to the discharge point and should fall as steeply as possible away from the appliance with no horizontal runs in which condensate might stand The use of fittings elbows etc should be kept to a minimum and any internalburrsoncutpipewor...

Page 31: ... away the history of the locality and the ability of the surrounding area to disperse the condensate should be taken into account e g areas prone to flooding and ground with a high clay content can result in poor drainage with an increased risk of water logging or freezing causing the condensate pipe to become obstructed by water or ice and the boiler to shut down Although it is possible to increa...

Page 32: ...ll external pipework must be insulated using suitable waterproof and weather resistant insulation External pipework exceeding three metres in length One of the following must be installed Trace heating or A condensate pump or A CondeseSure accessory Trace heating fitted Check with trace heating manufactures instructions for additional requirements Condensate pump or CondenseSure fitted to the appl...

Page 33: ...tances Where the PRV discharge pipe could be susceptible to damage vandalism freezing etc that could cause either a blockage or restriction in the ability to discharge safely then a tundish should be considered The tundish should be sited in a position where damage to the property or injury to occupants cannot occur from any spillage or discharge Fig 39 Pressure relief pipework 1 Discharge pipe tu...

Page 34: ...then it is possibletousetheappliancewhilstcleaningthesystem Asystem filter must be fitted to the return to reduce the risk of contaminants entering the appliance Follow the guidance of BS7593 Inhibitor Add a suitable inhibitor or combined inhibitor anti freeze if the system is exposed to freezing conditions to the heating system in accordance with the DWTA code of practice and manufacturer s guide...

Page 35: ...redorthebladeretractedafteruseand put away in a safe place Care should be taken when lifting the appliance from the base and the proper technique for safe lifting of any heavy object should be strictly observed The appliance packaging and base tray are designed so that the appliancecanbetiltedbackwardsontotheoutercarton Thecartonthen becomes a protective mat Now remove the front casing and set saf...

Page 36: ...ng template The wall mounting template has been sized to allow for the minimum clearances around the appliance section 4 3 3 Appliance clearances Fig 41 Wall mounting template 1 Side exit flue example 2 Rear exit flue example 3 Wall mounting template 4 Primary fixing points D 125mm Theappliancewallmountingtemplateshowstherelativepositionsofthe flue and the top fixings of the wall mounting bracket ...

Page 37: ...autions NOTICE Appliance hydraulic connections Ensureallwaterpipework tobeconnected areisolated drainedand follow all relevant safety precautions Be careful of plastic components when using a naked flame on pipework Surpluswatermaybepresentinsidetheapplianceduetofactorytesting External condensate pipework or internal pipe runs in unheated areas such as lofts basements and garages exposed to prolon...

Page 38: ...ischarge pipe to the latest advice in BS6798 Always route discharge pipes with a continuous fall Appliance connections NOTICE Commissioning without water damages the appliance Only operate the appliance when filled with water OPTIONAL Fit the supplied copper CH tails 1 to the CH flow and return 22mm compression connections Thesetailsaredesignedtoallowallhydraulicandgasconnections to be 30mm from t...

Page 39: ...y install the flue with this appliance Donotexceedthemaximumstraightlengthforahorizontalorvertical flue or a 60mm plume management system if used as stated in the relevant Installation and Maintenance Instructions manual or addendum Telescopic flue Cutting the flue to an exact measurement is not required as the telescopic flue terminal can allow for some adjustment Apply silicone lubricant to seal...

Page 40: ...uated next to the appliance for new systems and where practicable replacement appliances The mains electrical supply to the appliance must be through a fused double pole isolator Theisolatormusthavecontactseparationof3mmminimumbetween poles Any system connected to the appliance must not have a separate electrical supply Any additional components that are connected to the appliance that require 230...

Page 41: ...cessories Low Voltage signal cable accessories connections Release the latches using a thin bladed screwdriver Arrows on the electrical cover indicate the position where the screw driver must be inserted to release the catches Open the rear cover Fig 52 Open the cover For splash protection IP Cut the strain relief according to the diameter of the cable Care should be taken not to damage cables whe...

Page 42: ... party controls separatedextra low voltage cannot be guaranteed Low voltage switching contact for hard wired Worcester mechanical controls Not to be used with 3rd party controls separatedextra low voltage cannot be guaranteed Communication BUS connection for hard wired Worcester Bosch EMS controls Low voltage power supply for hard wired Worcester mechanical controls 0010033634 001 1 1 0010027249 0...

Page 43: ...ontrol connections example External frost protection Proprietary external frost protection will only be able to be used if external 230V controls are fitted wired in parallel to the external 230V controls Worcester weather compensating controls have built in external frost protection functionality Worcester controller Instructions manual Theelectricalpowersupplytotheexternalequipment 2 issupplied ...

Page 44: ...mpletingallofthechecksandanyrectificationwork Isolate the electricity supply Isolate the gas supply Close the water shut off valves to the appliance Label appropriately 6 2 Water treatment Primary system flushing Central Heating Ensure that the system has been cleaned Following the guidance of BS 7593 Code of Practice for treatment of water in hot water central heating systems Overview available i...

Page 45: ... to Integrated filling link accessory instructions for any further actions required after filling the system Keyless filling link An additional 0 75bar static mains pressure is required above required system pressure to ensure the effective operation of the keyless filling link accessory Adjusting the operating pressure of the heating system Table 22 If the indicator is below 1 bar when the system...

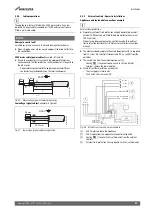
Page 46: ... display Open automatic air vent valve Automatic siphon fill mode will begin when the appliance is first powered up When the flow temperature and the symbol appear alternately on the display the siphon filling program is active 0010029487 001 1 2 3 4 5 6 7 8 9 0010016015 004 10 9 2 1 3 4 5 6 8 7 Key Explanation 1 Digital display Displays a temperature or appliance status diagnostic code 2 Central ...

Page 47: ...meanstherewillbeashort delay when drawing DHW However the device will switch on even if no DHW is being drawn In ECO mode heating up to the set temperature begins as soon as the DHW is being drawn In Eco mode to reduce water usage Briefly open and close the DHW tap The water is heated once to the set temperature To set ECO mode press until eco appears in the display To return to comfort mode press...

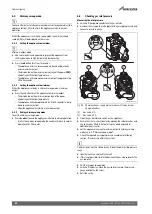
Page 48: ...llow the appliance to stabilise at minimum output 6 5 3 Exiting chimney sweep mode To exit the chimney sweep mode Presstheokbuttonandtheappliancewillreturntonormaloperation Ifleft inthechimney sweep modethecontrol willreturntonormal operation after 30 minutes 6 6 Checking gas inlet pressure Measuring the inlet pressure Switch off the appliance and close the gas isolator Unscrew the screw on the te...

Page 49: ... standards Ensureallothergasappliancesareisolatedwhencarryingoutthegas rate check on the appliance Maximum output mode A hot water outlet can be opened to prevent the appliance from shutting down due to high temperature during testing Ensure all other gas appliances are isolated Press the ok button until the C symbol appears on the display The display shows the maximum percentage of the power 100 ...

Page 50: ...se the analyser must have been calibrated as specifiedbythemanufacturer Theinstallermustbecompetentinthe use of the analyser Check and zero the analyser in fresh air as specified by the manufacturer The air gas ratio valve is factory set and must not be adjusted during commissioning unless this action is recommended following contact with the Worcester Bosch Group help line 0330 123 3366 Fig 66 Co...

Page 51: ...rying out the combustion check is equipped with a calibrated Flue Gas Analyser conforming to BS 7967 and is competent in its use Flue gas analysis Ensure that the gas inlet pressure has been checked and is satisfactory Refit the test point plugs after the test has been completed The flue gas analysis performance of the appliance can be checked via the flue turret adaptor sample points Refer to fig...

Page 52: ...r how to safely isolate the appliance Advise the customer where they can find information on the Worcester Bosch Group website www worcester bosch co uk Ensure that all documentation is left with the appliance or homeowner Appliance documentation Controls documentation Any other equipment documentation that is connected to the appliance or system Appliance not in use If the appliance is not going ...

Page 53: ...set and checked in the service menu It includes Menu 1 information menu Menu 2 not used in UK IE Menu 3 factory settings Menu 4 special features Menu 5 limit values Menu 6 function checks Menu 0 manual operation 8 1 Operating the service menu Selecting and setting the service function If a key is not pressed for 30 minutes the system exits the selected service function automatically To select a se...

Page 54: ...ature C 1 b8 Current thermal output as a of the maximum rated heat output in heating mode During DHW heating values greater than 100 may be displayed 1 C1 Ionisation current A Minimum burner operation or greater 2 A OK 2 A faulty While the burner is switched off 2 A OK 2 A faulty 1 C2 Current pump output as of rated pump output 1 C4 Current outside temperature with outside temperature sensor conne...

Page 55: ...ent Measure gas flow rate Compare measured result with the setting tables page 92 Correct the setting in the case of any deviation 3 C4 Turbine signal delay 2 16 0 25 seconds Thedelaypreventssuddenchangesinthewater supply pressure from causing the burner to briefly operate although no water is drawn off 3 C5 Delay of DHW mode solar mode 0 not active 50 seconds DHW mode will be suppressed until the...

Page 56: ...sed time 4 A5 Inspection interval according to hours run 10 60 x 100 hours This service function is only available if service function 4 A4 is activated 01 After this interval has expired the display indicates that an inspection is due via the service display 1018 4 A6 Inspection interval according to elapsed time 1 72 months This service function is only available if service function 4 A4 is acti...

Page 57: ...zing 4 b6 Temperature value for the system frost protection 0 5 10 C This service function is only available if the frost protection function service function 4 b1 was activated If the outside temperature does not exceed the frost threshold temperature then the heating pump in the heating circuit switches on system frost protection 4 E2 Unit of temperature C F 4 F1 Reset device to basic setting YE...

Page 58: ...ings adjustment range Remark restriction 6 t1 Permanent ignition OFF switched off ON switched on Testing the ignition by means of permanent ignition without gas supply To prevent damage to the ignition transformer Leave the function switched on for a maximum of 2 minutes 6 t2 Permanent fan operation 0 100 Fan running without gas supply or ignition 6 t3 Permanent pump operation heating pump 0 100 I...

Page 59: ...nspection and maintenance considerations To ensure continued efficient operation the appliance must be checked at regular intervals The frequency of servicing will depend upon the particular installationconditionsandusage however atleastanannualservice is recommended The extent of the service work required on the appliance is determined by the operating condition of the appliance when tested by qu...

Page 60: ...s and LPG values If the manometer reading is within tolerance in the white area of the table values The heat exchanger exhaust path siphon does not require attention Ifthemanometerreadingisoutoftolerance intheshadedareaofthe table values then carry out the following checks Check that the siphon is not restricted or blocked Check the exhaust paths for restrictions Clean the heat exchanger with a su...

Page 61: ...alysis Ensure that the gas inlet pressure has been checked and is satisfactory Refit the test point plugs after the test has been completed Refer to chapter 6 10 Checking flue integrity and check that the readings conform to those given confirming flue system and combustion circuit are ok 9 8 Cleaning the siphon and heat exchanger WARNING Gaskets and seals gas related components Burner electrode a...

Page 62: ...e screw 1 on the mixing device Remove the fan with mixing device 4 Fig 73 Removing the fan with mixing unit Refer to figure 74 Pull off cables from the electrode set 2 Pull off cable 1 Remove M8 nut 3 Remove the burner cover 4 On re assembly to ensure a full gas tight seal tighten the M8 nut down firmly without over tightening Fig 74 Remove the burner cover Refer to figure 75 Remove the non return...

Page 63: ... Fig 78 Cleaning the heat exchanger Clean out residue and re fit the inspection aperture again Refer to figure 79 Rinse the heat exchanger with water from the top Fig 79 Rinse the heat exchanger with water Refer to figure 80 Re open inspection aperture and ensure no residue remains Close the inspection aperture once checked Fig 80 Checking the heat exchanger for residue Refit the cleaned baffles C...

Page 64: ...e left of the condensate trap 2 Actuate the locking lever at the bottom to release the siphon 3 Pull the condensate trap down to remove it and drain it Fig 81 Removing the condensate trap 1 Unscrew the cleaning cap 2 Check the gasket for cracks deformation or breakage and replace if required 3 Clean the condensate trap and check that the aperture towards the heat exchanger is clear 4 Insert a new ...

Page 65: ... inserted the pin is visible in the recess and is flush with the top edge of the gasket Fig 85 Pressing on the gasket Replace the condensate trap and check for tightness Check the condensate hose and clean if required Grease the hose during assembly and check tightness of connection Fig 86 Inserting the condensate trap Fill the condensate trap with approximately 150 ml water 0010019151 001 1 2 3 2...

Page 66: ...nutes after firing the appliance Adjusting the minimum rated output settings With the appliance in minimum rated output Remove the seal from the adjusting screw of the gas valve only gas valve is shown in the below Figure 87 and set the CO2 content for minimum rated output Fig 87 Setting the CO2 content above SIT valve below Honeywell valves 1 Gas valve NG 2 Gas valve LPG Re check settings at maxi...

Page 67: ...rantee if applicable and any warranty Acomprehensivelistofappliancesparescanbefoundonthewebsite www worcester bosch co uk spares 10 1 Component access Removing the front casing Thefrontcasingissecuredwithtwoscrewswhicharecriticaltomaintain the case seal and to prevent unauthorised removal electrical safety Always secure the casing with these screws Loosen the two screws 1 and pull the bottom of th...

Page 68: ...replace if necessary 1 Remove the screw 2 Remove the plate heat exchanger Fig 93 Removing the plate heat exchanger 10 5 Checking the expansion vessel The expansion vessel must be checked every year If necessary adjust the expansion vessel pre charge pressure to the static head of the heating system 10 6 Adjusting the operating pressure of the heating system Table 35 If the indicator is below 1 bar...

Page 69: ...stall the gas valve in reverse order and check the gas air ratio 10 8 Removing the pump Unplug the electrical plug 5 Disconnect nut connection 1 between pump and heatcell Remove clip 3 between diverter valve manifold and pump assembly Remove 2 x T20 Torx screws 4 from the bottom plate of the appliance Remove pump assembly 2 Fig 96 Removing the pump 10 9 Removing the automatic air vent valve 1 Remo...

Page 70: ...he plug 10 11 Removing the heat exchanger Remove the fan gas hose and mixing device Chapter 9 8 page 61 1 Remove the clip 2 Detach the flow pipe 3 Disconnect the cable from the flow temperature sensor on the heat exchanger 4 Disconnect the cable from the flue gas temperature limiter 5 Remove the nut Fig 99 Detach the flow pipe and disconnect the cable 1 Unclip the flue pipe 2 Push the flue pipe up...

Page 71: ...ptor box top cover Loosen the screws 8 connecting the mains cable to the earth bracket Remove the PCB upwards from clips 5 Remove the mains cable and 230v controls cable if fitted 6 Remove PCB edge connectors 1 and 2 Remove 230V strain reliefs and set aside 7 Unscrew the 2 adaptor box screws 3 Remove the adaptor box housing with PCB Earth bracket and HV cable 4 To replacetheadaptorboxwith PCBtaket...

Page 72: ...2 2021 02 72 10 14 Reattaching the casing on the side Align the side panel so that the underside can be guided along the flange Push the side panel towards the rear Tighten the fixing screws Fig 104 Attaching the side panel 1 1 2 2 0010019239 001 ...

Page 73: ... with the service function 1 A1 Non blocking faults fault category R The heating system remains in operation with non blocking faults The H symbol is shown on the display Fig 105 Example non blocking fault Resetting a non blocking fault Press the key until the H and symbols are displayed The fault code with the smallest number is displayed To select a fault code press arrow key or To delete the fa...

Page 74: ...if blockage restriction within boiler pipe work restricting the flow 227 B V No flame signal after ignition Tip Check the ceramic insulator is not damaged this can cause the spark to earth twist and pull the ceramic insulator to ensure it is not broken Check the gas supply to property and the inlet on the gas valve Check the low pressure when the gas valve opens Gas valve failing to open check for...

Page 75: ...ion Replace the code plug if required If code plug is not present Check appliance electronics software version replace if necessary 237 V System fault If code plug is present Check that correct plug is inserted Check the code plug is not damaged Replace the code plug if required If code plug is not present Check appliance electronics PCB replace if necessary 238 V Boiler electronics faulty Checkth...

Page 76: ...for loose wires etc Check the code plug if present is not damaged Replace the code plug if present and required Replace the control unit PCB 254 V Eeprom test error Restart the appliance to see if the problem re occurs Check the electrical connections on the board check for loose wires etc Check the code plug if present is not damaged Replace the code plug if present and required Replace the contr...

Page 77: ...e domestic hot water keep warm function Diverter valve is held in the hot water position for a period of time Check for false demands on the cold water inlet 306 V Flame signal after closing the fuel supply Tip Ensure the working pressure returns immediately to the standing pressure when the gas valve closes Checkthegassupplytothepropertyandtheinletonthegasvalve checkdroponinlet Check the gas valv...

Page 78: ...e is a problem in the cable between the control panel and valve Check screw terminals and cables Ifcurrentisbeingsuppliedtothe3 wayvalvebutitisstillnotworking thevalveisfaulty and must be replaced If a voltage of approx 230 V is measured at the terminals and the pump is not running the pump is faulty and must be replaced Eliminate all faults in the cables Vent if necessary Replace the pump if ther...

Page 79: ...of harness and replace if required Replace the flow temperature sensor 1074 W No signal from flow temperature sensor Check the flow temperature sensor plug is connected Check the resistance of the flow temperature sensor and replace if required Check the continuity of harness and replace if required Replace the flow temperature sensor Replace the PCB 1075 W Short circuit heat exchanger temperature...

Page 80: ...the power modulation on the fan PCB may be defective 2916 V Gas valve was detected to be open during post purge Carry out a localised tightness test on the gas valve and replace if required Check the voltage to gas valve The gas valve or the PCB may have a fault 2917 V No flame signal when checking the combustion control Disconnect power and then reconnect Trigger heat demand Wait 5 minutes If the...

Page 81: ...ary Check pump for blockage clear if required Check pump settings correct if required Check water pressure if necessary top up until the pre set pressure is reached 2942 No speed feedback signal from fan Connect plug for speed control to the fan Connect plug for power supply to the fan Check fan harness Check and replace control unit 2943 Mains voltage too low Establish supply voltage of at least ...

Page 82: ...he appliance Low loss header setting OFF Internal DHW hydraulic 1 ON Heat circuit 1 hydraulic 1 ON CH hydraulic 1 ON 2956 O Hydraulic configuration at the boiler activated Verify that the following settings are correct This can only be reset by powering off the appliance Low loss header setting OFF Internal DHW hydraulic 1 ON Heat circuit 1 hydraulic 1 ON CH hydraulic 1 ON 2957 V Internal burner c...

Page 83: ... voltage to the pump 2967 B Flow heat exchanger temperature sensor differential too great Check the flow through the appliance and the system is filled Check for air locks in the system and purge if required Check the isolation valves Check the pump is operating freely and check the voltage to the pump Check the heat exchanger sensor and the flow sensor are making contact with the pipework Check t...

Page 84: ...age U 160V or U 280V Check mains voltage supply to pump 160V U 280V The pump will restart itself afterthedisappearanceofthe external failure Overload of motor Friction due to particles and or impeller blocked with debris and or too high viscosity Checkinstallationwaterquality clean system if debris Over speed The pump rotor is driven by an external flow above the maximum allowed value Ensure that ...

Page 85: ...ly pressure Check the flue system clean or repair if required Check the gas air ratio Check the ratio control valve replace if required Delayed ignition poor ignition Check the ignition transformer function for misfiring in Menu 6 replace if required Check the gas type Check the gas supply pressure Check operation of meter governor Check the power supply Check the electrodes replace if required Ch...

Page 86: ...ces This symbol means that the product must not be disposed of with other waste and instead must be taken to the waste collection points for treatment collection recycling and disposal The symbol is valid in countries where waste electrical and electronic equipment regulations apply e g European Directive 2012 19 EC on old electronic and electrical appliances These regulations define the framework...

Page 87: ...imum heat input kW 4 9 4 9 Maximum rated heat input net QnW kW 25 5 30 Maximum rated heat output PnW kW 25 0 29 5 Maximum mains inlet pressure standing pressure PMW bar 10 10 Minimum mains inlet pressure working for max flow bar 1 5 Low NOx 1 5 Minimum mains inlet pressure working for operation bar 0 3 only applies to 0 3 Minimum required flow to activate DHW demand l min 2 5 Central Heating 2 5 D...

Page 88: ... appliance weight excluding packaging kg 36 36 36 Lift weight without front panel kg 33 4 33 4 33 4 SEDBUK 2009 89 1 89 1 89 1 1 For minimum and maximum permissable pressure refer to Gas pressure within the system section 6 6 2 The Gas Rate provided assumes the accepted NG averaged calorific value of 34 9 MJ m3 net 3 Appliances are fitted with a flow regulator set to achieve a 35 C temperature ris...

Page 89: ...ut kW 4 9 4 9 Maximum rated heat input net QnW kW 25 5 30 Maximum rated heat output PnW kW 25 0 29 5 Maximum mains inlet pressure standing pressure PMW bar 10 10 Minimum mains inlet pressure working for max flow bar 1 5 1 5 Minimum mains inlet pressure working for operation bar 0 3 0 3 Minimum required flow to activate DHW demand l min 2 5 2 5 DHW temperature range C 35 60 35 60 Maximum cold water...

Page 90: ... 0 75 Appliance protection rating 4 IP X4D X4D Permissible ambient temperature short term long term C 0 50 40 0 50 40 Nominal capacity of the appliance l 7 7 Total package weight kg 40 40 Total appliance weight excluding packaging kg 36 36 Lift weight without front panel kg 33 4 33 4 SEDBUK 2009 91 91 1 For minimum and maximum permissable pressure refer to Gas pressure within the system section 6 ...

Page 91: ...e 7 Diverter valve 8 Exhaust gas temperature limiter 9 Gas valve 10 Flow temperature sensor 11 Fan 12 Heat exchanger flow temperature sensor 13 Earth connection 14 Ignition electrode 15 Flame sense electrode 16 Heat exchanger high limit stat 17 Ignition transformer 18 Pump 19 Low voltage I Os for controls 20 Code plug interface Not used 21 230V external controls interface N L N L 230V IN 5AF L N L...

Page 92: ...2300iW 30 C Display percentage Heat Output kW Heat input kW Gas flow rate l min 80 20 0 20 40 35 0 75 18 7 19 13 32 8 70 17 5 17 85 30 6 65 16 2 16 58 28 4 60 15 0 15 30 26 3 55 13 7 14 03 24 1 50 12 5 12 75 21 9 45 11 2 11 48 19 7 40 10 0 10 20 17 5 35 8 7 8 93 15 3 30 7 5 7 65 13 1 25 6 2 6 38 10 9 20 5 0 5 10 8 8 19 4 8 4 92 8 4 Display percentage Heat Output kW Heat input kW Gas flow rate l mi...

Page 93: ... no what is the maximum central heating output selected kW Dynamic gas inlet pressure mbar C Central heating return temperature C System correctly balanced rebalanced Yes COMBINATION BOILERS ONLY Is the installation in a hard water area above 200ppm Yes No Water scale reducer softener pre existing Fitted Not required Brand Product Yes No If yes DHW expansion vessel pre existing Fitted Not required...

Page 94: ...Yes Yes Yes No Yes Yes Yes Yes Yes Year 3 ________________________ ___________________ Yes Yes Yes Yes Yes Yes Yes Yes Yes No Yes Yes Yes Yes Yes Year 4 ________________________ ___________________ Yes Yes Yes Yes Yes Yes Yes Yes Yes No Yes Yes Yes Yes Yes Year 5 ________________________ ___________________ Yes Yes Yes Yes Yes Yes Yes Yes Yes No Yes Yes Yes Yes Yes Year 6 ________________________ ...

Page 95: ... rate Were parts fitted Parts fitted Comments Signature OR Yes No m h ft h Where possible has a flue integrity check been undertaken in accordance with manufacturers instructions and readings are correct System inhibitor concentration has been checked and appropriate action taken in accordance with BS 7593 and boiler manufacturers instructions Telephone No Gas Safe registration No Company name Dat...

Page 96: ... rate Were parts fitted Parts fitted Comments Signature OR Yes No m h ft h Where possible has a flue integrity check been undertaken in accordance with manufacturers instructions and readings are correct System inhibitor concentration has been checked and appropriate action taken in accordance with BS 7593 and boiler manufacturers instructions Telephone No Gas Safe registration No Company name Dat...

Page 97: ... Toprovideservicessuchas salesandmarketingservices contractmanagement paymenthandling programming datahostingandhotlineserviceswecancommissionand transfer data to external service providers and or Bosch affiliated enterprises In some cases but only if appropriate data protection is ensured personal data might be transferred to recipients located outside of the European Economic Area Further inform...

Page 98: ......

Page 99: ......

Page 100: ... Kingdom Tel 0330 123 9559 worcester bosch co uk TECHNICAL SUPPORT 0330 123 3366 RENEWABLE SUPPORT 0330 123 9229 CONTROLS AND CONNECTIVITY TEAM 0330 123 3641 APPOINTMENTS 0330 123 9339 SPARES 0330 123 9779 LITERATURE 0330 123 9119 TRAINING 0330 123 0166 SALES 0330 123 9669 ...

Reviews: