means the power on, and meanwhile the LED shows the
battery volume at the same time.
Switch on/off
(
see fig.8
)
After power on, you can to activate the switch trigger to
operate the saw to do the sawing operation.
To switch on, just use you thums to push the safety knob and
keep it in place, meanwhile press the switch trigger. The saw
will runing.
To switch off the saw, it only release the trigger.
Cutting branches (see figure 9)
●
Always wear hard hat to protect head against falling
branches.
●
A cut branch can lead to personal injury by falling on
you or springing back from the ground. Cut longer
branches in sections.
●
Reduce the cutting force before the branch is
completely cut off. You can get injured, when losing
balance and control of the chain saw.
The chain must be running at full speed before it makes
contact with the wood. Use the tip protector to support when
undercutting.
Pruning straight through a tree branch from the top edge down
is appropriate for branches up to 5 cm in diameter.
Thicker branches should be pruned in three-steps, to prevent
damaging the tree.
Do not force the chain saw while cutting, let the chain do the
work.
Sawing is optimized when the chain speed remains steady
during cutting.
Kickback
Kickback is the sudden backward/upward motion of the chain
saw, occuring when the chain (at the tip of the chain bar)
comes in contact with a log or wood, or when the chain
becomes jammed. When kickback occurs, the chainsaw
reacts unpredictably and can cause heavy injuries to the
operator or bystanders.
Particular attention must be given when sawing sidewards,
slanted or during length cuts, as the gripping teeth usually can
not be applied.
To avoid kickback:
– Saw with the chain bar at a flat angle.
– Never work with a loose, widely stretched or heavily worn
out saw chain.
– Replace blunt chain as specified.
– Never saw above shoulder height.
– Never work with the tip of the chain.
– Always hold a chain saw firmly with both hands.
– Always use a approved low-kickback saw chain.
– Apply the metal gripping teeth for leverage.
– Ensure correct chain tension.
Working with the Chain Saw
Before Cutting
Before starting operation and periodically during cutting, carry
out the following checks:
– Is the chain saw in a safe condition?
– Is the oil reservoir filled? Check oilprior to starting and
regularly during operation. Refill oil when oil tank empty. The
oil tank filling will last approx. 20 minutes, depending on
sawing intensity and stops.
– Is the saw chain properly tensioned and sharp? Check
chain tension every 10 minutes during operation. Upon initial
operation, new chains can lengthen considerably. The
condition of the chain influences the cutting performance.
Only a sharp chain protects from overload.
– Are you wearing the required protective equipment? Wear
safety glasses and hearing protection. Further protective
equipment for head, hands, legs and feet is recommended.
Suitable protective clothing reduces the danger of injury from
thrown about cutting material and accidental touching of the
saw chain.
Chain /or Guiding Bar replacement (Fig.10)
After long time using, the chain / bar would be blunt or worn
out. You need to changing a new one. To replace the chain,
please do the following steps as below:
1. Unscrew and remove the locking knob (5).
2. Remove press plate (3) and take out worn chain or
guiding bar.
3. Remount the chain and bar as figure 10.3, put the bar
against the tension plate (17).
4. Push the bar and tension plate rightside and hold it in
bottom side place, then put the chain into the drive
wheel grooves. Be sure to put it organized well. Then
release the bar. The bar will automatically tensioned.
5. Put back press plate (3).
6. Screw back the lock screw and fasten it.
Battery Charging (Fig.11)
1. Plug the battery charging into the 230VAC socket; The
power indicator light on green.
2. Slide the battery pack into the slot of battery chrger, after
hear a click, the battery pack was secured. The power
indicator light off, and meanwhile the charging indicator
light on red. The charging process starts.
3. After around 50min to 1hour, the charging indicator light
will off,and meanwhile the power indicator light green on
again. It denotes the charging process is completely
finished.
4. Pull out the charger plug, and then pull off the battery
pack form charger.
Charging tips (Fig.12)
After using, the battery pack probably a little bit hot. In that
case, the battery pack can not be charged in.It need to have
a rest, let it cool down.
Battery volume indicator (fig. 13)
The battery pack has a feature to indicator which volume
status. To show this feature, just press the button on the
housing. See fig.10
0 light on means the volume remains below 10%;
1 lights on means the volume remains 10% to 25%
2 lights on means the volume remains 25% to 50%
3 lights on means the volume remains 50% to 75%
4 lights on means the volume remains 75% to 100%
MAINTENANCE
●
Warning: Switch off and remove battery from power tool before adjusting or cleaning.
Note:
To ensure long and reliable service, carry out the following maintenance regularly.
For safe and proper working, always keep the power tool and its ventilation slots clean.
Regulary check the chain saw for obvious defects such as loose, dislodged or damaged saw chain and chain bar, loose fixings
and worn or damaged components.
Check that covers and guards are undamaged and correctly fitted. Carry out necessary maintenance or repairs before using.
Note:
Before returning the chain saw, ensure all oil in the oil reservoir has been emptied.
Sharpening the Saw Chain
Summary of Contents for CHS-S20LiB
Page 2: ......
Page 3: ......
Page 4: ......
Page 5: ......
Page 17: ......
Page 29: ......
Page 48: ...Descriere detaliat CHS S20Li...
Page 50: ......
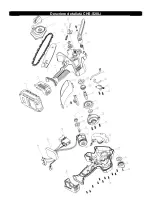
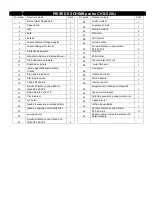
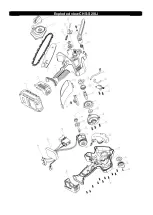
Page 65: ...Exploded view CHS S20Li...


