background image


● 

Inserting SDS-Quick Drilling Tools: 

Check the latching by 

pulling the tool. 

 The maximum torque is reached only in the screwdriving 

operating mode (1. gear). The maximum no-load speed is reached 
only in the operating modes drilling and hammer drilling. 


Replace a damaged dust protection cap immediately. 

The 

dust protection cap largely prevents the penetration of drilling dust 
into the tool holder during operation. When inserting the tool, pay 
attention that the dust protection cap is not damaged. 


Dust from materials such as lead-containing coatings, some 

wood types, minerals and metal can be harmful to 

one’s 

health and cause allergic reactions, lead to respiratory 
infections and/or cancer. 

Materials containing asbestos may 

only be worked by specialists. 
– As far as possible, use a dust extraction system suitable 
for the material. 
– Provide for good ventilation of the working place. 
– It is recommended to wear a P2 filter-class respirator. Observe 
the relevant regulations in your country for the materials to be  

worked. 

● 

Prevent dust accumulation at the workplace. 

Dust can 

easily ignite. 


If the application tool should become blocked, switch 

the machine off. Loosen the application tool. 

● 

When switching on with a blocked drilling tool, high 

torque reaction can occur. 

● 

Apply the power tool to the screw only when it is 

switched off. 

Rotating tool inserts can slip off. 

● 

Always wait until the machine has come to a complete 

stop before placing it down. 

The tool insert can jam and 

lead to loss of control over the power tool. 

To save energy, only switch the power tool on when using 

it. 


Avoid unintentional switching on. Ensure the On/Off 

switch is in the off position before inserting battery 
pack. 

Carrying the power tool with your finger on the On/Off 

switch or inserting the battery pack into power tools that 
have the switch on invites accidents. 

ASSEMBLY 

Disconnect plug from the socket before making 

any assembly, adjustments or changing accessories. 

Such 

preventive safety measures reduce the risk of starting the tool 
accidentally. 


INSTALLING AND USING DEPTH STOP (Fig. 3).


Mounting the depth stop into the auxiliary handle. Then move it 
forward or backward to a certain position as you wish. 
To set the drilling depth, press the depth stop locking knob, and 
then move the depth stop and keep the distance between depth 
stop end and drill bits end equal the drill depth you want. 
 

AUXILIARY HANDLE (Fig. 4). 

The tool must be supported with the auxiliary handle, which can 
be swiveled 360°. 
To reposition and/or swivel the handle, loosen the hand grip, move  

the handle to the desired position along the barrel and 
securely re-tighten the hand grip. 

 
INSTALLING AND REMOVE DRILL BITS (Fig.5 &6). 

Clean the insert shank end of the drills or chisles to remove 
any debris, then lightly grease with a light oil or lubricant 
Insert drill bits or chisels into the chuck through the dust 
shield, while twisting and pushing inward until it locks 
automatically into place. Pull outward on the drill bits or 
chisels to be certain it is locked into the chuck.  
To remove the drill bits or chisels, pull locking sleeve 
backward and pull bit forward. All accessories should be 
wiped clean after removing. 

Accessories may be hot after use. 

Avoid 

contact with skin and use proper protective gloves or cloth to 
remove. 

OPERATION 

SWITCHING ON/OFF 

Fig. 7 & 8


To switching on the machine just press down the on/off switch. To 
get the continuous running, just press down the switch trigger 
meanwhile press down the lock-on knob to lock it on ON position, 
the tool will keep running. 
To stop the tool, just relase the switch triiger or press switch 
trigger once again and release if under locked position. 

 
MODE SELECTOR 

Fig. 9


The selector knob allows the tool to be set for various 
drilling/hammer drilling applications. 
Depress release button and turn selector dial right or left 
depending on the applications show in Fig 9. 

Do not operate the selection dial until the tool 

comes to a complete stop. 

Shifting during rotation of the chuck 

can cause damage to the tool. 
When using demolition or chipping bits such as bull points, chisels, 
spades, gouges, etc. 

the “Hammer Only” mode must be selected. 


SLIP CLUTCH 

The tool has a internal pre-set slip clutch. The output spindle will 
stop rotating if the accessory binds and overloads the tool. 
 

VARIABLE SPEED CONTROLLED TRIGGER SWITCH


Your tool is equipped with a variable speed trigger switch. 

The tool can be turned "ON" or "OFF" by squeezing or 
releasing the trigger.  
The speed can be adjusted from the minimum to maximum 
nameplate RPM by the pressure you apply to the trigger. 
Apply more pressure to increase the speed and release 
pressure to decrease speed. 
 

FORWARD/REVERSING LEVER (Fig 10)


Your tool is equipped with a forward/reversing lever This 
lever was designed for changing rotation of the chuck. 
To get the forward rotation, (with woking mod changing knob 
faces to you) move the lever to the downside. To get the 
reverse rotation move the lever to the upside. 

Do not change direction of rotation until the 

tool comes to a complete stop. 

Shifting during rotation of 

the chuck can cause damage to the tool. 

  
DUST SHIELD ACCESSORY 

Fig. 11


A dust shield comes with the tool, it is used when nned to 
drill concrete holes in the ceiling or upside directions. When 
do this, just put ot through drill bits, and then drill the holes 
then, all dust will full into the shield and avoid dust fall to the 
operator.  


MAINTENANCE 

Make  sure  that  the  machine  is  not  live  when  carrying  out  maintenance  work  on  the  motor.  Regularly  clean  the  machine 

housing with a soft cloth, preferably after each use. Keep the ventilation slots free from dust and dirt. If the dirt does not come off 
use a soft cloth moistened with soapy water. Never use solvents such as petrol, alcohol, ammonia water, etc. These solvents may 

Summary of Contents for WRH13-26

Page 1: ...26 Bohrhammer DE M ot udarowo obrotowy PL Preklad origin ln ho n vodu na pou itie P eklad origin ln m n vodu k pou it Az eredeti haszn lati tmutat ford t sa Traducerea manualului de utilizare original...

Page 2: ......

Page 3: ......

Page 4: ......

Page 5: ...re komer n alebo priemyseln pou vanie Z ruka nebude platn pokia bude zariadenie pou van na komer n priemyseln alebo podobn ely TECHNICK PARAMETRE NAP TIE FREKVENCIA 230 V 50 Hz PR KON 800 W OT KY BEZ...

Page 6: ...K BEZPE NOS Vidlica nap jacieho k bla elektrick ho n radia mus zodpoveda sie ovej z suvke Nikdy ak mko vek sp sobom neupravujte el pr vodn k bel N radie ktor m na vidlici pr vodnej n ry ochrann kol k...

Page 7: ...enie ani perky Dbajte na to aby sa va e vlasy oble enie rukavice alebo in as V ho tela nedostala do pr li nej bl zkosti rotuj cich alebo rozp len ch asti el n radia Pripojte el n radie k ods vaniu pr...

Page 8: ...mohol pou it pracovn n stroj dosta do kontaktu so skryt m elektrick m veden m alebo s vlastn m nap jac m k blom Kontakt s elektrick m veden m pod nap t m m e dosta pod nap tie aj kovov asti n radia a...

Page 9: ...becn ch nariadeniach ku bezpe nosti a ochrane zdravia pri pr ci V robca nie je zodpovedn za zmeny vykonan na n rad ani za ak ko vek kody vypl vaj ce z tak chto zmien Elektrick n radia sa nesm pou va v...

Page 10: ...symbolu pre pr slu n re im pr ce V nasleduj cej tabu ke s vyobrazen poz cie prep na a pracovn ho re imu pre pr slu n pracovn re im UPOZORNENIE Nastavenie pracovn ho re imu nikdy nevykon vajte za chodu...

Page 11: ...astnej bezpe nosti vyme te Opotreben i po koden asti stroja sa m u vymeni iba v autorizovanom servise alebo ich v menu zaist predajca Postarajte sa o to aby boli pou it origin lne n hradn s iastky zna...

Page 12: ...craft WRH13 26DFR 230V 50 Hz 800 W Class II bolo navrhnut a vyroben v zhode s nasleduj cimi normami was constructed and produced in compliance with following standards EN 55014 1 2017 EN 55014 2 2015...

Page 13: ......

Page 14: ...U N SERVIS VYKON VA SPLNOMOCNEN Z STUPCA V ROBCU Splnomocnen z stupca v robcu Slovakia Trend Export Import s r o Michalovsk 87 1414 073 01 Sobrance Fax 056 652 2329 Tel 0915 392 687 E mail servis slov...

Page 15: ...o komer n nebo pr myslov pou v n Z ruka nebude platn pokud bude za zen pou v no pro komer n pr myslov nebo podobn ely TECHNICK PARAMETRY NAP T FREKVENCE 230 V 50 Hz P KON 800 W OT KY BEZ Z T E 0 1 050...

Page 16: ...suvce Nikdy jak mkoli zp sobem neupravujte el p vodn kabel N ad kter m na vidlici p vodn ry ochrann kol k nikdy nep ipojujte rozdvojkami nebo jin mi adapt ry Nepo kozen vidlice a odpov daj c z suvky s...

Page 17: ...ipojte el n ad k ods v n prachu Pokud m el n ad mo nost p ipojen za zen k zachyt v n nebo ods v n prachu ujist te se e do lo k jeho dn mu p ipojen a pou v n Pou it takov ch za zen m e omezit nebezpe...

Page 18: ...lektrick ok Nepracujte s materi ly kter obsahuj azbest Azbest je karcinogenn UPOZORN N P ed p ipojen m n ad ke zdroji energie se ujist te e nap jec nap t je stejn jako je uvedeno na typov m t tku n st...

Page 19: ...racovn prost ed by m lo b t dn osv tleno POU IT A MONT P ed zah jen m mont e za zen vypn te a vyt hn te z str ku z elektrick z suvky abyste zabr nili jeho necht n mu spu t n MONT A POU IT HLOUBKOV HO...

Page 20: ...vn ho re imu pro p slu n pracovn re im UPOZORN N Nastaven pracovn ho re imu nikdy neprov d jte za chodu n ad Pracovn re im lze nastavit pouze p i uvoln n m provozn m sp na i a pokud se skl idlo neot P...

Page 21: ...ovan m servisu nebo jejich v m nu zajist prodejce Postarejte se o to aby byly pou ity origin ln n hradn sou stky zna ky Worcraft OCHRANA IVOTN HO PROST ED Symbol p e krtnut n doby na odpad na produkte...

Page 22: ......

Page 23: ...A POZ RU N SERVIS PROV D Z STUPCE V ROBCE Zplnomocn n z stupce v robce Slovakia Trend Export Import s r o Michalovsk 87 1414 073 01 Sobrance Fax 056 652 2329 Tel 0915 392 687 E mail servis slovakia tr...

Page 24: ...ha a k sz l ket kereskedelmi ipari vagy hasonl c lokra haszn lj k TECHNIKAI ADATOK FESZ LTS G FREKVENCIA 230 V 50 Hz TELJESITM NYIG NY 800 W SEBESS G TERHEL S N LK L 0 1 050 perc 1 T SEK SZ MA 0 5 80...

Page 25: ...zati k bel csatlakoz dug j n ved dugasz van soha ne csatlakoztassa eloszt khoz vagy m s adapterekhez Az eredeti csatlakoz s a megfelel dugaszol aljzat haszn lata cs kkenti az ram t s vesz ly t A s r l...

Page 26: ...t l Ez a k sz l k alkalmatlan olyan szem lyek bel rtve gyerekek haszn lat ra akik cs kkent fizikai rz kszervi vagy ment lis k pess g ek illetve nem rendelkeznek kell tapasztalattal s ismeretekkel hacs...

Page 27: ...nak s mag t a szersz mot is k ros thatja Ha k ts gei vannak ne csatlakoztassa a szersz mot a h l zathoz Az alacsonyabb fesz lts g ramforr s haszn lata k ros tja a motort A t lmeleged s elker l se rde...

Page 28: ...SE S HASZN LATA 3 BRA A f rt furat m lys g nek m r s re lehet s g van a m lys g tk z t a seg dfoganty furat ba a m lys g tk z reteszel gomb megnyom sa mellett behelyezni s a k v nt furatm lys gre ll...

Page 29: ...eteit mutatja az adott zemm dhoz FIGYELMEZTET S Soha ne ll tsa be az zemm dot mik zben a szersz m m k dik Az zemm d csak akkor ll that be ha az zemi kapcsol t elengedik s a tokm ny nem forog ZEMM D KA...

Page 30: ...ki Gy z dj n meg arr l hogy eredeti Worcraft cserealkatr szeket haszn l K RNYEZETV DELEM A term keken vagy a k s r dokumentumokon th zott kerekes kuk n l that szimb lum azt jelenti hogy a haszn lt el...

Page 31: ...Elad s d tuma Garancialev l Warranty Elad al r sa s pecs tje Az gyf l az al r s val meger s ti hogy a k sz l ket bemutatt k s elmagyar zt k neki hogy ismeri a g p zemeltet s re s haszn lat ra vonatko...

Page 32: ...s sorban ojan alkatr szek kop sa rthet mind minden forg s mozg alkatr sz v g r sz s burkolat kapcsok s kek fogaskerekek s ksz jak l ncos fogaskerekek s rl d s s tengelykapcsol s rl d fel letek gumiabr...

Page 33: ...luare preliminar a expunerii Nivelul de emisie de vibra ii declarat reprezint principalele aplica ii ale sculei Cu toate acestea n cazul n care scula este utilizat pentru diferite aplica ii cu diferit...

Page 34: ...a prafului asigura i v c acestea sunt conectate i utilizate n mod corespunz tor Utilizarea colect rii prafului poate reduce pericolele legate de praf Utilizarea i ngrijirea sculelor electrice Nu for a...

Page 35: ...mandrin prin ap r toarea de praf n timp ce r suci i i mpinge i spre interior p n c nd se blocheaz automat n pozi ie Trage i spre exterior pe burghie sau d l i pentru a v asigura c este blocat n mandr...

Page 36: ...e eurilor chimice pentru a putea fi reciclate sau eliminate ntr un mod ecologic Aparatele electrice aruncate sunt reciclabile i nu trebuie eliminate mpreun cu de eurile menajere V rug m s ne sprijini...

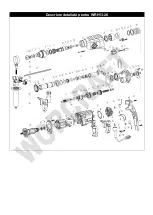
Page 37: ...Descriere detaliat pentru WRH13 26...

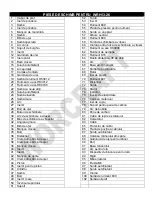
Page 38: ...Stator 23 urub autofiletant 74 Inductor 24 aib elastic 75 nveli de elasticitate 25 aib mare 76 Carcasa motorului 26 Arc 77 Inel de cupru 27 Inel O 78 Suport pentru peria de carbon 28 Bol de o el 79 Ar...

Page 39: ......

Page 40: ...FECTUAT DE C TRE REPREZENTANTUL AUTORIZAT AL PRODUC TORULUI Reprezentantul mputernicit al produc torului Slovakia Trend Export Import s r o Michalovsk 87 1414 073 01 Sobrance Fax 056 652 2329 Tel 0915...

Page 41: ...ed for a preliminary assessment of exposure The declared vibration emission level represents the main applications of the tool However if the tool is used for different applications with different acc...

Page 42: ...ction and collection facilities ensure these are connected and properly used Use of dust collection can reduce dust related hazards Power tool use and care Do not force the power tool Use the correct...

Page 43: ...ubricant Insert drill bits or chisels into the chuck through the dust shield while twisting and pushing inward until it locks automatically into place Pull outward on the drill bits or chisels to be c...

Page 44: ...agbohrmaschinen beim Bohren in Beton Dieses Werkzeug erlaubt den Gebrauch jedes normalen SDS Zubeh rs TECHNISCHE DATEN Typ Modell WRH13 26 Z1A HB 2616 Stromspannung 220 240V 50Hz Leistung 800W Drehges...

Page 45: ...en Sie das Kabel nicht um das Elektrowerkzeug zu tragen aufzuhangen oder um den Stecker aus der Steckdose zu ziehen Halten Sie das Kabel fern von Hitze Ol scharfen Kanten oder sich bewegenden Geratete...

Page 46: ...che Hilfe in Anspruch Austretende Akkuflussigkeit kann zu Hautreizungen oder Verbrennungen fuhren Service Lassen Sie Ihr Elektrowerkzeug nur von qualifizier tem Fachpersonal und nur mit Original Ersat...

Page 47: ...chine in einer soliden Verpackung geliefert Die Verpackung besteht weitgehend aus verwertbarem Material Benutzen Sie also die M glichkeit zum Recyclen der Verpackung Bringen Sie bei Ersatz die alten M...

Page 48: ...przerwania kabla zasilaj cego nale y natychmiast wyci gn wtyk sieciowy Przed wykonaniem wszelkich prac na urz dzeniu wyci gn wtyk sieciowy Przeczytaj instrukcj obs ugi Nosi ochronniki s uchu No i okul...

Page 49: ...ewni si e s one pod czone i b d prawid owo u yte U ycie urz dzenia odsysaj cego py mo e zmniejszy zagro enie py ami Prawid owa obs uga i eksploatacja elektronarz dzi Nie nale y przeci a urz dzenia Do...

Page 50: ...energi elektryczn elektronarz dzie nale y w cza tylko wowczas gdy jest ono u ywane Nale y zapobiega niezamierzonemu uruchomieniu elektronarz dzia Przed pod czeniem elektronarz dzia do akumulatora upe...

Page 51: ...Exploded view for WRH13 26...

Page 52: ...e teeth washer 73 Stator 23 Self tapping screw 74 Inductor 24 Circlip 75 Elasticity sheath 25 Big washer 76 Motor housing 26 Spring 77 Copper ring 27 O ring 78 Carbon brush bracket 28 Steel pin 79 Coi...

Reviews: