background image


Step 2: Handlebar assembly 


Place the handlebar set onto in the center of the


adjustable tube. (the brake lever shall be on the right


hand side). Cover the


handlebar with the clamp


cap. Screw in the bolts,


adjust for correct angle of

 the 

handlebar  and  ensure  that  it  is  central,  and  then  tighten  the  bolts  to  complete  the  assembly.  Make 
sure the handlebar cannot be moved forward or backward and is secured


tightly. 

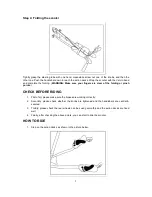
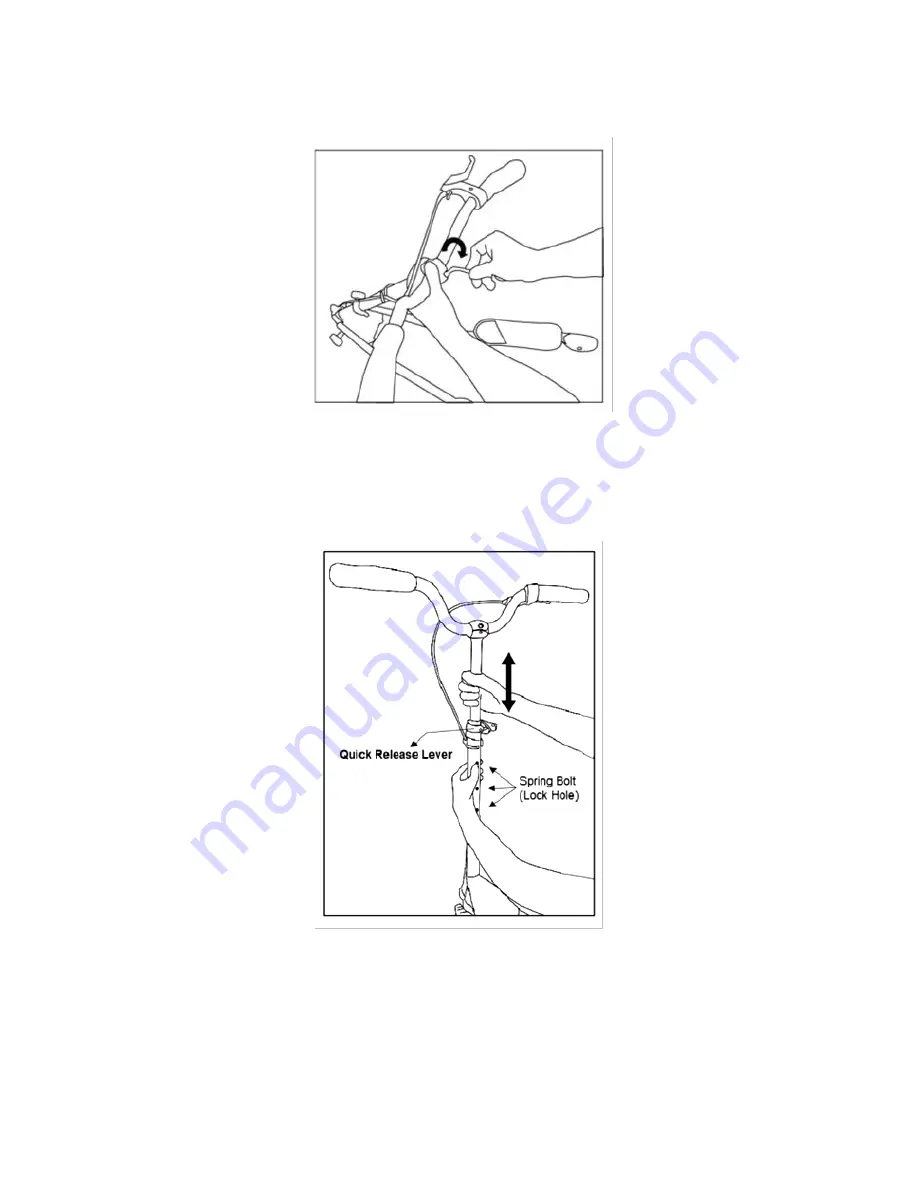
Step 3: Adjusting height 


This scooter can be adjusted to suit the height of different users. First release the quick release lever, 
pushing the spring bolt  with one hand  while the other hand pulls the adjustable  tube up or pushes  it 
down. Lock the spring bolt into one of the locking holes. Then tighten the quick release lever. Check 
that the adjustable tube cannot be moved. 

Summary of Contents for Fliker 100

Page 1: ...USER MANUAL EN IN 13253 Triscooter WORKER Fliker 100...

Page 2: ...ENTS 4 ASSEMBLY INSTRUCTIONS 4 Step 1 Unfolding the scooter 5 Step 2 Handlebar assembly 6 Step 3 Adjusting height 6 Step 4 Folding the scooter 7 CHECK BEFORE RIDING 7 HOW TO RIDE 7 USER GUIDE AND MAIN...

Page 3: ...the handlebar of the scooter can be twisted and the scooter may lose control DO NOT ride the scooter on slippery or wet ground as the scooter with PU wheel can slip and lose control DO NOT ride the sc...

Page 4: ...ke Lever 9 Front Wheel 4 Brake Cable 10 Folding Knob 5 Handlebar Clamp Cap 11 Action Deck 6 Adjustable Tube 12 Rear Wheel ASSEMBLY INSTRUCTIONS Open the box and take out the scooter unit wrench stem c...

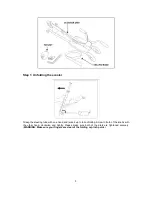
Page 5: ...tube with one hand and raise it up to full unfolding Screw in both of the knobs with the other hand clockwise and tightly Please make sure both of the dials are tightened securely WARNING Make sure yo...

Page 6: ...the bolts to complete the assembly Make sure the handlebar cannot be moved forward or backward and is secured tightly Step 3 Adjusting height This scooter can be adjusted to suit the height of differ...

Page 7: ...fingers are clear of the folding or pinch points CHECK BEFORE RIDING 1 First of all please make sure the brakes are working correctly 2 Secondly please check whether the knobs are tightened and the ha...

Page 8: ...the moving parts If any parts require replacing please check with the dealer to make sure the parts specifications are correct 5 The PU wheels are non durable and may wear out after some time please...

Page 9: ...specified in the Purchase Agreement in the Amendment to this Contract or in another written agreement Warranty Conditions Warranty Period The Seller provides the Buyer a 24 months Warranty for Goods Q...

Page 10: ...s paragraph The Seller shall settle the Warranty Claim within 30 days after the delivery of the defective Goods unless a longer period has been agreed upon The day when the repaired or exchanged Goods...

Reviews: