6
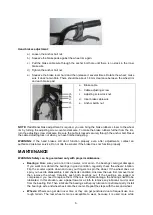
Hand brakes adjustment:
a) Loosen the anchor bolt nut.
b) Squeeze the brake pads against the wheel rim again.
c) Pull the brake cable wire through the anchor bolt hole until there is no slack in the inner
brake wire.
d) Tighten the anchor bolt nut.
e) Squeeze the brake lever hard and then release it several times. Rotate the wheel; make
sure it does not wobble. There should be about 1.6 mm clearance between the wheel rim
and each brake pad.
a. Brake cable
b. Cable adjusting screw
c. Adjusting screw lock nut
d. Inner brake cable wire
e. Anchor bolt & nut
NOTE:
If additional brake adjustment is required, you can bring the brake rubbers closer to the wheel
rim by turning the adjusting screw counter-clockwise. To make the brake rubbers further from the rim,
turn the adjusting screw clockwise. Be sure the cable is locked securely through the anchor bolt. Reset
the cable adjusting lock nut when you have finished adjusting.
WARNING:
If
the hand brakes still don’t function properly even after adjustments, contact an
authorized customer service. Do not ride the scooter if the brake does not function properly.
MAINTENANCE
WARNING: Safety can be guaranteed only with proper maintenance.
Bearings:
Make sure you do not ride on water, oil or sand
– the bearings could get damaged.
If you want to maintain the bearings in good condition, regularly check the wheels’ rotation.
Flip the scooter upside down and use your fingers to spin the wheel. If the wheel does not
spin, you need to disassemble it and check its condition. Unscrew the axle first, remove it and
then remove the wheel. Carefully push both bearings out. If the bearings are jagged or
compressed, you need to replace them. If there is no visible damage, the bearings need to be
lubricated. In this situation, use a paper towel or a cloth to remove any lubricant, mud or dust
from the bearing first. Then lubricate the bearings with spray lubricant or petroleum jelly. Install
the bearings, axle and wheel back onto the scooter. Repeat the steps with the second wheel.
Wheels:
Wheels can get worn over time or they can get punctured due to frequent use on a
rough terrain. The rear wheel is more susceptible to wear, because it is used more while


