background image

PRECISION SPRAY EQUIPMENT, a divison of Green Leaf, Inc.   9490 N BALDWIN ST   FONTANET, IN 47851   www.grnleafinc.com

a division of Green Leaf, Inc

®

P R E C I S I O N   S P R AY   E Q U I P M E N T

PSE

13

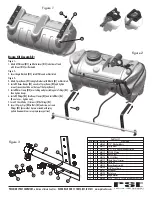
Boom Kit Assembly:


PARTS LIST

DESCRIPTION

STOCK #

QTY

ITEM

1/4" U-Bolt with Nuts

600169

2

1

Spray Boom

600111

1

2

B 11 - 3/4” R Boom Clamp Assembly

600113

2

3

NTL 38 P Fitting

600112

2

4

8027 P Nut

600119

2

5

N 1116 P Nut

600116

2

6

Check Valve / Strainer

600117

2

7

Spray Tip

600118

2

8

Boom Hose Assembly

600115

1

9

5/8" Hose Clamp

600120

2

10

ATV Mount

600189

2

11

Helix Lever

600190

2

12

Angle Bracket

600191

2

13

5/16  - 18 x 3/4" FLT HD Socket Head Cap Screw

600188

4

14

2

3

5

8

7

6

4

10

1

9

13

Figure 1 —

1.  Attach ATV Mount (#11) and Helix Lever (#12) to bottom of tank

     with Screws (#14) as illustrated.
Figure 2 —

2.  Insert Angle Brackets (#13) into ATV Mounts as illustrated.
Figure 3 —

3.  Attach Spray Boom (#2) to Angle Brackets with U-Bolts (#1) as illustrated.

4.  Install 2 Boom Clamps (#3) on ends of Spray Boom (#2) and tighten

     screws (screws should be on the top of the Spray Boom).

5.  Install Worm Clamp (#10) over tubing and press tubing onto fittings (#4)

     then tighten clamps.

6.  Install 2 fittings (#4) thru Boom Clamps (#3) and install Nuts (#6)

     (Do not over – tighten nuts).

7.  Insert 2 Check Valve / Strainers (#7)in fittings (#4).

8.  Insert 2 Spray Tips (#8) in Nuts (#5) and screw nuts onto

     fittings (#4) (assure that tips are oriented with spray

     pattern downward to assure proper spray pattern)

12

14

11

Figure 1

Figure 2

Figure 3

Summary of Contents for ATV 2522

Page 1: ...d part numbers can be obtained from the illustrated parts list section of this manual Whenever you need parts or repair service contact your distribu tor dealer first For warranty work always take you...

Page 2: ...ol valve to the ON position Once the pump is turned on the unit will begin spraying The system pressure will decrease slightly when you see solution flowing from the spray nozzles This is normal the p...

Page 3: ...use of a standard 12V receptacle on the vehicle This can be used as an alternate to the battery clips DESCRIPTION STOCK QTY ITEM 25 Gallon Tank 600132 1 1 2 0 GPM 12V Pump 600183 1 2 QD Cross Fitting...

Page 4: ...Head Cap Screw 600188 4 14 2 3 5 8 7 6 4 10 1 9 13 Figure 1 1 Attach ATV Mount 11 and Helix Lever 12 to bottom of tank with Screws 14 as illustrated Figure 2 2 Insert Angle Brackets 13 into ATV Mount...

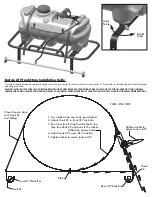
Page 5: ...LD RESULT FROM IMPROPER USE ALWAYS FOLLOW THE ATV MANUFACTURERS RECOMMENDATIONS Front ATV Rack Bar Rear ATV Rack Bar Custom ATV Tank Strap Installation Guide Tighten ratchet to secure tank to ATV Hook...

Page 6: ...1 5 Pan Head Screw 10 24 UNC x 1 1 4 600130 4 6 Relief Hose Assembly 600213 1 7 8 EL38QD P Fitting 600185 1 2 0 GPM 12V Pump 600183 1 9 QD Cross Fitting 600211 1 10 10 x 3 Self Tapping Screw 600210 2...

Page 7: ...state electrical codes Pressure Sensing Demand Switch The PowerFLO Series 7800 pump is controlled by a built in pressure sensing demand switch When a faucet or valve is opened down stream of the pump...

Page 8: ...connections Ensure switch is in the on position Check in line fuse and or fuse in car adapter end Ensure correct voltage 10 12 13 volt Low flow or no flow at all what should I check Check for a clogge...

Reviews: