background image

18 

AFTER SALES SUPPORT

t

 0151 649 1500

(Charged at local rates)

www.einhell.co.uk

1890 946 6244

WZAS 14,4/1 Li

XI/18/2012

6

Operation

6.1 Charging the battery (Fig. 2-3)

Important! At below 10° C, charging is reduced in keeping with the 
charger‘s intelligent safety concept. This may mean that the battery 
pack will not be fully charged. At below 0° C and above 40° C there is no 
charging performed.
The battery is protected from exhaustive discharge. An integrated 
protective circuit automatically switches off the equipment when the 
battery is flat. In this case the bit chuck will cease to turn. Warning! Do 
not press the ON/OFF switch any more if the protective circuit has 
actuated. This may damage the battery. 
1.  Remove the battery pack (5) from the handle, pressing the pushlock 

buttons (8) downwards to do so.

2.  Check that your mains voltage is the same as that marked on the 

rating plate of the battery charger. Plug the mains plug of the charger 
(6) into the mains socket outlet.

3.  Connect the charging cable (a) to the charging adapter (12).
4.   The green LED on the charger will flash. Plug the battery (5) into 

the charging adapter (12). Now the red LED will come on to indicate 
that the battery pack is being charged. When the charging process 
is finished, the green LED will be permanently lit. The time it takes 
to fully recharge an empty battery is approximately 1 hour. The 
temperature of the battery may rise slightly during the charging 
operation. This is normal. If the red and green LED flashes after the 
battery has been inserted, the battery is defective. In this case, pull 
out the mains plug of the charger immediately and remove the 
defective battery. Do not use the defective battery again. If the red 
and green LED on the charger lights up while the battery pack is 
inserted, the charging temperature is either too high or too low. 
In this case, pull out the mains plug of the charger and charge the 
battery in an environment in which the temperature is either warmer 
or colder.

There is no risk in leaving the battery in the charger as the charging is 
ended automatically. However, you should disconnect the charger from the 
battery and from the power supply so as not to waste electricity.

WZAS_14_4_1_Li_UK_SPK7.indb   18

30.07.12   08:50

Summary of Contents for 14.4 V LITHIUM-ION CORDLESS DRILL

Page 1: ...1 Li XI 18 2012 Charged at local rates D 1890 946 6244 Now you have purchased a Workzone product you can rest assured in the knowledge that as well as your 3 year parts and labour guarantee you have t...

Page 2: ...comprehensive manufacturer s 3 year warranty and an outstanding after sales service through our dedicated Helpline We hope you will enjoy using your purchase for many years to come If you require tech...

Page 3: ...w einhell co uk D 1890 946 6244 WZAS 14 4 1 Li XI 18 2012 Tableof contents 04 Safety information 14 Items supplied 15 Layout 16 Use 17 Before putting into operation 18 Operation 23 Information 29 Guar...

Page 4: ...safety regulations and instructions Any errors made in following the safety information and instructions set out below may result in an electric shock fire and or serious injury Keep all safety inform...

Page 5: ...ck If you use an electric power tool outdoors use only extension cables that are suitable for outdoor use The use of an extension cable which is suitable for outdoor use reduces the risk of an electri...

Page 6: ...d by dust 4 Using and handling the power tool Do not overload the equipment Use the correct electric tool for the job in hand The correct tool will enable you to work better and more safely within the...

Page 7: ...paper clips coins keys nails screws and other metallic objects that could cause a short circuit between the contacts A short circuit between the battery contacts may cause burns or a fire In case of i...

Page 8: ...t use and poor care are the main causes of the damage caused by high performance batteries Information about the battery Ensure that the equipment is switched off before you insert the battery Inserti...

Page 9: ...ery pack appears to be undamaged The battery cells inside the battery may have suffered serious damage In this respect please also read the waste disposal information If the battery pack suffers overl...

Page 10: ...imes apply only to discharged batteries Frequent insertion of a charged or partly charged battery pack will result in over charging and cell damage Do not leave batteries in the charger for days on en...

Page 11: ...ing and exposure to direct sunlight will result in overheating and cell damage Never charge or work with batteries which have been overheated replace them immediately if possible Storage of batteries...

Page 12: ...to the gearing change the gear only when the equipment is at a standstill Store the battery only in dry rooms with an ambient temperature of 10 C to 40 C Place only charged batteries in storage charg...

Page 13: ...ar muffs The impact of noise can cause damage to hearing Wear safety goggles Sparks generated during work or splinters chips and dust emitted by the equipment can cause loss of sight Wear a breathing...

Page 14: ...all items are supplied Inspect the equipment and accessories for transport damage If possible please keep the packaging until the end of the guarantee period Important The equipment and packaging mat...

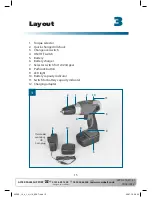
Page 15: ...ick change drill chuck 3 Changeover switch 4 ON OFF switch 5 Battery 6 Battery charger 7 Selector switch for 1st 2nd gear 8 Pushlock button 9 LED light 10 Battery capacity indicator 11 Switch for batt...

Page 16: ...only for its prescribed purpose Any other use is deemed to be a case of misuse The user operator and not the manufacturer will be liable for any damage or injuries of any kind caused as a result of t...

Page 17: ...mation before you put the cordless screwdriver into operation 1 Charge the battery pack only with the charger supplied 2 Only ever use sharp drill bits and screwdriver bits which are suitable for the...

Page 18: ...rging adapter 12 4 The green LED on the charger will flash Plug the battery 5 into the charging adapter 12 Now the red LED will come on to indicate that the battery pack is being charged When the char...

Page 19: ...ust recharge the battery pack when you notice that the power of the cordless equipment drops 6 2 Torque setting Fig 4 Item 1 The cordless screwdriver is fitted with a mechanical torque selector The to...

Page 20: ...tion of rotation of the cordless screwdriver and for preventing the cordless screwdriver from being switched on inadvertently You can select between clockwise and counter clockwise rotation To avoid c...

Page 21: ...battery 6 7 Changing the tool Fig 7 Important Set the changeover switch 3 to its centre position whenever you carry out any work for example changing the tool maintenance work etc on the cordless scr...

Page 22: ...screw size as specified in the instructions 6 9 LED lamp Fig 1 Item 9 The LED lamp 9 can be used to additionally illuminate the area where you want to screw or drill The LED lamp 9 will be lit automa...

Page 23: ...and some soft soap Do not use cleaning agents or solvents these may be aggressive to the plastic parts in the equipment Ensure that no water can get into the interior of the equipment Maintenance The...

Page 24: ...er to the additional information on page 27 Storage Store the equipment and accessories out of children s reach in a dark and dry place at above freezing temperature The ideal storage temperature is b...

Page 25: ...al vibration values vector sum of three directions determined in accordance with EN 60745 Drilling in metal Vibration emission value ah 3 2 m s2 K uncertainty 1 5 m s2 Screwing without hammer action V...

Page 26: ...king to the equipment Do not overload the equipment Have the equipment checked if necessary Switch off the equipment when not in use Wear gloves Residual risks Even if you use this electric power tool...

Page 27: ...cannot be removed return the complete cordless machine or tool You can then be sure that the equipment will be correctly disposed of by the manufacturer When shipping or disposing of batteries and co...

Page 28: ...components supplied with the old equipment The reprinting or reproduction by any other means in whole or in part of documentation and papers accompanying products is permitted only with the express co...

Page 29: ...will be accepted after the end of the guarantee period This also applies if an on site service is used The guarantee is valid for a period of three years starting from the purchase date Keep your sal...

Page 30: ...you keep the receipt with this warranty card Location of purchase Description of malfunction Return your completed warranty card to Einhell UK Unit 5 Morpeth Wharf Twelve Quays Birkenhead Wirral CH 4...

Page 31: ...31 AFTER SALES SUPPORT t 0151 649 1500 Charged at local rates www einhell co uk D 1890 946 6244 WZAS 14 4 1 Li XI 18 2012 WZAS_14_4_1_Li_UK_SPK7 indb 31 30 07 12 08 50...

Page 32: ...EH 07 2012 02 WZAS_14_4_1_Li_UK_SPK7 indb 32 30 07 12 08 50...

Reviews: