

IMPORTANT
PARTS
ASSEMBLY
A
B
C
D
E
PARTS IDENTIFICATION:
A.
B.
C.
D.
E.
Treat your tent seams with waterproofing. Set up your tent at home before your first camping trip. A dark campsite is no place
to learn how to assemble your WORLD FAMOUS SPORTS tent. Read assembly instructions with care. When selecting a
campsite, make sure you find a flat area with good drainage free from all sharp objects. Protect your investment.
Tent ........(1)
Rainfly ........(1)
Shock Corded Fiber Glass Poles..(6)
[2 Long & 4 Short Fiber Glass Poles]
Tent Stakes ........ (8) (& guyline)
Carry bag ........ (1)
This product can expose you to chemicals including Diethylhexyl Phthalate,
which is known to the state of California to cause cancer, birth defects, or
other reproductive harm. For more info go to:
www. P65Warnings.ca.gov
1
3
2
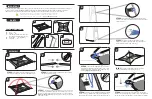
STEP 1:
Unfold and spread the privacy tent out on
clear camp area. Remove all stones and sharp objects.
STEP 2:
Assemble all shock corded poles by unfolding
and slipping shafts together
.
STEP 3:
Lay the two long pole assemblies across the tent to form
an “X”. Then insert the MIDDLE pin and ring attached on the corner of
the tent, into the open metal ferrule at the end of the pole assembly.
Repeat for all four corners.
In repeating the procedure, you have now
formed two arches.
2
5
2
STEP 5:
Reinforce the base of the privacy tent by
sliding the remaining short fiber glass poles through the
sleeves located at the bottom of the tent.
4
STEP 4:
Erect the privacy tent by attaching the clips
located on the tent, onto the fiber glass poles securely until
it snaps into place.
5
5
5
5
2
2
STEP 8:
Each corner of the rainfly has a bungee cord with
plastic “S” hooks. - Attach each “S” hook to the fabric loop.
Then attach one end of the guyline to the fabric loop as well.
6
STEP 7:
Spread out the rainfly over the top of the
tent to prevent debris from entering the tent.
8
9
7
STEP 6:
Insert the short fiber glass poles into the
remaining pins and ring attached on the corner of the
tent into the open metal ferrule at the end of the pole
assembly,
Repeat for all four corners.
8
2
6
6
STEP 9:
Securely insert the Tent Stakes into the ground
through the small pin and ring on each corner of the tent. Then
tie the other ends of the guylines to all tent stakes for stability.
8
4


