background image

24

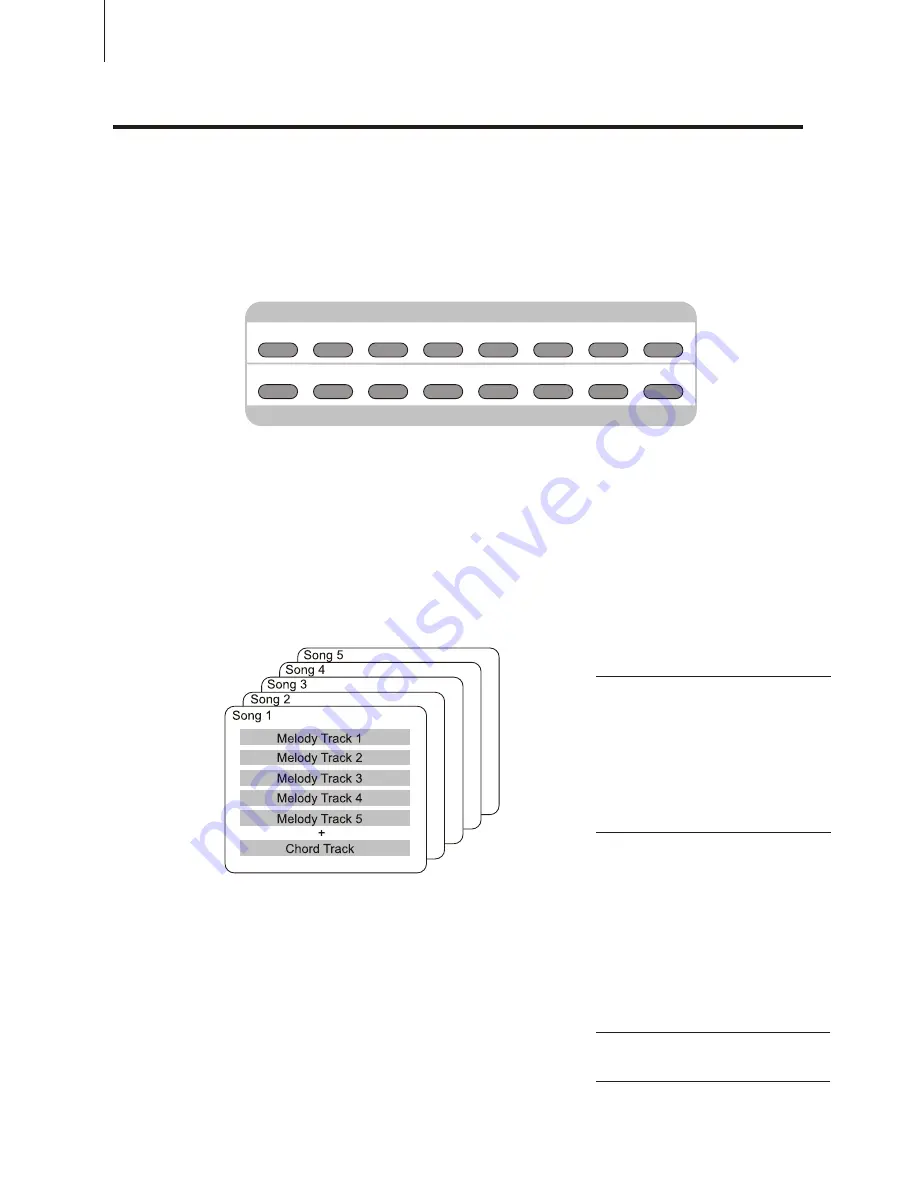
To save songs is to save your own performance (5 melody channels) and the accompaniment 
(chord channel) together as a song, in case sometimes you want to repeat it again. This 
instrument can save at most 5 songs. Saving Songs consists of 8 control buttons: [SONG NO.] 
to choose the song, [SAVE] to do the preparation, [MELODY 1-5] to choose the melody voice 
part, [CHORD / CLEAR] to select the chord and musical track and as well as clear the saved 
songs.

As a matter of fact, this function provides with 5 musical tracks available for saving the 

melody (Melodies in each track can choose different kinds of voices and percussions) and one 
special channel to save the accompaniment (using Style mode or auto bass chord function). 
Please save the songs with the methods below:

Save any melody track or chord track. (Single track record)
When the auto bass chord function is on, save the melody track and chord track 

together.(Double tracks record)

In addition, each track can save what stated below
Melody1-5: the melody played on the keyboard, voice, 

dual on/off(and the choice of the second voice), dual balance, 
reverb on/off, sustain on/off, pitch bend roller, touch response 
on/off, percussion, chord on/off(with the parameters you've 
set), transpose on/off(with the parameters you've set)

Chord: the chord played on the keyboard (regardless of 

auto bass chord mode), Style choice, accompaniment 
proceeding (intro, fill-in, ending, A/B variation on/off, change 
of accompaniment volume).

.

SAVING SONGS

SAVING SONGS

DEMO SONGS. CONTROL & EFFECT

DEMO SONGS. CONTROL & EFFECT

DEMO

DUAL

REVERB

TOUCH

CHORUS

HARMONY

PERCUSSION

CHORD

SYNC STOP

SYNC

START

START/STOP INTRO

MAIN A

MAIN B

ENDING

CHOOSE & PLAY

CHOOSE & PLAY

MINUS

CHANNEL

NOTE:
There's no special difference between 
single-track recording and double-track 
recording. Even when you record the 
m e l o d y   a n d   c h o r d  p e r f o r m a n c e   b y  
double-track recording, this instrument 
can automatically separate it into melody 
track and chord track according to your 
performance. Thus, you can re-record a 
certain track (or correct an error) after 
double-track recording.

NOTE:
Both the beginning tempo and the tempo 
change in the recording will be recorded 
as parts of the song.

Summary of Contents for W8808A

Page 1: ...Style P 14 Adjusting the Accompaniment Volume P 14 Adjusting the Accompaniment Tempo P 14 Playing the Accompaniment P 15 SYNCHRO Start P 16 SYNCHRO Stop P 19 Accompaniment Sections Main A B fill ins P...

Page 2: ...le with a line through it means that the indicated action must not be performed Indications within or nearby this symbol are specifically prohibited The example at left indicates that disassembly is p...

Page 3: ...instrument Never attempt of take apart or modify the instrument its accessories or separately sold options Doing so may cause fire electrical shock or malfunction Consult your dealer concerning all in...

Page 4: ...e into contact with battery fluid Take care to observe the followings Install batteries so their polarity matches that indicated on the instrument For safety and to prevent possible leakage of battery...

Page 5: ...allow the liquid inside the LCD to come into contact with your skin which can cause inflammation and reddening Should the LCD liquid get into your mouth immediately wash out your mouth with water and...

Page 6: ...button It is to turn on off the Chorus function See P 12 9 HARMONY button This turns on off the Harmony function See P 13 10 Minus Channel button It is to control the Channel of the keyboard See P 13...

Page 7: ...ng playback point back toward the beginning in Song mode See P 20 25 MAIN B button It is to control the auto fill and change the auto accompaniment sections while in Style mode and when Song mode is s...

Page 8: ...BOARD 21 REAR PANEL REAR PANEL 20 22 23 FOOT SWITCH FOOT SWITCH BACK BOARD BACK BOARD Headphone Auxiliary Output P 9 AC Adapter Socket P 9 Rear Panel P 9 MIDI IN P 9 35 MIDI OUT P 9 35 Footswitch P 9...

Page 9: ...tting Up Setting Up Using Headphones or Stereo System Using Headphones or Stereo System 1 Fix the left and right feet on the ground board with 4 black screws at each side 2 Put 8 wooden screws into th...

Page 10: ...back also you can use the SEARCH dial to select the number In this instrument there are 348 vivid voices including 25 Chinese voices and many GM voices All these are separated into A and B groups and...

Page 11: ...elf Press the FUNCTION button until it shows Second Voice Volume in the LCD Press YES and NO or use the SEARCH dial to adjust the second voice volume ranging from 0 to 127 CONTROL AND EFFECT CONTROL A...

Page 12: ...buttons or SEARCH dial NOTE The keyboard will automatically call up touch response after you turn it on Its default touch type is medium response As to setting the parameter in touch function please...

Page 13: ...on to select this function and the Transpose icon appears in the LCD You can adjust the range of transpose by using YES and NO buttons or SEARCH dial Harmony The Harmony section features a variety of...

Page 14: ...ou perform The auto accompaniment features that are built into the rhythms add the excitement of instrumental backing to your performance letting you control the accompaniment by the chords you play A...

Page 15: ...ccompaniment The currently selected Main A B section will play Playing the Accompaniment The panel buttons below function as accompaniment controls You can select the Main A B section by pressing the...

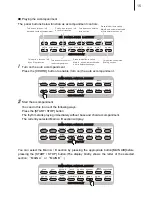
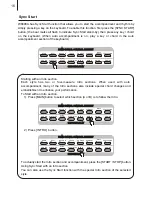
Page 16: ...the keyboard To enable this function first press the SYNC START button the beat marks all flash to indicate Sync Start stand by then press any key chord on the keyboard When auto accompaniment is on p...

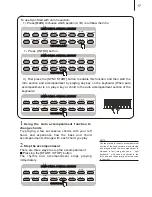
Page 17: ...o enable this function and then start the Intro section and accompaniment by playing any key on the keyboard When auto accompaniment is on play a key or chord in the auto accompaniment section of the...

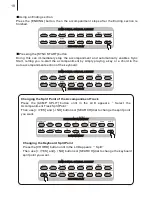
Page 18: ...ON CHORD SYNC STOP SYNC START START STOP INTRO MAIN A MAIN B ENDING CHOOSE PLAY CHOOSE PLAY MINUS CHANNEL 18 Using an Ending section Press the ENDING button then the accompaniment stops after the Endi...

Page 19: ...he rhythm and accompaniment briefly while you play a melodic break or solo with your right hand Press the ACMP button To enable the accompaniment function By pressing CHORD button repeatedly you can g...

Page 20: ...joy Main A again You can also select either the Main A or B section to start by pressing the MAIN AUTO FILL button before starting the style Accompaniment Sections Main A B and Fill ins Accompaniment...

Page 21: ...nth and minor seventh The illustration below shows how to produce the four chord types The key of C is used here as an example other keys follow the same rules For example B 7 is played as B and A Fin...

Page 22: ...The chord fingerings listed are all in root position but other inversions can be usedwith the following exceptions m7 m7 5 6 m6 sus4 aug dim7 7 5 6 9 1 2 5 Inversion of the 7sus4 and m7 11 chords are...

Page 23: ...ied to percussion music DEMO SONGS CONTROL EFFECT DEMO SONGS CONTROL EFFECT DEMO DUAL REVERB TOUCH CHORUS HARMONY PERCUSSION CHORD SYNC STOP SYNC START START STOP INTRO MAIN A MAIN B ENDING CHOOSE PLA...

Page 24: ...y1 5 the melody played on the keyboard voice dual on off and the choice of the second voice dual balance reverb on off sustain on off pitch bend roller touch response on off percussion chord on off wi...

Page 25: ...r Tempo Time Signature if it is not in the chord track Reverb Type Chorus Type The data recorded into Chord track Style number Accompaniment Volume Chord changes and timing Tempo Time Signature Changi...

Page 26: ...s the previous display Recording to the Chord Track A special chord track is prepared for recording accompaniment data This is automatically recorded to the Chord track track A Selecting the chord tra...

Page 27: ...can start recording simply by playing the keyboard or by pressing the START STOP button When Sync start is on play the first chord of the song in the auto accompaniment section of the keyboard The ac...

Page 28: ...erase a song and record a new one To erase an individual track of a song while leaving the other tracks intact use the Track Clear operation Select the desired song Press the SONG NO button and then u...

Page 29: ...record a new one To erase the data of an entire song use the Song Clear operation Select the desired song Press the SONG NO button and then use the numeric keypad or press Yes or No button to select t...

Page 30: ...PERCUSSION CHORD SYNC STOP SYNC START START STOP INTRO MAIN A MAIN B ENDING CHOOSE PLAY CHOOSE PLAY 30 This button is the panel button of song control functions Its usage covers your saved User songs...

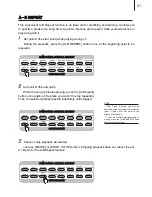
Page 31: ...rase of a song from A point to B point and repeat it while yourself practice or play along with it Set point A the start point while playing a song During the playback press the A B REPEAT button once...

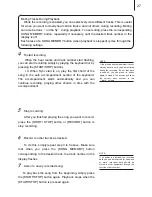
Page 32: ...epeat function Press the A B REPEAT button Turn off the A B Repeat function HINT If you are repeat practicing a particularly difficult section try slowing down the tempo to an appropriate speed to mak...

Page 33: ...ice and Dual balance Chorus on off type Touch Type Reverb Transpose setting Style Number as well as Group A B choice Tempo setting Tuning Harmony on off and its type Accompaniment volume Press the BAN...

Page 34: ...RONOME ACMP SPLIT ACMP TRACK CLEAR 4 34 First press BANK button and then use YES and NO to select the register number from 1 to 18 if you do not select it means to use the present memory bank Then pre...

Page 35: ...ds But how do digital instruments go about playing a note As shown in the pictures above in digital instruments the sample notes reserved notes stored in the tone generator section electronic circuit...

Page 36: ...voice and effect and change the parameter and as well as perform the appointed voice MIDI Interface MIDI IN is to receive outside data from other MIDI devices like sequencer in order to control this...

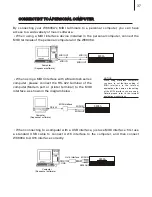
Page 37: ...nect the MIDI terminals of the personal computer and the W8808A When using a MIDI interface with a Macintosh series computer please connect the RS 422 terminal of the computer Modem port or printer te...

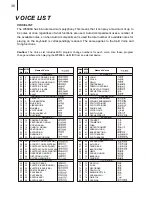
Page 38: ...P 48 47 TIMPANI RNSEMBLE 49 48 STRINGS ENSEMBLE1 1 50 49 STRINGS ENSEMBLE12 2 51 50 SYNTH STRINGS1 1 52 51 SYNTH STRINGS2 2 53 52 CHOIR AAHS 54 53 VOICE OOHS 55 54 SYNTH VOICE 56 55 ORCHESTRA HIT BRAS...

Page 39: ...L 114 113 AGOGO 115 114 STEEL DRUMS 116 115 WOOOBLOCK 117 116 TAIKO DRUM 118 117 MELODIC TOM 119 118 SYNTH DRUM 120 119 REVERSE CYMBAL SOUND EFFECT 121 120 FRET NOSE 122 121 BREATH NOISE 123 122 SEASH...

Page 40: ...1 43 DIXIE 2 2 44 JAZZBALLAD 1 1 45 JAZZBALLAD 2 2 46 JAZZWALTZ 47 CHARLSTON 48 RAGTIME COUNTRY No Name 49 COUNTRY 1 1 50 COUNTRY 2 2 51 COUNTRYDANCE 52 COUNTRYROCK 53 COUNTRYWALTZ CARIBBEAN 54 REGGAE...

Page 41: ...T 5 HQ ELEC SET 39 D 2 42 F 2 44 G 2 46 A 2 49 C 3 51 D 3 54 F 3 Closed Hi Hat EXC1 56 G 3 58 A 3 61 C 4 63 D 4 66 F 4 89 F6 Low Wood Block 90 F 6 Mute Cuica EXC4 91 G6 Open Cuica EXC4 92 G 6 Mute Tri...

Page 42: ...HQ TR808 SET 7 HQ DANCE SET 8 BRUSH 9 ORCHESTRA 10 SFX SET HQ Dance snare1 HQ Dance snare2 808 OHH EXC1 808 OHH EXC1 89 F6 Horse Gallop 90 F 6 Birds 91 G6 Rain 92 G 6 Thunder 93 A6 Wind 94 A 6 Sea Sh...

Page 43: ...FUNCTION PARAMETERS TYPE DISPLAY RANGE SETTING INSTRUCTION W8808A W8808A W8808A W8808A 43...

Page 44: ...sure that the Accompaniment Volume is set to an appropriate level The voice chosen does not sound properly or the volume is too low Make sure the settings are appropriate master volume dual balance No...

Page 45: ...t mode ON OFF Panel Control Demo songs Voice Style Mode Accompaniment Volume Touch Sense Reverb Sustain Dual Function Song Number Memory Song Memory Registration Memory Dual Voice Dual Balance Sustain...

Page 46: ...as its own intro and main A B two types variation and ending 32 types of commonly used voices and 32 types of commonly used styles for rapid choice With 9 groups of percussion instrument and a group o...

Reviews: