Maintenance—Every 100 Hours
DH10862,000017D -19-11MAY18-1/1
Inspect and Re-Torque Track Hardware
Each inspection and re-torquing should be documented
by completing a service report for each unit, placing a
copy of this report in the machine file, and forwarding a
copy to the manufacturer’s attention.
For shoes with missing or loose cap screws and nuts,
remove shoes and clean the mating surface of shoes
and links before replacing cap screws and nuts. The
cap screws must be replaced because they have been
stretched to yield previously.
IMPORTANT: Prevent possible machine damage.
Operating a machine with loose shoes can
cause the cap screws and holes in the shoes
and links to wear, making it difficult to keep
the shoes tight. Loose shoes can also cause
hardware malfunction and loss of shoes.
Improper track shoe cap screw torque will
result in serious damage to the undercarriage
components, shorter life expectancy, and
will void the manufacturer's warranty on the
undercarriage components.
Checking Track Shoe Hardware Torque
NOTE: This procedure is for checking the torque
specification on existing track shoe hardware.
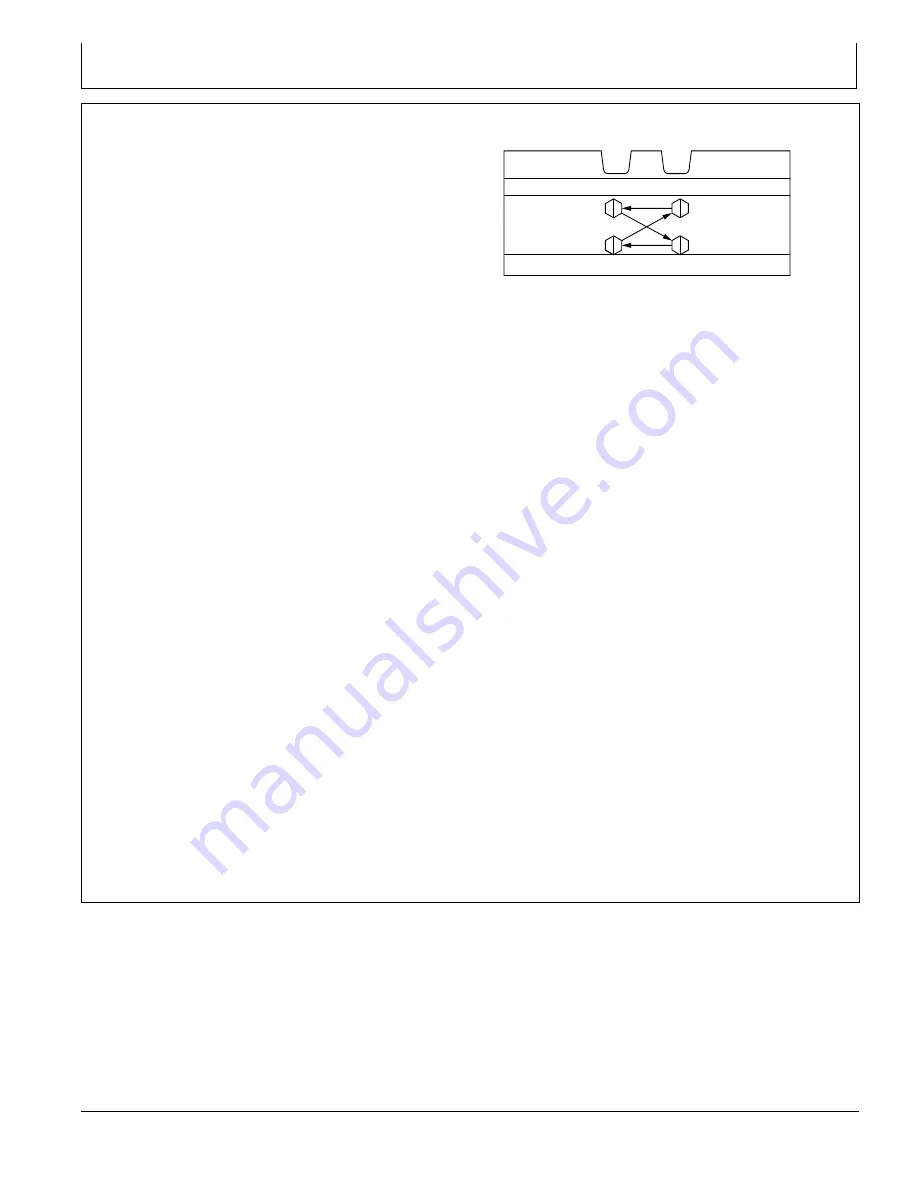
1. Tighten cap screws in sequence to specification.
Specification
Cap Screw—Torque..................................................................1556 N·m
1148 lb·ft
2. Cap screws that have turned have reduced tightness
and need to be re-torqued. See Re-Torquing Track
Shoe Hardware. (Section 3-6.)
3. Check track shoe holes for wear or damage. Replace
as necessary.
Re-Torquing Track Shoe Hardware
NOTE: This procedure is for re-torquing existing track
hardware that was found loose during the Checking
Track Shoe Hardware Torque procedure.
1. Loosen cap screw.
2. Tighten cap screws in sequence to specification.
TX1255661
—UN—19APR18
Cap Screw Torque Sequence
Specification
Cap Screw—Initial
Torque.........................................................................................136 N·m
100 lb·ft
3. Re-torque cap screws in sequence to specification.
Specification
Cap Screw—Final
Torque............................................................ 407 N·m + 1/3 Turn (120°)
300 lb·ft + 1/3 Turn (120°)
Torquing Replacement Track Shoe Hardware
IMPORTANT: Prevent possible machine damage.
Clean shoe and link surfaces of dirt, paint,
and debris before installation.
NOTE: This procedure is for installing and torquing new
track shoe hardware to specification.
1. Clean shoe and link surfaces of dirt or paint.
2. Tighten cap screws in sequence to specification.
Specification
Cap Screw—Initial
Torque.........................................................................................136 N·m
100 lb·ft
3. Torque cap screws in sequence to specification.
Specification
Cap Screw—Final
Torque............................................................ 407 N·m + 1/3 Turn (120°)
300 lb·ft + 1/3 Turn (120°)
3-6-1
092221
PN=159
Summary of Contents for 380GLC
Page 6: ...Introduction Continued on next page TX JDEULA 19 11JUL16 2 3 TX1219046 UN 11JUL16 092221 PN 6...
Page 7: ...Introduction TX JDEULA 19 11JUL16 3 3 TX1219047 UN 14JUL16 092221 PN 7...
Page 9: ...Introduction DX EMISSIONS EPA 19 12DEC12 2 2 TS1721 UN 15JUL13 092221 PN 9...
Page 17: ...Introduction DX EMISSIONS CARB 19 26AUG20 8 8 RG32759 UN 19AUG20 092221 PN 17...
Page 24: ...Introduction 092221 PN 24...
Page 287: ...Index Index 11 092221 PN 11...
Page 288: ...Index Index 12 092221 PN 12...


