2
20V Cordless Brushless
Paint Sprayer
WX020
WX020.X
TABLE OF CONTENTS
1. SAFETY INSTRUCTIONS
2. COMPONENT LIST
3. TECHNICAL DATA
4. NOISE INFORMATION
5. VIBRATION INFORMATION
6. CONTROLS AND FUNCTIONS
7. INTENDED USE
8. OPERATING INSTRUCTIONS
9. NOZZLE AND PRESSURE SELECTION
10. CLEANING
11. STORAGE
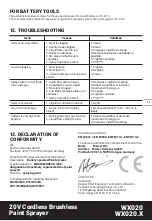
12. TROUBLESHOOTING
13. DECLARATION OF CONFORMITY
1. SAFETY INSTRUCTIONS
PRODUCT SAFETY
GENERAL SAFETY
WARNINGS
WARNING Read all safety warnings,
MRWXVYGXMSRWMPPYWXVEXMSRWERHWTIGMƼGEXMSRW
provided with this power tool.
Failure to follow
all instructions listed below may result in electric
WLSGOƼVIERHSVWIVMSYWMRNYV]
Save all warnings and instructions for future
reference.
The term “power tool” in the warnings refers to your
mains-operated (corded) power tool or battery-
operated (cordless) power tool.
1) Work area safety
a) Keep work area clean and well lit.
Cluttered or
dark areas invite accidents.
b) Do not operate power tools in explosive
atmospheres, such as in the presence of
ƽEQQEFPIPMUYMHWKEWIWSVHYWX
Power tools
create sparks which may ignite the dust or
fumes.
c) Keep children and bystanders away while
operating a power tool.
Distractions can cause
you to lose control.
2) Electrical safety
a) Power tool plugs must match the outlet. Never
modify the plug in any way. Do not use any
adapter plugs with earthed (grounded) power
tools.
9RQSHMƼIHTPYKWERHQEXGLMRKSYXPIXW
will reduce risk of electric shock.
b) Avoid body contact with earthed or grounded
surfaces, such as pipes, radiators, ranges
and refrigerators.
There is an increased risk
of electric shock if your body is earthed or
grounded.
c) Do not expose power tools to rain or wet
conditions.
Water entering a power tool will
increase the risk of electric shock.
d) Do not abuse the cord. Never use the cord for
carrying, pulling or unplugging the power tool.
Keep cord away from heat, oil, sharp edges or
moving parts.
Damaged or entangled cords
increase the risk of electric shock.
e) When operating a power tool outdoors, use an
extension cord suitable for outdoor use.
Use of
a cord suitable for outdoor use reduces the risk
of electric shock.
f) If operating a power tool in a damp location
is unavoidable, use a residual current device
(RCD) protected supply.
Use of an RCD reduces
the risk of electric shock.
3) Personal safety
a) Stay alert, watch what you are doing and use
common sense when operating a power tool.
Do not use a power tool while you are tired
SVYRHIVXLIMRƽYIRGISJHVYKWEPGSLSPSV
medication.
A moment of inattention while
operating power tools may result in serious
TIVWSREPMRNYV]
F 9WITIVWSREPTVSXIGXMZIIUYMTQIRX%P[E]W
wear eye protection.
Protective equipment
such as dust mask, non-skid safety shoes, hard
hat, or hearing protection used for appropriate
GSRHMXMSRW[MPPVIHYGITIVWSREPMRNYVMIW
c) Prevent unintentional starting. Ensure the
switch is in the off-position before connecting
to power source and/or battery pack, picking
up or carrying the tool.
Carrying power tools
[MXL]SYVƼRKIVSRXLIW[MXGLSVIRIVKMWMRK
power tools that have the switch on invites
accidents.
d) Remove any adjusting key or wrench before
turning the power tool on.
A wrench or a key left
attached to a rotating part of the power tool may
VIWYPXMRTIVWSREPMRNYV]
e) Do not overreach. Keep proper footing and
balance at all times.
This enables better control
of the power tool in unexpected situations.
f) Dress properly. Do not wear loose clothing or
jewellery. Keep your hair and clothing away
from moving parts.
0SSWIGPSXLIWNI[IPPIV]SV
long hair can be caught in moving parts.
g) If devices are provided for the connection of
dust extraction and collection facilities, ensure
these are connected and properly used.
Use of
dust collection can reduce dust-related hazards.
L (SRSXPIXJEQMPMEVMX]KEMRIHJVSQJVIUYIRXYWI
of tools allow you to become complacent and
ignore tool safety principles.
A careless action
GERGEYWIWIZIVIMRNYV][MXLMREJVEGXMSRSJE
second.
Summary of Contents for WX020
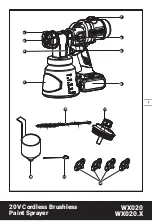
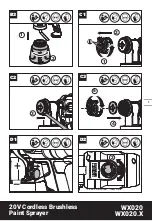
Page 6: ...6 20V Cordless Brushless Paint Sprayer WX020 WX020 X A1 A2 B1 B2 A3 A4 1 2 1 2 3...
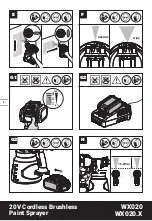
Page 7: ...7 20V Cordless Brushless Paint Sprayer WX020 WX020 X B3 C2 C3 3 4 5 C1 1 2 15 D1 D2 2 2 1...
Page 8: ...8 20V Cordless Brushless Paint Sprayer WX020 WX020 X G1 G2 G3 H E F WIDE NARROW 100 0 15 20cm...
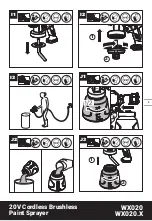
Page 9: ...9 20V Cordless Brushless Paint Sprayer WX020 WX020 X J3 J1 J2 1 2 2 1 I3 I2 1 2 I1...
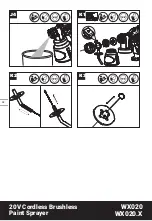
Page 10: ...10 20V Cordless Brushless Paint Sprayer WX020 WX020 X K3 K1 K2 J4...


