Cordless Portable Power Cleaner
EN
14
OPERATING INSTRUCTIONS
NOTE:
Before using the tool, read the
instruction book carefully.
ASSEMBLY & OPERATION
ACTION
FIGURE
BEFORE OPERATION
Installing the battery pack
NOTE:
This machine will only run
when 2 batteries are installed. It
is recommended to use the same
two batteries and charge the two
batteries at the same time.
Using two batteries with different
power, the machine will
only run to the lower common
denominator.
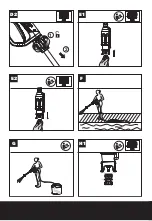
See Fig. A1
Removing the battery pack
See Fig. A2
Charging the battery pack
NOTE:
The batteries are shipped
uncharged. Each battery must be fully
charged before the first use.
Always fully charge the two batteries
at same time. More details can be
found in WA3884’s manual.
See Fig. A3
ASSEMBLY
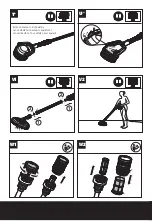
Attaching pressure cleaning lance to
the power nozzle
NOTE:
When attaching, align the
two projections on the lance with
the grooves of the power nozzle as
shown in Fig. B.
See Fig. B
Attaching the multi-spray nozzle
NOTE:
When attaching, try gently
pulling the nozzle to make sure it is
locked into position securely.
See Fig. C
Attaching the cord hose to the power
nozzle
See Fig. D1
Detaching the cord hose
See Fig. D2
Attaching the draw hose to the pump
motor
NOTE:
After the draw hose is
attached, check the connection by
gently pulling upon the draw hose. It
should not be pulled off.
WARNING:
It is not
recommended to connect the
draw hose to your garden hose or
your home tap.
See Fig. E1
Detaching the draw hose
See Fig. E2
NOTE
: There are three options to use
this washing machine:
Option 1
Connect the supplied draw hose to
the end of the pump motor to draw
from any fresh water source (river,
lake, pond, water bucket, etc.)
See Fig. F
Option 2
Place pump motor directly into a
bucket of water.
See Fig. G
Option 3
Connect a standard garden hose (not
supplied) with quick-connect adapter
See Fig. H1,
H2
OPERATION
Battery power indicator on the machine
See details in BATTERY STATUS part
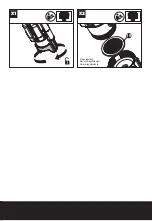
See Fig. I
Pressure setting
Your power nozzle has two pressure
modes, High and Low, delivering
different pressure settings per mode.
See Fig. J
Selecting the nozzle pattern
NOTE:
Choose a suitable nozzle
pattern according to your work. Spray
patterns 0
o
, 15
o
, 25
o
and 40
o
are
applicable for cleaning.
WARNING:
Do not shift the
nozzle pattern when the tool is
powered on due to potential
temporary water leakage.
Make sure the nozzle pattern symbol
aligns with the indicator mark
on tool, otherwise the nozzle will
leak and there will be no sufficient
working pressure.
See Fig. K1,
K2
Start
NOTE:
At the first use, you need to
empty the air in hose, place the
power nozzle below waist level
(<5ft/1.5m), then attach the pressure
cleaning lance and set it at high
pressure. It does not start working
until the water goes up along the
hose and sprays out. This could take
up to 30 seconds or more depending
on the fresh water source.
NOTE:
If air builds up within the
hose or pump, the water pressure
will drop. First, restart the machine,
then air will be released through the
multi-spray nozzle along with any
excess water.
See Fig. L


