background image

Robot tosaerba 

I

55

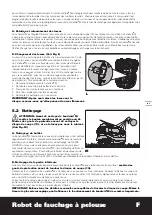
A. Ruotare e capovolgere le lame

Landroid

®

M dispone di lame, tutte avvitate sul disco lama (13). Le lame sono ciò che consentono a Landroid

®

M di svolgere 

il suo lavoro e necessitano di cura e attenzione. Ogni tanto è necessario ruotare e capovolgere contemporaneamente 
tutte le lame per ottenere un taglio perfetto. Quando si ruotano e capovolgono le lame, assicurarsi che tutte le lame siano 
regolate contemporaneamente. In caso contrario, potrebbero sbilanciare il disco lama. Qualora Landroid

®

M tagli con 

normale frequenza (quotidiana), le lame devono durare una stagione se ruotate e capovolte ogni mese. Verificare sempre 
se le lame sono scheggiate o danneggiate e sostituirle, se necessario.   

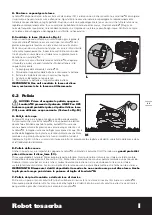
B. Sostituire le lame (Vedere La Fig. L)

Dopo un certo periodo di tempo, di solito dopo ogni stagione, le 
lame di Landroid

®

M devono essere sostituite. Landroid

®

M non 

gradisce eseguire la tosatura con lame di anni e qualità diversi.  
Pertanto, quando si sostituiscono la lame, assicurarsi di sostituirle 
tutte contemporaneamente. È possibile sostituirle con uno dei 
tre kit di lame di ricambio e le viti della lama supplementare in 
dotazione con Landroid

®

M.

Prima di tentare di sostituire le lame di Landroid

®

M, spegnere 

il tosaerba e indossare guanti protettivi. Quindi attenersi alle 
seguenti procedure:
1.  Capovolgere delicatamente Landroid

®

M.

2.  Rimuovere il coperchio della batteria e rimuovere la batteria.
3.  Svitare le viti delle lame con un cacciavite a taglio.
4.  Avvitare saldamente le nuove lame.
5.  Risistemare la batteria e il coperchio della batteria.

IMPORTANTE: Una volta avvitata la lama sul disco
lama, assicurarsi che la lama ruoti liberamente.

6.2   Pulizia

AVVISO:  Prima di eseguire la pulizia, spegnere 
Landroid

®

M premendo il pulsante ON/OFF su OFF.  

Indossare guanti protettivi prima di pulire il disco lama 
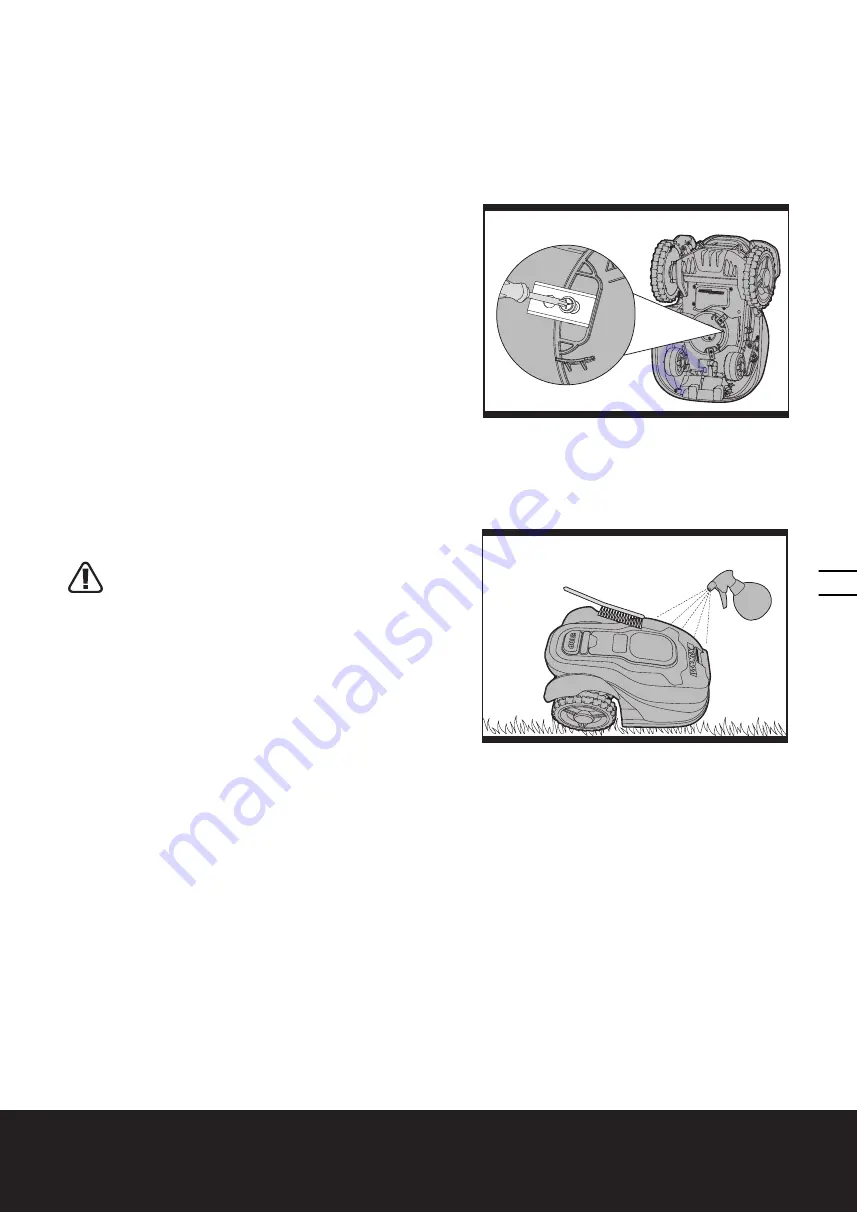
(13) e non utilizzare acqua corrente. (Vedere La Fig. M)

A. Pulizia del corpo

Landroid

®

M dura più a lungo e meglio se pulito periodicamente. 

Dal momento che il vostro Landroid

®

M è un apparecchio elettrico 

dovete fare attenzione quando lo pulite, quindi NON usare una 
canna, apparecchi ad alta pressione o versare acqua corrente  sul 
Landroid

®

M, è meglio usare una bottiglia spray piena d’acqua. Per la 

pulizia dell'alloggiamento in plastica stampo utilizzare una spazzola 
morbida o un panno pulito ed evitare l'uso di solventi o lucidanti 
(Vedere La Fig. M). Infine, assicurarsi di rimuovere tutto l'accumulo di erba tagliata e dii detriti, soprattutto dalle prese d'aria 
di raffreddamento del motore.

B. Pulizia della scocca

Anche in questo caso, è importante spegnere Landroid

®

M utilizzando il pulsante On/Off e indossare 

guanti protettivi 

prima di toccare il disco lama (13).


Prima capovolgere il Landroid

®

M per esporne la parte inferiore. Qui si può notare il disco lama, il telaio scatolato motore 

circostante e le ruote anteriori (15) e motrici (10).  Pulire tutto accuratamente con una spazzola morbida o un panno umido.
Ruotare il disco lama per assicurarsi che si muova liberamente e che non vi sia alcun deposito tra esso e il telaio 
scatolato motore circostante. Assicurarsi inoltre che le lame possano ruotare liberamente e che l'erba non le ostruisca.

IMPORTANTE: Rimuovere i detriti depositatisi in modo che non causino crepe nel disco lama. Anche 
la più piccola crepa può ridurre la potenza di taglio di Landroid

®

M.

C. Pulizia dei pin di contatto e delle strisce di ricarica

Pulire con un panno i pin di contatto (3) situati sulla base di ricarica (4) e le strisce di ricarica (5) situate su Landroid

®

M. 

Rimuovere periodicamente tutto l'accumulo di erba tagliata e di detriti intorno ai pin di contatto e alle strisce di ricarica 
per garantire ogni volta il corretto caricamento di Landroid

®

M.

M

L

Summary of Contents for LANDROID M WG754E

Page 1: ...100 P114 P128 Lawn Mowing Robot Roboter Rasenm her Robot de fauchage pelouse Robot tosaerba Robot cortac sped Rob corta relvas Robotick seka ka Robotick kosa ka Gr ssl ende robot Robot do koszenia tra...

Page 2: ...n my Landroid M mow 3 4 How efficiently will my Landroid M mow the grass 4 Boundary Wire Basics 4 1 Pegging the Boundary Wire 4 2 Burying the Boundary Wire 4 3 Joining the Boundary Wire 4 4 Turn on an...

Page 3: ...as rotating one blade can cause other blades to rotate e WARNING The lawnmower shall not be operated without the guard in place OPERATION 1 GENERAL a Never operate the appliance with defective guards...

Page 4: ...rcuit a battery pack Do not store battery packs haphazardly in a box or drawer where they may short circuit each other or be short circuited by conductive materials When battery pack is not in use kee...

Page 5: ...ride on the machine Do not burn Batteries may enter water cycle if disposed improperly which can be hazardous for ecosystem Do not dispose of waste batteries as unsorted municipal waste Batteries sho...

Page 6: ...Lawn Mowing Robot EN 6 2 Component List 6 8 7 5 9 10 11 12 13 23 22 21 17 19 16 18 3 4 2 1 25 20 24 15 14...

Page 7: ...7 CONTROL PANEL COVER 8 STOP BUTTON 9 RAIN SENSOR 10 REAR DRIVING WHEEL 11 HANDLE 12 BATTERY PACK 13 BLADE TURNING DISC 14 CUTTING BLADE 15 FRONT WHEEL 16 START KEY 17 DISPLAY 18 KEYPAD 19 ON OFF KEY...

Page 8: ...ng into the care free life of automatic mowing In the following we would like to help you better understand how your Landroid M thinks 3 1 How does my Landroid M know what to mow The Landroid M choose...

Page 9: ...e battery power is more than 75 You can check the battery power in the display B Rain sensors The Landroid M is fitted with a Rain Sensor 9 that will detect rain drops and tell the Landroid M to stop...

Page 10: ...size in programming guide Mowing times are different for every lawn depending on the factors mentioned previously Gradually adjust the time you allow your Landroid M to mow each day until you find th...

Page 11: ...to make adjustments if necessary This will allow the Landroid M to become adjusted to its new environment and ensures it will successfully work with the charging base before the Boundary Wire is burie...

Page 12: ...o See Fig J3 6 Maintenance Your Landroid M needs to be checked from time to time The Landroid M works hard and after time needs a good cleaning as well as having some parts replaced as they can become...

Page 13: ...pressing the ON OFF Button Put on protective gloves before cleaning the Blade Turning Disc 13 and do not use running water See Fig M A Cleaning the body Your Landroid M will live a much happier and lo...

Page 14: ...ed or garage during the winter Before you prepare your Landroid M for winter hibernation we recommend you Thoroughly clean your Landroid M Fully charge the battery Turn the power off To maximize the b...

Page 15: ...may not correspond with the coloured markings identifying the terminals in your plug proceed as follows The wire which is coloured blue must be connected to the terminal which is marked with N The wi...

Page 16: ...ein Landroid M m hen 3 4 Wie gut m ht der Landroid M das Gras 4 Grundlegendes zum Begrenzungskabel 4 1 Begrenzungskabel abstecken 4 2 Begrenzungskabel eingraben 4 3 Begrenzungskabel verbinden 4 4 Eins...

Page 17: ...besch digt sind Abgenutzte Messer und Schrauben nur im ganzen Satz auswechseln um Unwuchten zu vermeiden d Achten Sie darauf dass bei Ger ten mit mehreren Klingen ein Klingensatz durch den anderen in...

Page 18: ...esserteller beimTragen des M hers vom K rper weg Sicherheit hinweise f r Akkupack a Zellen bzw Akkupack nicht zerlegen ffnen oder zerdr cken b Akkupack nicht kurzschlie en Akkupacks nicht wahllos in e...

Page 19: ...ecycling zugef hrt werden Akkus enthalten Lithium Ionen Altakkus sollten einer umweltgerechten Wiederverwertung zugef hrt werden Altakkus nicht ber den unsortierten Siedlungsabfall entsorgen Akku nich...

Page 20: ...Roboter Rasenm her D 20 2 Komponenten 6 8 7 5 9 10 11 12 13 23 22 21 17 19 16 18 3 4 2 1 25 20 24 15 14...

Page 21: ...ECKUNG DES BEDIENFELDES 8 STOPPTASTE 9 REGENSENSOR 10 HINTERES ANTRIEBSRAD 11 GRIFF 12 AKKU 13 DREHSCHEIBE DER MESSER 14 SCHNEIDMESSER 15 VORDERRAD 16 STARTTASTE 17 DISPLAY 18 TASTATUR 19 EIN AUSTASTE...

Page 22: ...fortablen Welt des automatischen M hens Nun m chten wir Ihnen zeigen wie Ihr Landroid M funktioniert und denkt 3 1 Wie wei mein Landroid M wo er m hen soll Der Landroid M w hlt seine Richtung nach dem...

Page 23: ...n wenn die Akkuleistung mehr als 75 betr gt Sie k nnen die Akkuleistung im Display berpr fen B Regensensor Der Landroid M hat einen Regensensor 9 auf der Seite der Regentropfen registriert und den Lan...

Page 24: ...d M etwas langsamer aufl dt Auf offenen Fl chen mit nur wenigen Hindernissen wie Blumenbeeten Springbrunnen Gehwegen und dergleichen verbraucht der Landroid M weniger Energie Sie finden die Standard A...

Page 25: ...rig sein sollte schneiden Sie das bersch ssige St ck ab und lagern es separat Vergessen Sie aber nicht beim Abschneiden ein kleines St ck zum Anschluss an die Ladebasis zu verschonen damit der Anschlu...

Page 26: ...N OFF berpr fen Die Software Version wird in der unteren rechten Ecke des Displays eingeblendet Die aktuellste Software kann auf unserer Website heruntergeladen werden siehe nachfolgende Anweisungen z...

Page 27: ...beim Worx H ndler in Ihrer N he A Messer drehen und umdrehen Ihr Landroid M arbeitet mit Messern die allesamt mit der Messerscheibe 13 verschraubt sind Die Messer braucht der Landroid M mehr als alle...

Page 28: ...rahmen darum herum eingeklemmt ist Vergewissern Sie sich auch dass sich die Messer frei drehen lassen und nicht von Grasresten behindert werden WICHTIG Entfernen Sie s mtliche auch die kleinsten R cks...

Page 29: ...d M wieder aus seinem Winterschlaf erwecken sorgen Sie daf r dass die Ladestreifen 5 und die Kontaktstreifen 3 gr ndlich sauber sind dies k nnen Sie mit feinem Schleifpapier erledigen berzeugen Sie si...

Page 30: ...aximale mon Landroid M est il capable de tondre 3 4 Quel sera le degr d efficacit du travail de mon Landroid M 4 Principe de fonctionnement du fil barri re 4 1 Pose du fil barri re 4 2 Enterrement du...

Page 31: ...m me temps d Sur les appareils comportant plusieurs arbres veuillez noter que la rotation d une lame peut entra ner la rotation des autres lames e ATTENTION Ne faites jamais fonctionner l appareil si...

Page 32: ...s en garde concernant la batterie a La batterie et les piles secondaires ne doivent pas tre ouvertes d mont es ou broy es b La batterie ne doit pas tre court circuit e vitez de mettre la batterie en v...

Page 33: ...de la soulever ATTENTION teignez la machine avant de la manipuler ou de la soulever Ne pas jeter au feu Ne pas jeter a l eau Les piles doivent tre recycl es Les piles au Li ion doivent tre tri s avec...

Page 34: ...Robot de fauchage pelouse F 34 2 Liste des composants 6 8 7 5 9 10 11 12 13 23 22 21 17 19 16 18 3 4 2 1 25 20 24 15 14...

Page 35: ...MMANDE 8 BOUTON STOP 9 CAPTEUR PLUVIOM TRIQUE 10 ROUE MOTRICE ARRI RE 11 POIGN E 12 BATTERIE 13 DISQUE DE COUPE ROTATIF 14 LAMES DE COUPE 15 ROUE AVANT 16 BOUTON START 17 CRAN 18 CLAVIER 19 BOUTON MAR...

Page 36: ...s laquelle votre pelouse se tondra toute seule Dans cette section nous vous aiderons mieux comprendre le mode de fonctionnement du Landroid M 3 1 Comment mon Landroid M peut il savoir quels endroits i...

Page 37: ...ose d un D tecteur de pluie 9 sur ses c t s qui d tecte les gouttes de pluie et informe le Landroid M pour arr ter la tonte et suivre le c ble d limitant jusqu sa base de chargement Voir Fig B Le Land...

Page 38: ...aines all es etc Vous pouvez trouver la dur e de travail par d faut du Landroid M pour diff rentes tailles de pelouse dans le guide de programmation Les dur es indiqu es peuvent varier selon les facte...

Page 39: ...le fil d limitant au gazon pour qu il soit facile de faire des ajustements si n cessaire Ceci permettra au Landroid M de s ajuster son nouvel environnement et garantira qu il r ussira fonctionner avec...

Page 40: ...face horizontale Appuyez sur la touche 2 pour acc der l interface de diagnostic puis appuyez sur la touche 5 pendant quelques secondes jusqu ce que les trois num ros 1 2 et 3 soulign s ci dessous revi...

Page 41: ...tement le Landroid M 2 Retirez le couvercle de la batterie et la batterie 3 D vissez les vis des lames avec un tournevis 4 Puis fixez solidement les lames neuves 5 Remontez la batterie et son couvercl...

Page 42: ...x rouge de charge s allumera 4 Dans les 3 secondes avant que l indicateur lumineux de la base de charge devient vert appuyez sur le bouton MARCHE ARR T du Landroid M 5 Landroid M commencera se charger...

Page 43: ...oid M 2 Enlevez les vis de fixation de la batterie Voir Fig O 3 Sortez la batterie usag e Voir Fig P 4 Ins rez la batterie neuve 5 Remettez les 4 vis en place et serrez les bien Protection de l enviro...

Page 44: ...ndroid M 3 4 Con che efficienza Landroid M taglia l erba 4 Nozioni di base relative al filo perimetrale 4 1 Per fissare il filo perimetrale 4 2 Per interrare il filo perimetrale 4 3 Per unire il filo...

Page 45: ...io non siano usurati o danneggiati In tal caso sostituire le lame o i bulloni in blocco per mantenere l equilibrio d Su macchine con pi lame prestare attenzione perch ruotando una lama si provoca la r...

Page 46: ...ha intenzione di trasportarlo c Afferrare il rasaerba per l impugnatura presente sul fondo nella parte posteriore Trasportare il rasaerba con il disco a lame lontano dal corpo Istruzioni per la sicure...

Page 47: ...bot tosaerba Non gettare nel fuoco Non gettare nell acqua Le batterie vanno con la raccolta differenziata Le batterie contengono ioni di Li disporne in modo da proteggere l ambiente Non gettare le bat...

Page 48: ...Robot tosaerba I 48 2 Elementi dell apparecchio 6 8 7 5 9 10 11 12 13 23 22 21 17 19 16 18 3 4 2 1 25 20 24 15 14...

Page 49: ...PANNELLO DEI COMANDI 8 TASTO STOP 9 SENSORE PIOGGIA 10 RUOTA DI GUIDA POSTERIORE 11 MANIGLIA 12 PACCO BATTERIA 13 DISCO PER RUOTARE LA LAMA 14 LAMA DA TAGLIO 15 RUOTA ANTERIORE 16 TASTO START 17 LAMA...

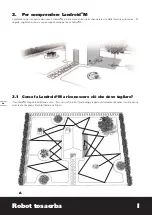
Page 50: ...ta vita della tosatura automatica Di seguito vogliamo aiutarvi a capire meglio come pensa Landroid M 3 1 Come fa Landroid M a riconoscere ci che deve tagliare Il Landroid M sceglie la direzione a caso...

Page 51: ...roid M di smettere di tosare l erba e di seguire il cavo di confine fino alla base di ricarica Vedere La Fig B La funzione di partenza ritardata di Landroid M 0 180min pu essere programmata quando pio...

Page 52: ...prato in base ai fattori citati in precedenza Regolare gradualmente i tempi di tosatura di Landroid M al giorno fino a trovare l impostazione pi adeguata Si pu anche programmare la durata del funzion...

Page 53: ...consentir verificare il funzionamento del Landroid M nel nuovo ambiente garantendone il funzionamento in relazione alla base si ricarica prima di seppellire il cavo di confine Al termine dell install...

Page 54: ...i 1 2 e 3 evidenziati sotto tornano a zero Vedere La Fig J3 6 Manutenzione Controllare periodicamente Landroid M Landroid M lavora sodo e dopo un certo periodo di tempo ha bisogno di una buona pulizia...

Page 55: ...FF su OFF Indossare guanti protettivi prima di pulire il disco lama 13 e non utilizzare acqua corrente Vedere La Fig M A Pulizia del corpo Landroid M dura pi a lungo e meglio se pulito periodicamente...

Page 56: ...android M nella rimessa o nel garage durante l inverno Prima di riporre al coperto Landroid M assicurarsi di Pulire accuratamente Landroid M Caricare completamente la batteria Spegnere il tosaerba Per...

Page 57: ...on possono essere gettati tra i rifiuti domestici L apparecchio da rottamare deve essere portato al centro di riciclaggio per un corretto trattamento Controllare con le autorit locali o con il rivendi...

Page 58: ...Copyright 2014 Positec All Rights Reserved 2CLM81FPK11000A0...

Reviews: