background image

Lawn Mowing Robot 

EN

4

e)  Use extreme caution when reversing the appliance towards you;
f)  Always switch on the motor according to instructions with feet well away from the blades(s);

MAINTENANCE AND STORAGE

WARNING! When the mower is turned upside down the main switch must always be set to the 

OFF position.

The main switch should be set to the OFF position during all work on the mowers under frame, such 

as cleaning or replacing the blades.

a)  Keep all nuts, bolts and screws tight to be sure the appliance is in safe working condition;
b)  Inspect the robotic lawnmower each week and replace worn or damaged parts for safety;
c)  Check that the blades and blade disc are not damaged. Replace all blades and screws at the same time if necessary so 

that the rotating parts are balanced.

d)  Ensure that only replacement cutting means of the right type are used;
e)  Ensure that batteries are charged using the correct charger recommended by the manufacturer. Incorrect use may result 

in electric shock, overheating or leakage of corrosive liquid from the battery;

f)  In the event of leakage of electrolyte flush with water/neutralizing agent, seek medical help if it comes into contact with 

the eyes etc;

g)  Servicing of the appliance should be according to manufacturers instructions.

Transport

The original packaging should be used when transporting robotic lawn mower over long distances.
To safely move from or within the working area:
a)  Press the Access Button to stop the mower. If the anti-theft alarm is activated, enter the first digit of the PIN code. 
 

You select the four digit PIN code when you start the mower for the first time.

b)  Move the main switch to the OFF position if you intend to carry the mower.
c)  Carry the mower by the handle at the rear under the mower. Carry the mower with the blade disc away from the body.

WARNING! 

 The appliance is only to be used with the unit provided.

Additional safety rules for lead acid battery

1.   Working in the vicinity of a lead-acid battery is dangerous. Battery pack generates explosive gases during normal battery operation. 

For this reason it is of the utmost importance that each time before using your charger, you read and follow the instructions provided 
exactly.

2.   Never smoke or allow an open spark or flame in the vicinity of the battery.
3.   Use charger for charging a lead-acid battery pack only.

Summary of Contents for LANDROID WG792E

Page 1: ...WG792E P02 P18 Lawn Mowing Robot Roboter Rasenm her EN D...

Page 2: ...g 3 3 How big of an area can my Landroid L mow 3 4 How efficiently will my Landroid L mow the grass 4 Boundary Wire Basics 4 1 Pegging the Boundary Wire 4 2 Burying the Boundary Wire 4 3 Joining the B...

Page 3: ...des to rotate OPERATION 1 GENERAL a Never operate the appliance with defective guards or without safety devices for example deflectors in place b Do not put hands or feet near or under rotating parts...

Page 4: ...leakage of electrolyte flush with water neutralizing agent seek medical help if it comes into contact with the eyes etc g Servicing of the appliance should be according to manufacturers instructions T...

Page 5: ...on press ON and the correct PIN code has been entered Inspection and or maintenance must be carried out with the ON OFF button press OFF WARNING Do not ride on the machine Do not wash the machine with...

Page 6: ...reaches maximum of 28 volts Nominal voltage is 25 2 volts Noise and technical data A weighted sound pressure 36dB A KPA 3dB A A weighted sound power 57dB A Wear ear protection when sound pressure is o...

Page 7: ...Lawn Mowing Robot EN 7 2 2 Packaging content 9 8 7 6 5 10 12 11 13 15 16 22 25 26 27 24 23 18 14 17 20 21 19 2 3 4 1...

Page 8: ...MENT COVER 8 ACCESS BUTTON 9 KEYPAD WINDOW 10 MOULD PLASTIC HOUSING 11 REAR DRIVING WHEEL 12 RAIN SENSOR 13 HANDLE 14 MOTOR FRAME BOX CONTAINING ELECTRONICS AND BATTERY 15 BATTERY PACK 16 BLADE TURNIN...

Page 9: ...into the care free life of automatic mowing In the following We would like to help you better understand how your Landroid L thinks 3 1 How does my Landroid L know what to mow The Landroid L chooses...

Page 10: ...ct rain drops and tell the Landroid L to stop mowing and follow the Boundary Wire back to its Charging Base See Fig B The Landroid L is programmable to have a delay start function 0 180 mins when it r...

Page 11: ...7 and set the cutting height to its maximum cutting height of 6cm See Fig F G Your Landroid L will cut its best in dry weather It does not like wet grass which can build up on the BladeTurning Disc 1...

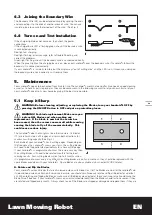
Page 12: ...e necessary length where it connects to the Charging Base so it can be connected and still remain buried 4 2 Burying the Boundary Wire We recommend that you bury your boundary wire a few centimeters u...

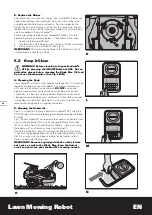
Page 13: ...ement Make sure you replace ALL blades and when making any replacement If the blade is new but the screw has been reused then the screw can wear off while mowing causing the blade to fly off the mower...

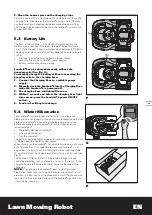
Page 14: ...r life if it is cleaned regularly Although as your Landroid L is an electric machine you will need to take care when cleaning so DO NOT use a hose high pressure washers or otherwise pour running water...

Page 15: ...charging base light turns green press the Landroid L power ON OFF button 5 Landroid L will begin to charge 5 4 Winter Hibernation Your Landroid L will live longer and healthier if it is allowed to hi...

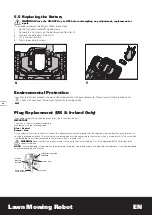
Page 16: ...below IMPORTANT The wires in the mains lead are colored in accordance with the following code Blue Neutral Brown Live As the colors of the wires in the mains lead of this appliance may not correspond...

Page 17: ...irectives 2006 42 EC 2004 108 EC 2011 65 EU 2000 14 EC amended by 2005 88 EC 2000 14 EC amended by 2005 88 EC Conformity Assessment Procedure as per Annex V Measured Sound Power Level 63dB A Declared...

Page 18: ...n 3 3 Welche Fl che kann mein Landroid L m hen 3 4 Wie gut m ht der Landroid L das Gras 4 Grundlegendes zum Begrenzungskabel 4 1 Begrenzungskabel abstecken 4 2 Begrenzungskabel eingraben 4 3 Begrenzun...

Page 19: ...tzt oder besch digt sind Abgenutzte Messer und Schrauben nur im ganzen Satz auswechseln um Unwuchten zu vermeiden d Achten Sie darauf dass bei Ger ten mit mehreren Klingen ein Klingensatz durch den an...

Page 20: ...kus nur das vom Hersteller empfohlene Ladeger t Eine nicht den Hinweisen entsprechende Verwendung kann zu einem Stromschlag zur berhitzung oder zum Auslaufen der Batteriefl ssigkeit f hren f Tritt Bat...

Page 21: ...AUS Taste auf die Position EIN geschaltet ist und der korrekte PIN Code eingegeben wurde Bei Inspektions und Wartungsarbeiten muss der EIN AUS Schalter auf AUS geschaltet werden WARNUNG Rasenm hrobot...

Page 22: ...al 28 Volt Die Nennspannung liegt bei 25 2 Volt Informationen ber l rm Gewichteter Schalldruck 36dB A KPA 3dB A Gewichtete Schallleistung 57dB A Tragen Sie bei einem Schalldruck ber einen Geh rschutz...

Page 23: ...Roboter Rasenm her D 23 2 2 Lieferumfang 9 8 7 6 5 10 12 11 13 15 16 22 25 26 27 24 23 18 14 17 20 21 19 2 3 4 1...

Page 24: ...UNGS DECKELS 8 ZUGANGSTASTE 9 TASTATURFENSTER 10 KUNSTSTOFFGEH USE 11 HINTERES ANTRIEBSRAD 12 REGENSENSOR 13 GRIFF 14 MOTORGEH USERAHMEN ENTH LT ELEKTRONIK UND AKKU 15 AKKU 16 MESSERDREHSCHEIBE 17 SCH...

Page 25: ...rtablen Welt des automatischen M hens Nun m chten wir Ihnen zeigen wie Ihr Landroid L funktioniert und denkt 3 1 Wie wei mein Landroid L wo er m hen soll Der Landroid L w hlt seine Richtung nach dem Z...

Page 26: ...s M hen ein und folgt dem Begrenzungskabel zur ck zu seiner Ladebasis Siehe Abbildung B Der Landroid L ist bei Regen ber eine verz gerte Startfunktion 0 180 Min programmierbar Sollten die Regensensore...

Page 27: ...6 cm einzustellen Siehe Abbildungen F G Ihr Landroid L m ht am Besten bei trockenem Wetter Er mag kein nasses Gras das sich in der Messerdrehscheibe 16 und im Motor ansammeln kann und beim Arbeiten au...

Page 28: ...Ladebasis zu verschonen damit der Anschluss m glich ist ohne wieder einenTeil des Kabels ausgraben zu m ssen 4 2 Begrenzungskabel eingraben Wir empfehlen dass Sie Ihren Begrenzungsdraht ein paar Zent...

Page 29: ...nigen einstellen oder die Messer auswechseln WARNUNG Beim Austauschen der Messer ist darauf zu achten dass beim Austausch ALLE Messer auf einmal ersetzt werden Falls neue Messer mit gebrauchten Schrau...

Page 30: ...Verschrauben der Messer dass sich diese frei drehen lassen 5 2 Sauber halten WARNUNG Vor dem Reinigen schalten Sie Ihren Landroid L unbedingt mit der Ein Austaste aus Ziehen Sie Schutzhandschuhe ber...

Page 31: ...d Ladestreifen regelm ig damit sich der Landroid L stets problemlos aufladen kann 5 3 Akkulaufzeit und haltbarkeit Das Herzst ck des Landroid L ist sein 28 V Lithiumbatterie Keine Wartung ist notwendi...

Page 32: ...zum Beispiel indem Sie ein mit Fett gef lltes D schen dar ber st lpen Falls die Ladebasis im Winter drau en verbleibt lassen Sie das Begrenzungskabel angeschlossen HINWEIS Wenn Sie den Landroid L wie...

Page 33: ...en Richtlinien entspricht 2006 42 EC 2004 108 EC 2011 65 EU 2000 14 EC ge ndert durch 2005 88 EC 2000 14 EC ge ndert durch 2005 88 EC Konformit tsbewertungsverfahren nach Annex V Gemessene Schallleist...

Page 34: ......

Page 35: ......

Page 36: ...Copyright 2013 Positec All Rights Reserved 2CLM80APK11001A2...

Reviews: