background image

2-in-1 Grass Trimmer/Edger 

EN

15

14

15

14

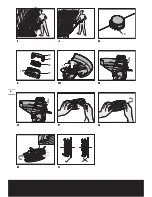
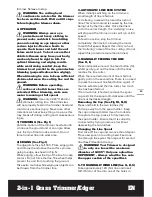
the upper section of the spool.  Wind the line 
in the direction of the arrows on the top of the 
spool. (See Q, R)
Leave approximately 4” (100mm) of line 
unwound and place it into the cleat. Repeat on 
the lower section of spool.
Care should be taken to ensure that the line is 
neatly coiled on the spool. (See S) Failure to do 
so will impair the efficiency of the automatic 
line feed.
Then fit the spool as described above in 

“Changing the line Spool”.


MAINTENANCE

After use, disconnect the machine from the 
mains and check for damage. Your power 
tool requires no additional lubrication or 
maintenance. There are no user serviceable 
parts in your power tool. Mains powered 
trimmers should only be repaired by an 
authorised repairer use only manufacturers 
recommended replacement parts and 
accessories.
Never use water or chemical cleaners to 
clean your power tool. Wipe clean with a dry 
cloth. Always store your power tool in a dry 
place out of the reach of children. Keep the 
motor ventilation slots clean. Keep all working 
controls free of dust. If you see some sparks 
flashing in the ventilation slots, this is normal 
and will not damage your power tool.

WARRANTY STATEMENT  

If your WORX tool becomes defective due 
to faulty materials or workmanship within a 
period of 2 years from the date of purchase, 
we guarantee to:
•  Replace or repair all defective parts, free of 
charge, or,
•  Repair products free of charge, or,
•  Replace the unit with a new or re-
conditioned unit, free of charge.

If your WORX battery becomes defective due 
to faulty materials or workmanship within a 
period of 12 months from the date of purchase, 

we guarantee to:
•  Replace or repair all defective parts, free of 
charge, or,
•  Repair products free of charge, or,
•  Replace the unit with a new or re-
conditioned unit, free of charge.

WORX warranty is subject to the following 
conditions:
•  The product has not been misused, abused, 
neglected, altered, modified or repaired 
by anyone other than an authorized WORX 
service center.
•  The product has been subjected to fair wear 
and tear.
•  Only genuine WORX accessories and parts 
have been used on or with the product
•  The product has not been used for trade, 
professional or commercial purposes
•  The product has not sustained damage 
through foreign objects, substances or 
accidents.

WORX warranty does not cover;
•  Components that are subject to natural wear 
and tear caused by use in accordance with 
operating instructions.
•  Unauthorized or improper maintenance or 
handling
•  Tool and or battery failure caused by the 
use of non WORX branded accessories and or 
parts

For claims, please contact the WORX Helpline. 
You will need to submit a proof of purchase in 
the form of a valid receipt that displays date 
and place of purchase.

woRx helpline 1-866-354-woRx (9679)

This guarantee statement does not replace but 
is in addition to your statutory rights.
This warranty does not apply to accessories 
supplied with the tool.
This warranty applies only to the original 
purchaser and may not be transferred.
All repairs and product replacements will 
be covered by the limited warranty for the 
balance of the warranty period from the date 
of the original purchase.

Summary of Contents for WG108

Page 1: ...2 in 1 Grass Trimmer Edger EN Coupe gazon Taille bordure 2 en 1 F 2 en 1 Cortadora de cesped Ribeteadora ES P07 P16 P26 WG108 hElPliNE NumbER 1 866 354 woRx 9679 hElPliNE NumbER www worxyardtools com...

Page 2: ......

Page 3: ......

Page 4: ...1 11 2 5 6 7 8 9 10 3 4...

Page 5: ...12 2 1 1 2 3 4 Pull collars apart to raise Release collars to lock 1 2 3 4 Pull collars apart to rotate shaft 180o Rotate shaft release collars to lock A B C1 C2 D1 D2 E F1 F2 G1 G2 H...

Page 6: ...6 13 14 15 16 17 1 18 2 I J K L M N O P Q R S...

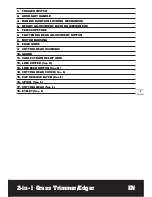
Page 7: ...ment locking mechanism 5 Telescope tube 6 Flattening head adjustment button 7 Motor housing 8 Edge guide 9 Cutting head assembly 10 Guard 11 Cable strain relief arm 12 Line cutter see B 13 LINE FEED B...

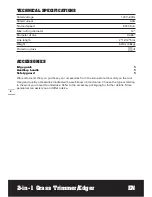
Page 8: ...s 2 8kg Protection class II ACCESSORIES edge guide 1 Auxiliary handle 1 Safety guard 1 We recommend that you purchase your accessories from the same store that sold you the tool Use good quality acces...

Page 9: ...f the plug still does not fit contact a qualified electrician to install the proper wall outlet Do not change the equipment plug extension cord receptacle or extension cord plug in any way 2 FOR ALL A...

Page 10: ...h as blades and the like q Store idle appliances indoors When not in use appliances should be stored indoors in dry and high or locked up place out of reach of children r Maintain appliance with care...

Page 11: ...nsert screws and securely attach the safety guard See Fig B CAUTION Line cutter on edge of safety guard is sharp Use caution when handling 2 FITTING THE AUXILIARY HANDLE See Fig C1 NOTE THE AUXILIARY...

Page 12: ...parts or cleaning the trimmer or making any adjustments 2 Press the trimmer head adjustment button on the motor housing See Fig E 3 Move the trimmer head to one of four different angles and release th...

Page 13: ...own from the trimmer line 3 AUTOMATIC LINE FEED SYSTEM When initially switching on the trimmer a small length of line is fed out A clattering noise will be heard for a short time This is normal and is...

Page 14: ...nit free of charge If your WORX battery becomes defective due to faulty materials or workmanship within a period of 12 months from the date of purchase we guarantee to Replace or repair all defective...

Page 15: ...rmance of your WORX tool simply return it within 30 days It must be returned in its original packaging complete as purchased including accessories and any items provided free of charge to the point of...

Page 16: ...ique 6 Bouton de r glage de la t te 7 Roue De Coupe Bordures 8 guide de bordure 9 Assemblage de la t te de coupe 10 Guide de bordure 11 R ducteur De Tension Du C ble 12 Coupe fil Voir Fig B 13 Bouton...

Page 17: ...lation II ACCESSOIRES Guide de bordure 1 Poign e auxiliaire 1 Garde de s curit 1 Nous vous recommandons d acheter tous vos accessoires du m me magasin qui vous a vendu l outil N utilisez que des acces...

Page 18: ...pl tement dans la prise murale tournez la fiche Si la fiche ne rentre toujours pas contactez un lectricien qualifi afin d installer une prise murale appropri e Ne changez pas la fiche de l quipement o...

Page 19: ...nt la charge pour laquelle il est con u n N essayez pas d utiliser l appareil hors de votre port e normale Gardez votre quilibre et les pieds bien ancr s au sol o Restez alerte Faites attention ce que...

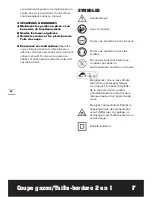
Page 20: ...er cet outil Si une autre personne utilise cet outil assurez vous de lui fournir ces instructions SYMBOLES Avertissement Lisez le manuel Porter une protection pour les yeux Porter une protection pour...

Page 21: ...horaire et retirez le 3 Placez la poign e auxiliaire sur le support situ sur la partie sup rieure du taille bordure Voir Fig C1 4 Ins rez le bouton et la vis travers la poign e auxiliaire et le manch...

Page 22: ...rique doit tre connect une rallonge appropri e Retirez le capuchon du connecteur du cordon en tire bouchon Faites une boucle dans la rallonge Poussez la boucle travers le trou dans la poign e Voir Fig...

Page 23: ...as cette proc dure plus de 6 fois 4 ALIMENTATION MANUELLE DU CORDON DE COUPE Voir Fig K L Pressez et rel chez le bouton d alimentation manuelle du cordon de coupe tout en tirant doucement sur le cordo...

Page 24: ...cation dans un d lai de 2 ans compter de la date d achat nous garantissons que nous Remplacerons ou r parerons toutes les pi ces d fectueuses sans aucun frais ou R parerons les produits gratuitement o...

Page 25: ...produit seront couverts par la garantie limit e pour le reste de la p riode de garantie partir de la date d achat initial Garantie de satisfaction de 30 jours Si vous n tes pas enti rement satisfait d...

Page 26: ...ajuste del cabezal de corte 7 Tapa del motor del cabezal de la podadora 8 guia de borde 9 cabeza 10 Guarda protectora de seguridad 11 boquilla de gancho 12 Cuchilla del hilo Ver Fig B 13 Bot n de aba...

Page 27: ...quina 6 2lbs 2 8kg Doble aislamien II ACCESORIOS Gu a de borde 1 Mango auxiliar 1 Guarda protectora de seguridad 1 Recomendamos que usted compre todos los accesorios en el mismo lugar donde adquiri l...

Page 28: ...rizado El enchufe del prolongador se inserta en el tomacorriente polarizado de un nico modo Si no encaja completamente invierta el enchufe Si a n as no se inserta acuda a un electricista calificado pa...

Page 29: ...te Mant ngase firme y con buen equilibrio en todo momento o Permanezca alerta Ponga siempre atenci n en lo que est haciendo Utilice el sentido com n No opere la herramienta cuando est cansado p Descon...

Page 30: ...las otras personas que podr an usar esta herramienta Si le presta esta herramienta a alguien aseg rese de que tenga estas instrucciones S MBOLOS Advertencia Lea el manual Utilice protecci n ocular Uti...

Page 31: ...go auxiliar en el conjunto del soporte del mango ubicado en el eje superior de la cortadora de c sped V ase C1 4 Coloque la perilla y el tornillo a trav s del mango auxiliar y soporte y apriete la per...

Page 32: ...e del cable de alimentaci n flexible Realice un bucle en el cable de extensi n Haga pasar el bucle por el orificio ubicado en el mango V ase G1 Sujete el bucle alrededor del gancho de sujeci n del cab...

Page 33: ...o 14 mientras tira suavemente de los hilos hasta que estos lleguen a la cuchilla Cuando se ha abastecido la longitud requerida de hilo tire suavemente del segundo hilo no es necesario presionar nuevam...

Page 34: ...o de todas las piezas defectuosas La reparaci n de todos los productos sin cargo o La sustituci n de la unidad sin cargo por una nueva o reacondicionada La garant a de WORX se encuentra sujeta a las s...

Page 35: ...encuentra completamente satisfecho con el funcionamiento de su herramienta WORX puede devolverla antes de 30 d as Deber hacerlo dentro de su embalaje original ntegro tal y como la adquiri e incluir co...

Page 36: ...Designed in Italy Made in China Con u en Italie Fabriqu en Chine Dise ado en Italia Fabricado en China Copyright 2011 Positec All Rights Reserved...

Reviews: