13
12
2-in-1 Cordless Li-ion grass Trimmer/Edger
EN
13
12
trimmer has been switched off; wait until
it has completely stopped then lay down
the tool.
6. adJusTmenT of THe Telescopic
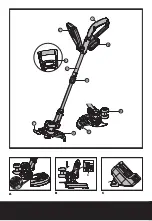
sHafT (see fig g)
Unscrew the locking collar (4) in the direction
indicated to unlock.
Adjust the length of the telescopic shaft to the
most comfortable length.
Tighten the lower locking collar.
7. main Handle RoTaTion (see fig
H1&H2)
Holding the lower housing then pull upward
the shaft, then rotate 90 degree clockwise,
then release, the shaft will be locked in
position automatically.
8. adJusTmenT of auxiliaRy Handle
(see fig i)
Pull up the auxiliary handle locking lever (5).
Hold the lever and rotate the auxiliary handle
to the most comfortable and balanced
position.
Release the lever, your auxiliary handle has
been locked.
9. adJusTmenT of THe TRimmeR
Head angle To THe sHafT (see fig
J1&J2)
Adjust the trimmer head angle downwards,
Put your one foot on the motor house, then
grip the main handle, apply adequate force to
adjust, as shown in Fig J1.
Adjust the trimmer head angle upwards, Put
your one foot on the safety guard, then grip
the main handle, apply adequate force to
adjust, as shown in Fig J2.
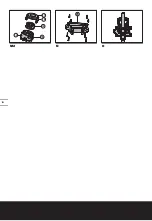
10. spaceR guaRd (see fig k)
Push the flower guard in and out into place
before trimming, as shown in Figure K. Make
sure the flower guard is locked firmly in place.
oPErATIoN
waRning:
Always wear the eye
protection. Never lean over the trimmer
head. Rocks or debris can ricochet or be thrown
into eyes and face and cause blindness or other
serious injury. When operating unit, check for
the following:
Wear eye protection and heavy clothing. Hold
front handle with one hand and auxiliary handle
with the other hand. Keep unit below waist
level. Work only from your right to your left to
ensure debris is thrown away from you. Without
bending over, keep line near and parallel to the
ground (perpendicular when edging) and not
crowded into material being cut.
waRning: make sure that line is
fed out before operation. make sure
motor is up to full speed before trimming
or edging.
waRning:
Use only 0.065”(1.65mm)
cutting line, diameter line. Other sizes of
line will not feed properly and will result in
improper cutting head function or can cause
serious injury. Do not use other material
such as wire, string, rope, etc. Wire can break
off during cutting and become a dangerous
projectile that can cause serious injury.
Trimming
Hold the bottom of the trimmer head about
3.25”(8 cm) above the ground and at an angle.
Allow only the tip of line to make contact. Do
not force trimmer line into work area.
edging (see fig l)
Holding the lower housing then pull upwards
the shaft, then rotate 90 degree clockwise. (Fig
H1)
Adjust trimmer head angle to be the lowest
horizontal setting. Then position the wheel on
the ground for edge mode. The guard has two
white line guides to indicate the cutting line
position. Align these marks with the edge of
your lawn.
While edging, allow the tip of the line to make
contact. Do not force the line. The rotation
wheel helps protect the unit and keeps the
unit from contacting the ground. Take extra
caution while edging as objects can be thrown
from the trimmer line.
auTomaTic line feed sysTem
When initially switching on the trimmer, a
small length of line is fed out.
A ‘clattering’ noise will be heard when the
lines hit the line cutter. DO NOT BE ALARMED

